Showing posts with label all is calm embellishments. Show all posts

Thursday, November 20, 2014

Candle, Candle, Burning Bright

Hi there! It's been a bit since I've posted but I have been busy.

On the weekend, I attended the Stampin' Up! Fall Conference in Winnipeg with my upline and best friend, Charlene. There was one session on Friday evening and two on Saturday.

Friday was a "play" session where you could bring non demonstrators with hopes that they would be inspired to become a demonstrator. We got a chance to play with different tools as we moved from station to station around the room. It was a bit hectic at some stations but good fun all the same!

Saturday morning was a business session and the afternoon session was another "play" session for demonstrators only. I have some neat creations to show you from the conference but you'll have to wait until another post for those!

The rest of the weekend was spent babysitting my beautiful granddaughter. We just can't get enough of her! My mother was coming over to our house for supper to celebrate her 89th birthday so Raine was dressed up in a special dress I had bought her. Of course, I had to snap a few shots of her . . .

She was a little shy at first but she had Bunny to comfort her!

Linda Vich Creates: Candle, Candle, Burning BrightLinda Vich Creates: Candle, Candle, Burning BrightLinda Vich Creates: Candle, Candle, Burning Bright


Linda Vich Creates: Candle, Candle, Burning BrightLinda Vich Creates: Candle, Candle, Burning Bright


She can't resist playing on the keyboard when she comes over!


Linda Vich Creates: Candle, Candle, Burning BrightLinda Vich Creates: Candle, Candle, Burning Bright


My mother really enjoyed watching Raine! I was able to snap a few candids of her.


Linda Vich Creates: Candle, Candle, Burning BrightLinda Vich Creates: Candle, Candle, Burning Bright


Linda Vich Creates: Candle, Candle, Burning Bright


I was hoping to get a good picture of them together but Raine was a little bit shy around her so we didn't force the issue. I did manage to catch them in a couple of pictures together with the help of people holding her!

Here's my mother with her cake and a little sidekick:

Linda Vich Creates: Candle, Candle, Burning Bright

All in all, it was a pleasant get together!

The last few days, I have been preparing some cards and planning for my last stamping class before Christmas. Unfortunately, I can't show you pictures of those items yet because it would ruin the surprise! I promise I'll post those after December 5.

Tonight, after work, I got a chance to try out an idea that I had been rolling around in my mind for over a week. I wanted to use the Star Framelits to create a festive tea light holder.
This was my first attempt at a 3D item so please be kind!

Linda Vich Creates: Candle, Candle, Burning Bright

I knew that I wanted to use both Gold Foil and Gold Glimmer papers but I wanted to be sure that my idea would work BEFORE cutting! I made one mock up with scrap paper and another with Whisper White before I was satisfied with my design.

I used two of the star framelits–the smallest and the third largest–to cut a template for the star shapes so that each one would be identical. Then, for each star, I cut one from gold foil and one from gold glimmer paper. I also cut four small squares of vellum, which I trimmed into pentagon shapes.

Using Crafty Owl's Box Buster (a handy online tool for calculating measurements for boxes created with the Envelope Punch Board) I got the measurements for a box that was 2 x 2 x 3/4" in size. I created the box using my Envelope Punch Board and Gold Foil. (If you have never used the Box Buster, give it a try. It is a wonderful tool for using with the Envelope Punch Board.)

I then glued the pentagon shaped pieces of vellum to one star of each of the four star pairs. I glued the Gold Glimmer stars on the inside of the box so that they would really catch the sparkle from the candle. I glued the Gold Foil stars to the outside of the box and pressed together with the Gold Glimmer stars to act like a sandwich with the box in the middle!

Linda Vich Creates: Candle, Candle, Burning Bright

Linda Vich Creates: Candle, Candle, Burning Bright

I was quite pleased with the way it turned out! What do you think?

Built for Free Using: My Stampin Blog

Tuesday, November 11, 2014

It's All About The Sparkle

Mojo Monday definitely is living up to its name for me! Did a quick review of the various Monday challenges and fell in love with this sketch.


I knew just what I wanted to do with it, other than picking the designer paper and deciding which card stock to use for the base and which for the matte. I also tried several different ribbon choices until I felt I had the best one. The card came together quickly after these decisions.


Linda Vich Creates: It's All About The Sparkle

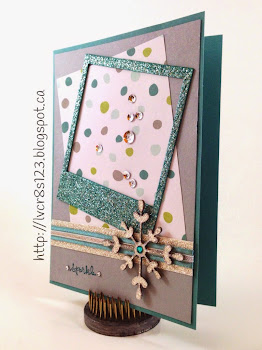
I started with a Lost Lagoon card base of 5 x 7." I cut a matte from Smoky Slate and a piece of All Is Calm Designer paper (love that stuff!).

I used the On Film framelits to cut a polaroid frame from Silver Glimmer paper. I also cut a 3/4" strip and a snowflake from the Glimmer paper. The snowflake is from the Snowflake Card Thinlits Dies, a beautiful set of framelits.

Because I found the frame and snowflake to be so flimsy, I also cut two snowflakes and two frames from Kraft card stock. I glued the two duplicate Kraft die cuts together and then glued the Glimmer paper die cuts on top. In retrospect, I should have cut the duplicates from Smoky Slate card stock instead of Kraft; because you could see some of the edge of the Kraft, I had to color it using a Smoky Slate Blendabilities marker.

I colored the frame using the darkest Coastal Cabana Blendabilities. I love how you can easily change the color of the Glimmer paper by using the Blendabilities and you still get that great glittery effect!

Look at that wonderful sparkle!

Linda Vich Creates: It's All About The Sparkle

I adhered the both Designer paper and the frame to the Smoky Gray matte. I then added the strip of Glimmer paper layered with first Lost Lagoon Ribbon and finally by Silver 1/8" Ribbon. I then adhered the matte to the card front.

I dropped a smattering of All Is Calm silver sequins within the polaroid frame, being sure I had an odd number. I find that dropping sequins from a height above the paper surface gives me a good random pattern, better than what I could come up with myself! I snapped a picture with my camera just to be on the safe side, and then adhered the sequins with a bit of Crystal Effects.

I adhered the snowflake and then added a rhinestone which I had colored with the Coastal Cabana Blendabilities marker.

Linda Vich Creates: It's All About The Sparkle

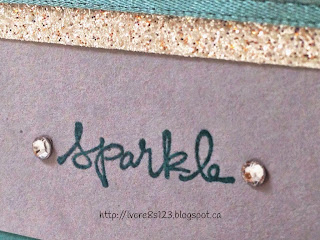
I chose the sentiment from the Good Greetings Hostess stamp set. I inked it first with Versamark and then Bermuda Bay before stamping it on the bottom left of the matte. I heat embossed it with clear embossing powder. I find that the new stamp pads dry too quickly to emboss well so I use a layer of Versamark and then the regular ink so that the stamped image catches more of the embossing powder.

The final touch was to add two small rhinestones on either side of the sentiment.

Linda Vich Creates: It's All About The Sparkle


I just love all the sparkles on this card–the frame, the snowflake, the sequins, the ribbon and the rhinestones bracketing the sentiment! Hope you like it too!

Linda Vich Creates: It's All About The Sparkle


Built for Free Using: My Stampin Blog