Showing posts with label botanical builder framelits. Show all posts

Wednesday, February 1, 2017

Waterlily Gift Box

Linda Vich Creates: Waterlily Gift Box. Succulent Framelits create a waterlily that tops a lovely gift box create with the Window Box Thinlits.
Instead of a card today, I have a gift box that was inspired by the photo of a waterlily that turned up in a Google search. I thought that the waterlily could be created by using the Succulent Framelits and the box could serve as the water and the lilypads could be represented by the die cut mattes added to the box.

After die cutting the two large sections for the box from Dapper Denim, I used Fast Fuse to assemble the box.

I got a tip on a Facebook group that one of the square Stitched Framelits perfectly fit as a matte for the Window Box so I die cut a matte from Cucumber Crush. A die from the Window Box Framelits was used to die cut little holes in the stitched matte.

On a scrap of Cucumber Crush, I tried sponging both Bermuda Bay and Emerald Envy to see which one would give me the look I was after; Bermuda Bay won! I sponged the matte and it looked great! I then die cut the remaining five mattes and sponged them as well.

Before adhering the mattes to the box, I decided to also sponge the edges of the box using Dapper Denim. The sponging gave the box some added depth. I then adhered the mattes using Glue Dots.

Next, I used the Succulent Framelits to cut two of the largest succulents, two of the middle size and one of the smallest size from Whisper White. I used Melon Mambo to sponge color on both sides of the die cuts and then used a bone folder to curl up the "petals" a bit. Liquid adhesive was used to adhere the die cuts to form the flower.

Clear Wink of Stella was used on the petals of the flower and then stamens were die cut from Crushed Curry using a die from the Botanical Builder Framelits. It was adhered and given a coat of Wink of Stella. A rhinestone was added to complete the flower.

When I put the flower on the top of the box, even though the blue of the box was designed to represent the water and I wanted it to show but, design-wise, I needed some greenery as well. I then die cut a hexagon using the largest Window Box die and further die cut it using the ornate hexagon die. I then trimmed the sides down as much as possible and adhered it to the top of the box before adhering the flower on top using Dimensionals.

Here is the Google photo that was my inspiration:

http://hubpages.com/living/Water-Lilies-The-Perfect-Addition-to-any-Garden

Here is my interpretation:

Linda Vich Creates: Waterlily Gift Box. Succulent Framelits create a waterlily that tops a lovely gift box create with the Window Box Thinlits.

I'm really pleased with how this little gift box turned out! It is so nice when a project you envision turns out so well!

If you would like to use my color scheme from this project, feel free to save it!


If you are ready to purchase the items to make this gift box, you can click on the items below to be taken directly to my store.


Tuesday, December 20, 2016

Christmas Decor and Gift Card Holder

Linda Vich Creates: Christmas Decor and Gift Card Holder. Christmas decor item CASEd from Connie Collins.
For the last class of the year for my Country Villas Stamp Group, we worked on a decor project cased from Constantly Stamping. Though I had intended to create the project using alternate colors, as a traditional red & green Christmas lover, I decided to follow Connie's color choices. I mean, why reinvent the wheel?

To begin, the Pyramid Pals Thinlits were used to cut two of each color, of both Old Olive and Always Artichoke.

Next, the Festive Flower Punch was used to punch petals from Cherry Cobbler and leaves from Old Olive and Always Artichoke. Then, using a leaf from Vintage Leaves, the leaf veins were stamped on each petal and leaf, using coordinating ink. The 1 1/4" Circle Punch was also used to
punch one circle from Cherry Cobbler.

A glue gun was used to adhere each petal to the 11/4" circle and then further petals were added, working toward the centre. The leaves were added behind the flower petals.

The stamens were cut from Glimmer Paper using the Botanical Builder Framelits and then adhered with the glue gun. Additional "greenery" was die cut from Gold Foil and Gold Glimmer using the Pretty Pines Thinlits. These were also adhered to the flower using the glue gun.

For the Pyramid Pal pieces, the tabs were cut off and then they were adhered together as per usual, using Fast Fuse.

Using the MISTI, they were each stamped with the large medallion from the Frosted Medallions stamp set using the matching ink. Once the ink had dried, each piece was scored from point to point and from corner to corner using the Simply Scored. A bone folder was used to burnish each fold well and each piece then formed a 3D, four-pointed star.

The two stars were placed one on top of the other, offset, and a pencil was used to mark the point where the top star sat on the bottom star. The glue gun was then used to place glue behind the pencil lines and the glue was allowed to cool. More glue was added to give additional height and the top star was adhered to the bottom. In the same way, the finished poinsettia was adhered to the top of the completed eight-pointed star.

To complete the fancy star-poinsettia, a rhinestone was added to the centre of the flower and a length of the Cherry Cobbler from the Silky Taffeta Combo Pack was knotted and glued into the back of one of the star points.

Linda Vich Creates: Christmas Decor and Gift Card Holder. Christmas decor item CASEd from Connie Collins.


Linda Vich Creates: Christmas Decor and Gift Card Holder. Christmas decor item CASEd from Connie Collins.

Linda Vich Creates: Christmas Decor and Gift Card Holder. Christmas decor item CASEd from Connie Collins.

I love how this turned out! The colors are so rich and festive. I hung mine on my tree while one member of our group decided to showcase hers in a shadow box frame.

Linda Vich Creates: Christmas Decor and Gift Card Holder.


Our second project was simple by comparison but still produced a pleasing and useful Gift Card Holder.

We used the Envelope Punch Board to create a small envelope using a piece of Candy Cane Lane DSP. A sentiment from the Tin of Tags stamp set was stamped on a piece of Whisper White using Real Red and the MISTI. A second stamping with Versamark allowed the sentiment to be heat embossed using the Real Red Glitter Embossing Powder. The paper was then adhered inside the envelope.

A strip of Cherry Cobbler was cut and wrapped around the envelope to create a belly band. The little house adhered to the belly band was fussy cut from another piece of the Candy Cane Lane DSP. The now retired 2-Way Glue Pen was used on the snow parts and then Dazzling Diamonds was added for a sparkly finish. To another touch of shimmer, a Clear Wink of Stella pen was used to trace over all the white and candy parts on the house.

To complete the gift card holder, a tag was die cut from Crumb Cake using the Tags & Labels Framelits and then stamped with a stamp from the Hang Your Stocking stamp set. It was hung from the belly band using a length of twine from the Candy Cane Lane Baker's Twine.

Linda Vich Creates: Christmas Decor and Gift Card Holder. Christmas gift card holder using Candy Cane Lane DSP.

Linda Vich Creates: Christmas Decor and Gift Card Holder. Christmas gift card holder using Candy Cane Lane DSP.

I hope you've enjoyed these little Christmas projects!


Saturday, October 29, 2016

Exciting Stampin' Up! News and Stamp Class Projects


Have you heard the news??

As of November 1, you will be able to purchase stitched dies from Stampin' Up! A collection of 12 stitched dies, four each of ovals, squares, and circles will be appearing in the new annual catalog in June but you can purchase them early!

View the video below for a look at these lovely dies!


To celebrate the release of these dies, Stampin' Up is offering a 25% discount on select stamp sets which coordinate with these dies! These stamp sets will only be on sale during the month of November.

Click photo for full size listing of stamps on sale.

Contact me to place your order for both the stitched dies and matching stamp sets of your choice!

On Thursday, I met with my second stamp group and we had a ball chatting about crafting and making two lovely projects.

A standard card base was cut from Real Red card stock. Two mattes were cut from Whisper White. One matte was embossed using the Softly Falling Embossing Folder. The edges were inked with Pool Party using a sponge and then it was adhered to the card front.

The igloo was cut from Thick Whisper White using the Layering Ovals. A backing was cut from Pool Party. The white piece was embossed using the Brick Wall Embossing Folder and then the two pieces of the igloo were glued together with liquid adhesive.

The outside of the igloo was inked with Pool Party as well as the lines between the bricks. Liquid glue was applied to the edges, around the doorway, and random spots on the igloo itself and then Dazzling Diamonds Glitter was applied.

The Eskimo from the Cookie-Cutter Christmas stamp set was stamped on watercolor paper using Stazon ink. After setting the ink with a heat tool, the Eskimo was colored by using Stampin' Write Markers with a Blender Pen.

The igloo and Eskimo were adhered to the card front using Dimensionals. The sentiment, from the Santa's Sleigh stamp set, was stamped with Basic Black on a strip of Pool Party. One end was flagged with scissors and then the sentiment was adhered to the card front using Snail Adhesive.

The matte for the inside was stamped in Pool Party with a brick stamp from the Ghoulish Grunge stamp set. The edges of the matte were inked with Pool Party and then the matte was adhered inside to complete the card.

Linda Vich Creates: Exciting Stampin' Up! News and Stamp Class Projects.This card features an Eskimo cut with the Cookie Cutter Builder Punch and an igloo created with the Layering Ovals.

Linda Vich Creates: Exciting Stampin' Up! News and Stamp Class Projects.This card features an Eskimo cut with the Cookie Cutter Builder Punch and an igloo created with the Layering Ovals.

Linda Vich Creates: Exciting Stampin' Up! News and Stamp Class Projects.This card features an Eskimo cut with the Cookie Cutter Builder Punch and an igloo created with the Layering Ovals.


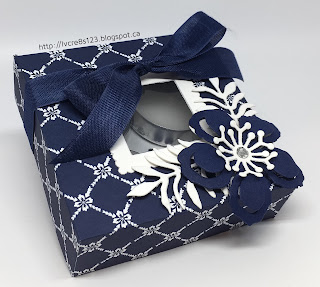
Our second project was a little box that holds four tea light candles. The project was CASEd from Square Fish Designs and there is a template there that shows the scoring lines for the project.

A piece of the Floral Boutique DSP was cut 9.5 x 5.25" and scored and cut according to the template mentioned above. The Layering Squares were used to cut a hole in the lid portion of the box and a piece of Window Sheet was adhered inside the lid using Snail Adhesive.

A frame for the outside was cut with the Layering Squares from Thick Whisper White. It was adhered outside the window using liquid adhesive. Tip: Apply liquid adhesive to the frame and lay it, glue side up on the desktop. Hold the unassembled box with the wrong side facing you. Look through the window in the lid to line up the frame and press to adhere.

The box was completed using liquid adhesive and the candles placed inside. The Botanical Builder Framelits were used to cut the flower, stamens, and leaves. These were attached to the box lid using liquid glue and Dimensionals. A rhinestone was added to the centre of the flower.

A piece of the now retired Night of Navy Seam Binding was tied in a bow around the box to complete it.

Linda Vich Creates: Exciting Stampin' Up! News and Stamp Class Projects. This box for four tea light candles is stunning when made from Floral Boutique DSP and embellished with flowers die cut with the Botanical Builder Framelits.

Linda Vich Creates: Exciting Stampin' Up! News and Stamp Class Projects. This box for four tea light candles is stunning when made from Floral Boutique DSP and embellished with flowers die cut with the Botanical Builder Framelits.

Linda Vich Creates: Exciting Stampin' Up! News and Stamp Class Projects. This box for four tea light candles is stunning when made from Floral Boutique DSP and embellished with flowers die cut with the Botanical Builder Framelits.

Fun was had by all and I look forward to our next class in November!


Sunday, August 14, 2016

Mini Treat Bag Cutlery Holders

Linda Vich Creates: Mini Treat Bag Cutlery Holders. Botanical Builder and Mini Treat Bag Thinlits team up with the flamingo from Pop of Paradise to create these darling cutlery holders
Our neighbors, Rob and Debby–both teachers–are newly retired. Usually, we see them several times over the summer but you know how it is with retired folk . . . they are busier than ever!

On Thursday I phoned to see if they were free for dinner on Saturday, but I expected to be turned down. I was pleasantly surprised though when they were able to come!

When we have them over, I try to use some new creative recipes but this time round I had to work until 5:00 so we simply had steaks, potatoes on the barbecue and corn. Debby brought a wonderful dessert.

Because I felt I needed to create something special for our evening, I decided to use an idea I had seen somewhere on Pinterest where the Mini Treat Bag Thinlits were used to make a cutlery holder.

Since I knew I would be using my favorite summer plates with flamingos on them, I decided to mimic the colors from the plate.

I started by die cutting the treat bag pieces from Dapper Denim and then embossed them using the Seaside Embossing Folder. In adhering the pieces, I turned them to use the debossed side.

Next up, I stamped the flamingo, from the Pop of Paradise stamp set, two times using Flirty Flamingo and my MISTI. I used Watermelon Wonder and Basic Black Stampin' Write Markers to add details to the flamingos by coloring on my stamp and re-stamping. Each flamingo was fussy cut.

I die cut a variety of leaves using the Botanical Builder Framelits and Wild Wasabi, Garden Green, Mint Macaron, Old Olive and Mossy Meadow. I used the Blossom Bunch and the Blossom Builder Punches to punch flowers from Watermelon Wonder and Peekaboo Peach.

I used a Delicate White Doily as a base for the flamingo and then played with the arrangement of leaves and flowers. My daughter, Courtney, was actually the one who came up with the winning design which involved sponging of the doily with first Blushing Bride, then Flirty Flamingo, and finally Crumb Cake on the edges.

The leaves and flowers all had edges inked with matching ink using a sponge dauber. The doily was then adhered to the front of the treat bag using Fast Fuse and then a circle of Linen Thread was attached with a Glue Dot. The flamingo was popped up slightly with some Dimensionals.

The leaves were adhered behind the doily using liquid glue and then the flowers added in the same manner. Tiny pearls were added to the flower centres to complete my project.

Linda Vich Creates: Mini Treat Bag Cutlery Holders. Botanical Builder and Mini Treat Bag Thinlits team up with the flamingo from Pop of Paradise to create these darling cutlery holders
Here is one of the cutlery holders on top of one of the plates. Can you see why I love these plates?

Linda Vich Creates: Mini Treat Bag Cutlery Holders. Botanical Builder and Mini Treat Bag Thinlits team up with the flamingo from Pop of Paradise to create these darling cutlery holders

I love how they turned out but once I put them on the plates I quickly regretted using Dapper Denim for the treat bag :(

I think that I should have chosen Peekaboo Peach to make the bag stand out from the plates more. Of course, we always have our best ideas in retrospect! Luckily, Rob and Debby loved them regardless and we spent a wonderful evening with them!