Showing posts with label sealed with love. Show all posts

Wednesday, February 15, 2017

Valentine Collection

Linda Vich Creates: Valentine Collection. Several valentine projects that use a host of die sets to create lovely boxes and a card.
Valentine's Day this year marked the day 30 years ago when my husband Bob proposed to me! Such a special day that was! We celebrated by going for supper at Jonesy's Restaurant in Bird's Hill. This was the first time we had eaten at this restaurant and it definitely won't be our last! It is a very small restaurant, and did not have a fancy decor, but the food was wonderful and I highly recommend the place.

Today I have for you a collection of items that I created for my family for Valentine's Day this year.

First up is a simple tea light holder for my daughter who likes candles. I added no extra embellishments to this box so that the light of the candle could shine through all the tiny die cut holes.

I simply used the largest of the Window Box Dies to cut out two pieces of card stock and then used a smaller die with a heart pattern to cut openings in the small sides of the box. A larger die was used to cut the holes in the top of the box. Liquid adhesive was used to assemble the box.

Linda Vich Creates: Valentine Collection. Several valentine projects that use a host of die sets to create lovely boxes and a card.

Linda Vich Creates: Valentine Collection. Several valentine projects that use a host of die sets to create lovely boxes and a card.


Next, I created an enlarged Window Box by using a tutorial from Kirsteen Gill. I wanted a larger box that could hold more treats and this worked perfectly!

To create the box, you need to do some fancy cutting with your Big Shot. In order to make the box larger, you need to shift the top cutting plate so that it doesn't extend all the way across the Window Box Thinlits die. It is not a hard technique but I did need to refer to the tutorial in order to make it work for me!

Once the pieces were cut out, the box was assembled like the original version and I used liquid adhesive to adhere the card stock. I cut panels for the box using the Sending Love DSP and also used the Love Notes Framelits to cut tiny envelopes, hearts, arrows, and the banner for the top.

Using the Sealed With Love stamp set, I stamped the tiny notes within the envelopes. I used the Bloomin' Love stamp set for the sentiment on the banner which I embellished with rhinestones. I also used one of the Lace Doilies on the lid of the box. These doilies are really nice because they are Whisper White on one side and Very Vanilla on the other!


Linda Vich Creates: Valentine Collection. Several valentine projects that use a host of die sets to create lovely boxes and a card.

Linda Vich Creates: Valentine Collection. Several valentine projects that use a host of die sets to create lovely boxes and a card.

Linda Vich Creates: Valentine Collection. Several valentine projects that use a host of die sets to create lovely boxes and a card.


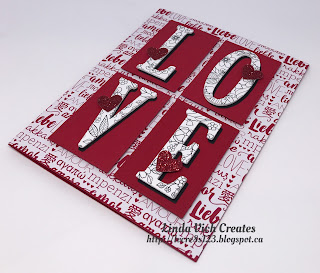
To create the card for my husband, I first die cut the four letters from the Sale-A-Bration Freebie, Inside The Lines DSP, using the Large Letters Framelits. I also cut three versions using Thick Whisper White and one from Basic Black for all four letters. These letters stacked and adhered using liquid adhesive, with the Basic Black layer being slightly offset to produce a shadow.

A 4.75 x 6" card base was cut from Real Red and then a sheet of the Sending Love DSP was cut and adhered to the front.

Next, I used one the squares from the Stitched Shapes Framelits to cut a rectangle on which to place each letter.

In order to cut a rectangle using a square die, the top cutting plate on the Big Shot must be placed so that the one edge of the die is not cut. The die is then moved, the platform rotated, and the cutting plate replaced so that the other side can be cut. To ensure that each of my rectangles was the same size, I cut one rectangle and then used the resulting "frame" as a template to place over each piece of card stock to be cut. The template ensured that the die could only be moved to the same place each time ensuring the same size of rectangle. For more information on this technique, check out the video tutorial by Dawn Griffith.


Linda Vich Creates: Valentine Collection. Several valentine projects that use a host of die sets to create lovely boxes and a card.
This shows the template on top with the square die
moved to create the second cut for the rectangle.

Linda Vich Creates: Valentine Collection. Several valentine projects that use a host of die sets to create lovely boxes and a card.
The top cutting plate is positioned so that the bottom
edge of the die does not cut through the card stock

Each letter was adhered to its stitched rectangle using liquid adhesive. The rectangles were adhered to the card front using Dimensionals. Small hearts were punched from Red Glimmer paper and adhered to the letters using Glue Dots.

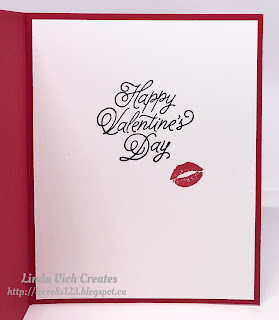
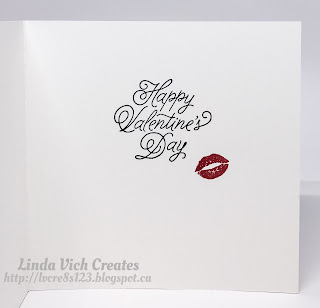
For inside the card, a white matte was stamped with a sentiment from the Sealed With Love stamp set using Basic Black and the lips were stamped with Real Red. The matte was adhered to complete the card.


Linda Vich Creates: Valentine Collection. Several valentine projects that use a host of die sets to create lovely boxes and a card.

Linda Vich Creates: Valentine Collection. Several valentine projects that use a host of die sets to create lovely boxes and a card.

Linda Vich Creates: Valentine Collection. Several valentine projects that use a host of die sets to create lovely boxes and a card.


Finally, I created a lidded box for my granddaughter using the Popcorn Box Thinlits. I referred to the tutorial by Intatwyne Designs.

I created my box using Real Red card stock and adhered panels cut from the Sending Love DSP. I decorated each panel by adhering layered hearts cut from Red and Dazzling Diamonds Glimmer paper using the Sweet & Sassy Framelits.

I stamped the sentiment from the Sealed With Love stamp set using Real Red and then Versamark inks and heat embossed it using the Real Red Glitter Embossing Powder. This was die cut using a square from the Stitched Shapes Framelits and adhered to the lid of the box.

A length of ribbon was adhered at the back of the box with a glue dot and then tied in a bow to complete the box.


Linda Vich Creates: Valentine Collection. Several valentine projects that use a host of die sets to create lovely boxes and a card.

Linda Vich Creates: Valentine Collection. Several valentine projects that use a host of die sets to create lovely boxes and a card.

Linda Vich Creates: Valentine Collection. Several valentine projects that use a host of die sets to create lovely boxes and a card.


This completes my Valentine projects for 2017. I hope you enjoyed a lovely Valentine's Day!


Monday, January 23, 2017

Love You Lots Valentine

Linda Vich Creates: Love You Lots Valentine. A faux quilted background showcases two little ladybugs on this sparkly red Valentine.
I have been wanting to try the Faux Quilted Background technique that Dawn Griffith demonstrates in her video tutorial. I thought that it would work nicely for a Valentine card.

I started by die cutting a piece of Watercolor Paper with one of the squares from the Stitched Shapes Framelits. I then stamped the ladybugs using Basic Black Archival ink.

After heat setting the image with my Heat Tool, I colored the insects using a Real Red Stampin' Write Marker. I added a layer of the now retired Crystal Effects and set it aside to dry.

I die cut two more mattes, one from Real Red and one from Thick Whisper White. These were layered with Dimensionals.

The sentiment was stamped on another piece of Thick Whisper White. I then used another technique from Dawn for using a square stitched die to cut a stitched rectangle. The technique involves cutting part of the die, using a cutting pad that didn't cover the die completely. The die was then run through the Big Shot again from the other direction, after lining up the die using the cutting marks left by the die. Great technique as an interim solution but I am hopeful that Stampin' UP! will come out with many more stitched dies, including rectangles and other shapes.

A 5.5 x 5.5" card base was cut from Thick Whisper White. A matte was cut, from the Sending Love DSP,  to fit the card front exactly and adhered with Snail Adhesive. A matte was also cut from Real Red.

I used the now retired Diagonal Scoring Plate for the Simply Scored to score the matte at .75" intervals and then turned the matte 90 degrees and scored again to produce the diamond effect. The matte was then folded on all the score lines and then one by one, each fold was inked on both sides with Real Red using a Sponge Dauber. After heat setting the ink, Gold Glitz Dazzling Details was used to add sparkle points to each diamond intersection. I then set the matte aside to dry.

Once everything was dry, I adhered the quilted matte to the card front using Fast Fuse. The ladybugs layer was adhered with Dimensionals on top of the other two stitched layers.

The stack was then adhered to the card front using Dimensionals, with a nest of the Gold Metallic Thread secured underneath. The sentiment was also adhered to the card front. Three Rhinestones were colored with a Sharpie marker and added to the sentiment.

A sentiment from the Sealed With Love stamp set was stamped inside using Basic Black. The lips were also stamped using Real Red to complete the card.

Linda Vich Creates: Love You Lots Valentine. A faux quilted background showcases two little ladybugs on this sparkly red Valentine.

Linda Vich Creates: Love You Lots Valentine. A faux quilted background showcases two little ladybugs on this sparkly red Valentine.

Linda Vich Creates: Love You Lots Valentine. A faux quilted background showcases two little ladybugs on this sparkly red Valentine.


I really like how this card turned out! The faux quilting technique does take some time to complete but I love the way it looks and I will definitely use it again!


Tuesday, January 17, 2017

January Stamping Projects with A Modified Use of the Balloon Pop-Up Framelits

Linda Vich Creates: January Stamping Projects with A Modified Use of the Balloon Pop-Up Framelits. The Baker's Box Thinlits are used to create a Sending Love Valentine Mailbox.
At our stamping group on Sunday afternoon, we worked on projects for Valentine's Day.

Our first project was a Valentine mailbox. We die cut two sheets of Sending Love DSP using the Baker's Box Thinlits, being sure to cut a slot in the top portion of one of the pieces.

Folding on all the score lines was somewhat difficult because patterned paper was being used but this was done and then the box was adhered together. The top flaps were punched with the 1/8" Circle Punch and then either a red or white ribbon was threaded through and tied into a bow.

Mini envelopes were die cut from both Real Red and Whisper White card stock and they were stamped with a variety of sentiments, lips, and hearts from the Sealed With Love stamp set. The envelopes were then glued shut.

One mini envelope was left open and a Love Note stamp was used on Whisper White card stock and die cut to form a  ruffled note. This was placed in the open envelope and glued to the front of the mailbox. A heart die was used to cut two 3D hearts which were put on the sides of the mailbox.

Linda Vich Creates: January Stamping Projects with A Modified Use of the Balloon Pop-Up Framelits. The Baker's Box Thinlits are used to create a Sending Love Valentine Mailbox.

Linda Vich Creates: January Stamping Projects with A Modified Use of the Balloon Pop-Up Framelits. The Baker's Box Thinlits are used to create a Sending Love Valentine Mailbox.


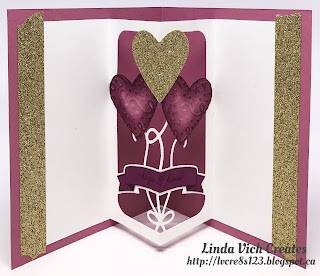
Our second project was a Valentine card that used a modified version of the Balloon Pop-Up Thinlits. In planning this card, I created a mock up using copy paper. This is a technique I use quite often when trying a new or finicky technique as a paper saving measure.

Linda Vich Creates: January Stamping Projects with A Modified Use of the Balloon Pop-Up Framelits. The Balloon Pop-Up Framelits die cut is modified to create a pop-up Valentine Balloon Bouquet card.
Mock up of inside of the card.
A standard card base was cut from Sweet Sugarplum as well as a matte. The matte was embossed using the Happy Hearts Embossing Folder. The matte was then sponged lightly with Rich Razzleberry ink and then about 1/4 of the way down, it was sponged heavier with the same ink. The retired Blackberry Bliss was then sponged 1/2 of the way down and then heavier 3/4 to the bottom of the matte. This created an ombré effect. The matte was adhered to the card front.

The sentiment, from the Sealed With Love stamp set was stamped on Thick Whisper White and die cut using a square from the Stitched Shapes Framelits. A larger square was also die cut from Rich Razzleberry. A scalloped square was die cut from Gold Glimmer paper using the Layered Squares Framelits. These were then layered using Dimensionals.

Three hearts were punched with the now retired Extra Large Full Heart Punch, two from Sweet Sugarplum, one from Gold Glimmer. The two Sweet Sugarplum hearts were embossed using the Confetti Embossing Folder. The Gold Glimmer heart was scored down the middle on the non-Glimmer side. Rich Razzleberry ink was used on the edges of the Sweet Sugarplum hearts to make them look more like 3D heart balloons.

The pop-up section for the inside of the card was die cut from a 5 x 7.5" piece of Whisper White using the Balloon Pop-Up Framelits. Kay Kalthoff's video tutorial was helpful in setting up the die to cut the pop-up, especially in adding Sharpie marks to the die to line up the card stock properly on the Big Shot.

The pop-up piece was folded in half on the centre score line and then the side pieces were folded inward on their score lines. Using the MISTI, the banner from the Balloon Adventures stamp set was stamped on Rich Razzleberry in matching ink. The sentiment, from the Sealed With Love stamp set was curved to fit the banner and also stamped with Rich Razzleberry. The banner was fussy cut and adhered to the banner portion of the pop-up section.

insert photo

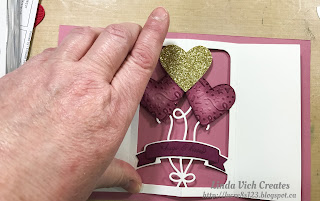
Removable adhesive was used on the punched hearts to position them over each of the balloons on the pop-up piece. Scissors were used to trim the excess from behind the hearts and then the hearts were secured permanently with liquid adhesive.

Linda Vich Creates: January Stamping Projects with A Modified Use of the Balloon Pop-Up Framelits. The Balloon Pop-Up Framelits die cut is modified to create a pop-up Valentine Balloon Bouquet card.
Photo shows balloon section
trimmed for placement of heart.

Linda Vich Creates: January Stamping Projects with A Modified Use of the Balloon Pop-Up Framelits. The Balloon Pop-Up Framelits die cut is modified to create a pop-up Valentine Balloon Bouquet card.
Photo shows back of pop-up
after hearts are placed. Tracing
the back of the hearts is helpful
for glue placement.

Linda Vich Creates: January Stamping Projects with A Modified Use of the Balloon Pop-Up Framelits. The Balloon Pop-Up Framelits die cut is modified to create a pop-up Valentine Balloon Bouquet card.

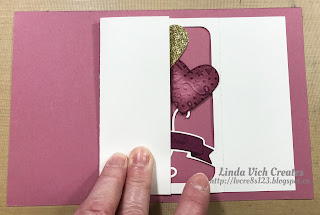
After the hearts were in place, the pop-up section could be adhered inside the card base. First, the pop-up piece needed to be aligned on the score line of the card base, keeping both top and bottom margins equal.

Linda Vich Creates: January Stamping Projects with A Modified Use of the Balloon Pop-Up Framelits. The Balloon Pop-Up Framelits die cut is modified to create a pop-up Valentine Balloon Bouquet card.

Next, one side panel was folded back toward the centre and adhesive applied. It was then folded back into place to adhere to the card base. This was repeated with the other side.

Linda Vich Creates: January Stamping Projects with A Modified Use of the Balloon Pop-Up Framelits. The Balloon Pop-Up Framelits die cut is modified to create a pop-up Valentine Balloon Bouquet card.

Linda Vich Creates: January Stamping Projects with A Modified Use of the Balloon Pop-Up Framelits. The Balloon Pop-Up Framelits die cut is modified to create a pop-up Valentine Balloon Bouquet card.

To tie in with the Glimmer balloon and the Glimmer scalloped square, Metallic Gold Washi Tape, from the 2016 Sale-A-Bration, was used on either side of the pop-up section.

Linda Vich Creates: January Stamping Projects with A Modified Use of the Balloon Pop-Up Framelits. The Balloon Pop-Up Framelits die cut is modified to create a pop-up Valentine Balloon Bouquet card.

Lastly, the layered sentiment piece was adhered to the card front to complete the card.

Linda Vich Creates: January Stamping Projects with A Modified Use of the Balloon Pop-Up Framelits. The Balloon Pop-Up Framelits die cut is modified to create a pop-up Valentine Balloon Bouquet card.

Linda Vich Creates: January Stamping Projects with A Modified Use of the Balloon Pop-Up Framelits. The Balloon Pop-Up Framelits die cut is modified to create a pop-up Valentine Balloon Bouquet card.


I hope you have enjoyed the Valentine projects from our Stamping Group. I can envision other projects that make use of a modified version of the Balloon Pop-Up Framelits in the future. Stay tuned!