Showing posts with label birds & blooms thinlits. Show all posts

Tuesday, August 2, 2016

Thoughtful Branches Birthday

Linda Vich Creates: Thoughtful Branches Birthday. Pop-up card created with the Limited Edition Thoughtful Branches Bundle.
I know it's been awhile since I posted but with the hot weather we have been having, our house is HOT! The fan I have in my craft room is not enough to keep it cool in there so I have not been crafting. I am anxious to get back into it though so grabbed a little (sweaty) time to craft a birthday card for my sister-in-law.

This is pretty much a complete CASE of the card by Kelly Kent. It uses the Limited Edition Thoughtful Branches stamp set and matching Thinlits which is now available to order until August 31 while supplies last.

You won't want to pass up this stunning bundle! The stamp set itself is perfect for all year stamping with its selection of trees, trunks, and leaves and the included sentiments are simply BEAUTIFUL! They have used a lovely combination of script and sans serif fonts that can dress up almost any card whether it be casual or formal, and the sentiments can be used alone or you can pair up outside and inside sentiments.


Don't miss out on this extremely versatile set! If you received coupons for ordering in July, you can use them for your purchase of this set. Contact me to order it today!

I adapted the directions from Kelly to put them into inches and then proceeded with my card by cutting a 11 x 4.25" card base from Wild Wasabi. I scored it at 1, 2.5, 3.75, 5.5, 7.25, 8.25 and 10 inches. I also cut a strip that was 1 x 5 inches in length.

I folded the card on the score lines and then set the card base aside. Using the stamps, I stamped the tree trunk on Soft Suede, using matching ink and I stamped two sets of tree leaves on Sweet Sugarplum, one with Sweet Sugarplum and one with Rose Red.

I stamped the bird with Pacific Point on Marina Mist. Two leaves were stamped on Wild Wasabi, one with Wild Wasabi and the other with Garden Green. Three flowers, from the Best Birds stamp set, were stamped on Sweet Sugarplum using Rose Red. The sentiment was stamped with Soft Suede on Sweet Sugarplum.

All stamped images were die cut using the Beautiful Branches Thinlits, Birds & Blooms Thinlits, and the Layering Ovals Framelits. An extra tree trunk was also die cut. A scalloped oval matte was also die cut from Rose Red card stock.

I found the centre scored line of the card base and used my 1/8" Circle Punch to punch holes .5" in from each side. I then used my Stampin' Trimmer to cut on each side of the holes between them, leaving a slit between them. It is important not to make the slit too wide or the pop-up part of the card will not stay in place.

Using the 1 x 5" strip and the card base, I attached one end of the strip to the side of the card base (see photo above number 5 here for clarification) and then poked the other end through the slit that was cut in the card base. I used Fast Fuse to glue both folded ends together, sealing the end of the strip between them while creating the pop-up structure for the card.

I used the tree trunks and tree leaves die cuts to determine how long I needed the piece to be and how much to trim it so it would fit between the two tree trunks. When doing this step, it is important to determine the correct placement so that the flattened card will fit in your chosen envelope–mine fit into a standard envelope for a 4.25 x 5.5" card.

After using scissors to trim it both in length to taper the sides, I used liquid adhesive to glue the two tree trunks to it. The leaves were then also glued in place onto the trunk. Wink of Stella was added to the leaves and the bird was adhered.

With the pop-up set up, the leaves and flowers were added using Dimensionals. Wink of Stella was also added to the flowers. The sentiment was matted and also adhered to finish the card.

Linda Vich Creates: Thoughtful Branches Birthday. Pop-up card created with the Limited Edition Thoughtful Branches Bundle.

Linda Vich Creates: Thoughtful Branches Birthday. Pop-up card created with the Limited Edition Thoughtful Branches Bundle.
Side view showing how the pop-up is formed.

Linda Vich Creates: Thoughtful Branches Birthday. Pop-up card created with the Limited Edition Thoughtful Branches Bundle.

I'm delighted with how this card turned out and my sister-in-law loved it! I can see myself using this pop-up design for many more card designs in the future.

For further inspiration using the Thoughtful Branches Bundle, you will want to check out the Stamp Review Crew–Thoughtful Branches and the Thoughtful Branches Artisan Blog Hop.


Wednesday, July 6, 2016

Best Birds Thank You

Linda Vich Creates: Best Birds Thank You. Learn how the bird was created to look 3D on this delightful thank you card.
Every once in awhile, the stars align and a crafting session goes as smoothly as spreading peanut butter on a slice of bread. Today was one of those days. :)

As I sat reviewing my new stamp sets, I chose the Best Birds to create a card.

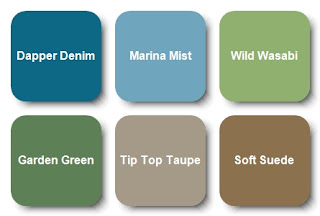
I had a blue bird in mind and chose a scrap of watercolor paper to try out my hunch that Marina Mist and Dapper Denim was the combination I was seeking. I used my Kuretake Fude Water Brush Pen and reinker to paint a few strokes. The blues were perfect together!

Then, since I was also going to be stamping a branch, I tried out Wild Wasabi and Garden Green for the leaves and Tip Top Taupe and Soft Suede for the branch. These combinations also worked well.

I then consulted a downloadable PDF from Patty Bennett that I had saved to Evernote. The PDF is a wonderful resource that provides a sample of all the DSP in the new 2016-2017 catalog. I was looking for a paper that would look good with the bird I was going to paint. One of the new Moroccan papers fit the bill!

I began by stamping, with Basic Black Archival ink, the bird and the branch onto watercolor paper using my MISTI. I zapped the images with my heat tool just to make sure the ink was set and then began watercoloring them using the reinkers I had selected previously. When complete, I heat set the images and then die cut them using the Birds & Blooms Thinlits.

Using the Hello You Thinlits, I die cut three "thanks" from Wild Wasabi and adhered them together using liquid adhesive. I chose green for this sentiment to pick up the green from the leaves and to provide a little relief from all the blue. I inked the stacked die cut with Versamark and then heat embossed with Clear Stampin' Emboss Powder three times to make the sentiment good and shiny.

To create the rest of the sentiment, I stamped with the Labeler Alphabet stamp set onto Thick Whisper White using Dapper Denim ink. To use these letters, you really need to stamp one letter at a time to be able to get them close enough to each other. Once complete, I cut the sentiment up into individual words.

Now that I had the sentiment, the bird and the branch, I took some time to plan out my layout for the card. I tried several different configurations, including both vertical and horizontal. I finally decided on a horizontal orientation.

It was necessary to create a 5 x 7" card to hold my layout. I first chose to matte the DSP with Dapper Denim card stock, after inking the edges of the DSP with Soft Suede. I then cut a Soft Suede card base to pick up the color of the branch. The matted DSP was adhered to the card front using Dimensionals.

In my post, Just Sitting Here, I used a technique learned from Lydia over at Understand Blue. The technique involves using a stylus, or in my case I used my McGill Paper Blossom Tool Kit, to push out the back of a die cut to give it a realistic 3D look. I wanted to apply this technique to my bird so it would not look so flat. I also used this technique on the branch to a lesser degree.

After puffing up my bird and branch, I attached double Dimensionals to the bird to maintain the "puffiness" and adhered both die cuts to the card front. This then allowed me to lay out and then adhere both parts of my sentiment. I attached the "thanks" with liquid glue. Before adhering the individual words, I used a sponge dauber to ink the edges of each word with Soft Suede. The words were then adhered to the card front using rolled up Glue Dots to provide a little height.

For the inside of the card, a matte was cut from watercolor paper. Leaves from the Birthday Blossoms stamp set were stamped in two corners using Basic Black Archival ink. Once dry, I used Wild Wasabi and Garden Green to watercolor the leaves. The matte was adhered with Fast Fuse to complete the card.

Linda Vich Creates: Best Birds Thank You. Learn how the bird was created to look 3D on this delightful thank you card.

Linda Vich Creates: Best Birds Thank You. Learn how the bird was created to look 3D on this delightful thank you card.

Here are a couple of shots showing the dimension on the card. It looks even better in real life!

Linda Vich Creates: Best Birds Thank You. Learn how the bird was created to look 3D on this delightful thank you card.

Linda Vich Creates: Best Birds Thank You. Learn how the bird was created to look 3D on this delightful thank you card.

I had a lot of fun creating this card! I really like the color scheme–feel free to save it!

Linda Vich Creates: Best Birds Thank You. Learn how the bird was created to look 3D on this delightful thank you card.


What was really nice was having the ability to create my own sentiment using alphabet stamps. Sometimes the sentiments in a stamp set just don't say what you need them to say so you have to get creative!

I hope you've enjoyed my card today!