Showing posts with label easter. Show all posts

Wednesday, April 12, 2017

Mini Egg Carton Easter Treats

Linda Vich Creates: Mini Egg Carton Easter Treats. Three cheerfully embellished mini egg cartons ready to share some Easter treats!
I was one of the lucky ones who ordered and received the mini egg cartons early into the Occasions Catalog. Today I got to use them and I'm so sorry I didn't buy more even though they are being retired!

Besides being just overly cute in their "mini-ness" they are so much fun to color using the Stampin' Spritzers!

I started by filling a Stampin' Spritzer almost to the top with 70% alcohol and then added 40 drops of Night of Navy reinker (I wanted this color to be really dark rather than muted) and shook it up.

Placing an egg carton in my "spray booth" (an old shoebox) I proceeded to spray the outside of the box. I was surprised by how well it turned out! Spraying the outside of the egg carton took about 2/3 of the mixture.

I labelled the spritzer and then mixed up another one, this time using Sweet Sugarplum and using only 20 drops of reinker. After spraying, I mixed one more batch using Tempting Turquoise, again using 20 drops of reinker. This carton took pretty much the whole batch of color but since I couldn't seem to get all the color out of the Stampin' Spritzer, I labelled it and set it aside for another time.

The cartons dried quite quickly on their own while I cut up paper to embellish the boxes.

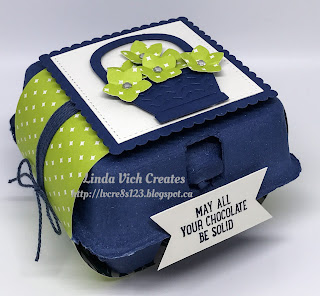
For the Night of Navy box I created a belly band using some of the new Eastern Elegance DSP. I also wound some Night of Navy Baker's Twine around the belly band, securing it with a little Fast Fuse Adhesive. I die cut a stitched square from some of the new Thick Very Vanilla using the Stitched Shapes Framelits and a scalloped square from Night of Navy using a die from the Layering Squares Framelits. These were adhered together using liquid adhesive.

The Basket Builder Framelits were used to cut the basket from Night of Navy and the flowers from the DSP. The basket was assembled using liquid adhesive and the flowers were shaped using a stylus from my Heartfelt Creations Deluxe Flower Shaping Kit.

The basket was adhered to the Very Vanilla square using Dimensionals and the flowers with Glue Dots. Rhinestones were added to the flower centres. The completed square was added to the belly band using Dimensionals. The sentiment was stamped on a strip of Thick Very Vanilla using Night of Navy and then the ends flagged using the Banner Triple Punch. It was adhered to the egg carton using Foam Adhesive Strips. I used Fringe Scissors on Night of Navy card stock to create my own fill for the egg carton.

Linda Vich Creates: Mini Egg Carton Easter Treats. Three cheerfully embellished mini egg cartons ready to share some Easter treats!

Linda Vich Creates: Mini Egg Carton Easter Treats. Three cheerfully embellished mini egg cartons ready to share some Easter treats!

Linda Vich Creates: Mini Egg Carton Easter Treats. Three cheerfully embellished mini egg cartons ready to share some Easter treats!

Linda Vich Creates: Mini Egg Carton Easter Treats. Three cheerfully embellished mini egg cartons ready to share some Easter treats!

For the Sweet Sugarplum egg carton, I started by stamping flowers on Watercolor paper using Basic Black Archival ink. After heat setting, I used my Watercolor Pencils and Clear Wink of Stella to color in the flowers, die cutting them using the Basket Builder Framelits.

The basket pieces were die cut from Tip Top Taupe and Early Espresso and assembled using liquid adhesive. The stitched square was die cut from the Succulent Garden DSP and the scalloped square from Mint Macaron. After adhering them with liquid adhesive, the basket was adhered with Dimensionals and the flowers with Glue Dots. Rhinestones were added to the centres.

Lace doily halves were added to the back of the scalloped square and then a length of the now retired Glitter Ribbon Combo was tied around the egg carton, anchoring the ribbon with a glue dot on top of the box. The squares were then adhered to the top of the box using Dimensionals. A strip of Sweet Sugarplum had its ends flagged and the sentiment was stamped with Tip Top Taupe. It was adhered to the top using Foam Adhesive Strips and rhinestones added. Fringe scissors and Mint Macaron was used for fill.

Linda Vich Creates: Mini Egg Carton Easter Treats. Three cheerfully embellished mini egg cartons ready to share some Easter treats!

Linda Vich Creates: Mini Egg Carton Easter Treats. Three cheerfully embellished mini egg cartons ready to share some Easter treats!

Linda Vich Creates: Mini Egg Carton Easter Treats. Three cheerfully embellished mini egg cartons ready to share some Easter treats!

Finally, the Tempting Turquoise egg carton was created. It was done in the same way as the previous carton but Festive Birthday DSP and Tempting Turquoise was used for the squares, Melon Mambo and Pumpkin Pie for the basket, Pumpkin Pie, Melon Mambo, Tempting Turquoise, Crushed Curry and Emerald Envy for the eggs, Chocolate Chip for the bunny and Melon Mambo 3/8" Stitched Ribbon. The sentiment was stamped with Melon Mambo on Thick Whisper Whtie. Fill was created using Melon Mambo card stock and Fringe Scissors.

Linda Vich Creates: Mini Egg Carton Easter Treats. Three cheerfully embellished mini egg cartons ready to share some Easter treats!

Linda Vich Creates: Mini Egg Carton Easter Treats. Three cheerfully embellished mini egg cartons ready to share some Easter treats!

Linda Vich Creates: Mini Egg Carton Easter Treats. Three cheerfully embellished mini egg cartons ready to share some Easter treats!

Linda Vich Creates: Mini Egg Carton Easter Treats. Three cheerfully embellished mini egg cartons ready to share some Easter treats!

Here's a final look at all three projects, though it's hard to take a photo of all three together in my Foldio 2 setup!

Linda Vich Creates: Mini Egg Carton Easter Treats. Three cheerfully embellished mini egg cartons ready to share some Easter treats!

I'm so pleased with how these all came together–I can't wait to give them to the recipients!


Monday, March 21, 2016

Mini Treat Baskets For Easter

The other day, a customer came through my till at Walmart with a miniature Daffodil plant. Why is it that whenever you see something in miniature it is so much cuter than the full size version? I love Daffodils as they are such a real sign of Spring but miniature ones . . . oh my!

Allison Okamitsu recently showcased a miniature Easter Basket in a blog hop and I knew that I would have to CASE it for some of my colleagues at Walmart!

I started by cutting 3.5" squares of Elegant Eggplant. I also cut 5.5 x .25" strips. I scored the squares at 1" and 2.5" and then rotated the square by 90° and repeated the scoring. I folded on all the score lines.

Leaving one flap folded, I used my Word Window Punch to punch two holes about 1/4" from the edge of the folded flap and up as far as the punch would reach. I then rotated 180° and repeated the punch. I then flipped to the other side, folded the edge and repeated the punching. This created the tiny openings in the side and bottoms of the baskets.

With the punched openings running horizontal, I cut up the vertical scoring to the horizontal score line and then cut in from the corner at an angle to the horizontal score line. I repeated this on the other end and then rotated 180 ° and repeated. this left triangles at each corner.

I placed Fast Fuse on each corner and adhered to create a box. I pulled each strip between my fingers to give it a slight curve and then placed Fast Fuse Adhesive at each end. I adhered the ends inside the box on the solid sides to provide a box handle.

I cut a piece of Cucumber Crush Cotton Paper 4 x 12" and folded it in half lengthwise. My Fringe Scissors were used to cut strips which were then crumpled and placed in the miniature baskets.
I nestled three chocolate carrots, found at Dollarama, in the crumpled grass. I formed miniature bows from 1/8" Crushed Curry Ribbon and adhered them to each basket handle using a glue dot.

After posting this, I decided that the little baskets weren't quite cute enough so I went back and added little basket liners to each one! I used a sheet of the now retired Regals Designer Series Paper Stacks because I needed the tiny polka dot Crushed Curry paper to make these.

I cut 1" squares and scored them on the diagonal. I then used glue dots to adhere them to two sides of each basket.


How cute are these? These were so much fun to create! Be sure to check out Allison's version and video tutorial for clearer directions on how to make these sweet little baskets.

Have you made any treat baskets, boxes, or bags for Easter? Let me know in the comments below!


Thursday, February 19, 2015

Indescribable Gift

Linda Vich Creates: Indescribable Gift. Blendabilities, ruffled ribbons, and complementary card stock combine to produce a Spring-like Easter card.

Got my Blendabilities out to color my card for today. I really wanted to color the apple blossoms (I think that's what they are?) from the Indescribable Gift stamp set.

After stamping the image on Whisper White with my Tuxedo Black Memento ink, I used my Pink Pirouette for the blossoms themselves and Wild Wasabi for the leaves. For the stem I used the two darkest markers in the Skin Tone assortment.

I chose to cut the completed image using the Window Frames Collection Framelits and cut a matte from Pear Pizzazz. (In retrospect, I should have cut the matte from from Wild Wasabi but in the end, I had three different yet complementary greens on the finished card!)

I chose a 5 1/2 x 5 1/2" card base of Soft Suede. I then faced a bit of a dilemma. I wanted to use Pink Pirouette paper behind the blossoms and I wanted to emboss it but the embossing folder would have been too small. Too compensate, I cut strips of Pink Pirouette from the Subtles Core'dinations collection and embossed the strips using the Decorative Dots embossing folder. I then used the now retired sanding block to reveal the white dots on the card stock.

Since the blossoms that I had colored looked closer in color to Crisp Cantaloupe than to Pink Pirouette, I chose to ink the edges of the embossed strips with Crisp Cantaloupe ink, using a Sponge Dauber.
I adhered the strips to the card base using Fuse Fast and trimmed the excess using my scissors. I then adhered both Calypso Coral and Lucky Limeade Ruffled Ribbons, now retired, in between the embossed strips.

I used Dimensionals to mount the Pear Pizzazz matte and the colored blossoms and then stamped the sentiment on Calypso Coral card stock using Versamark. I heat embossed it using White Stampin Emboss Powder and punched it using the Modern Label Punch. The edges were inked with Soft Suede.I adhered the sentiment using Dimensionals to complete the front of the card.

I cut a matte from Naturals White card stock for the inside of the card and used Soft Suede to stamp a portion of the blossoms in both the top left and bottom right corners, stamping off first. Edges were inked using Calypso Coral ink and the matte adhered using Fuse Fast.

I chose the colors of this card because they make me think of Spring. Hopefully, it isn't too far away!

Do you find that you are stamping in Spring colors to beat the winter blahs right now? Drop me a comment below to let me know!

Linda Vich Creates: Indescribable Gift. Blendabilities, ruffled ribbons, and complementary card stock combine to produce a Spring-like Easter card.

Linda Vich Creates: Indescribable Gift. Blendabilities, ruffled ribbons, and complementary card stock combine to produce a Spring-like Easter card.

Linda Vich Creates: Indescribable Gift. Blendabilities, ruffled ribbons, and complementary card stock combine to produce a Spring-like Easter card.


Built for Free Using: My Stampin Blog