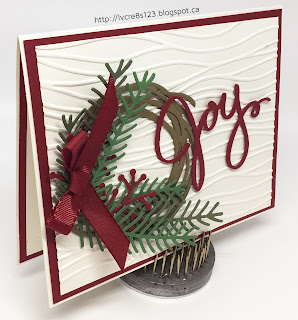
As we reach the end of the year, it is both a time for reflection and goal setting. I'd like to take this opportunity to look back at the projects I've created this year. Be sure to click on each image to be taken to the pertinent blog post for all the details.
Friday, December 30, 2016
My 12 Favorite Projects From 2016
Posted by Linda Vich at 12:30 PM 2 comments
Labels: beautiful you, birthday blooms, brick wall embossing folder, fluttering embossing folder, merry medley, pretty pines thinlits, sky is the limit, stitched shapes framelits, thoughtful branches, vivid vases
Tuesday, December 20, 2016
Christmas Decor and Gift Card Holder
To begin, the Pyramid Pals Thinlits were used to cut two of each color, of both Old Olive and Always Artichoke.
Next, the Festive Flower Punch was used to punch petals from Cherry Cobbler and leaves from Old Olive and Always Artichoke. Then, using a leaf from Vintage Leaves, the leaf veins were stamped on each petal and leaf, using coordinating ink. The 1 1/4" Circle Punch was also used to
punch one circle from Cherry Cobbler.
A glue gun was used to adhere each petal to the 11/4" circle and then further petals were added, working toward the centre. The leaves were added behind the flower petals.
The stamens were cut from Glimmer Paper using the Botanical Builder Framelits and then adhered with the glue gun. Additional "greenery" was die cut from Gold Foil and Gold Glimmer using the Pretty Pines Thinlits. These were also adhered to the flower using the glue gun.
For the Pyramid Pal pieces, the tabs were cut off and then they were adhered together as per usual, using Fast Fuse.
The two stars were placed one on top of the other, offset, and a pencil was used to mark the point where the top star sat on the bottom star. The glue gun was then used to place glue behind the pencil lines and the glue was allowed to cool. More glue was added to give additional height and the top star was adhered to the bottom. In the same way, the finished poinsettia was adhered to the top of the completed eight-pointed star.
To complete the fancy star-poinsettia, a rhinestone was added to the centre of the flower and a length of the Cherry Cobbler from the Silky Taffeta Combo Pack was knotted and glued into the back of one of the star points.
I love how this turned out! The colors are so rich and festive. I hung mine on my tree while one member of our group decided to showcase hers in a shadow box frame.
Our second project was simple by comparison but still produced a pleasing and useful Gift Card Holder.
We used the Envelope Punch Board to create a small envelope using a piece of Candy Cane Lane DSP. A sentiment from the Tin of Tags stamp set was stamped on a piece of Whisper White using Real Red and the MISTI. A second stamping with Versamark allowed the sentiment to be heat embossed using the Real Red Glitter Embossing Powder. The paper was then adhered inside the envelope.
A strip of Cherry Cobbler was cut and wrapped around the envelope to create a belly band. The little house adhered to the belly band was fussy cut from another piece of the Candy Cane Lane DSP. The now retired 2-Way Glue Pen was used on the snow parts and then Dazzling Diamonds was added for a sparkly finish. To another touch of shimmer, a Clear Wink of Stella pen was used to trace over all the white and candy parts on the house.
To complete the gift card holder, a tag was die cut from Crumb Cake using the Tags & Labels Framelits and then stamped with a stamp from the Hang Your Stocking stamp set. It was hung from the belly band using a length of twine from the Candy Cane Lane Baker's Twine.
I hope you've enjoyed these little Christmas projects!
Posted by Linda Vich at 10:13 PM 2 comments
Labels: botanical builder framelits, festive flower builder punch, frosted medallions, pretty pines thinlits, pyramid pals thinlits, vintage leaves
Saturday, November 26, 2016
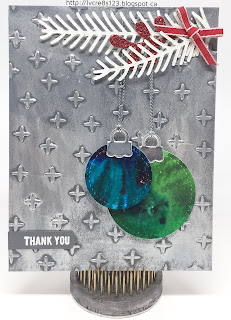
ColorBurst and Stitched Shapes Thank You
I started by cutting a standard card base from Thick Whisper White as well as a matte, to completely cover the card front, from Basic Gray.
Using the Sparkle Embossing Folder, I dry embossed the Basic Gray matte and then used my fingers to stroke on Silver Inka Gold. I was not overly particular about they way it went on because I wanted a kind of rustic finish to the matte. After the Inka Gold had been applied, I used a paper towel to buff it to bring out the shine. The matte was then adhered to the card front using Fast Fuse.
Next, I used my Ken Oliver Color Bursts on Watercolor paper. I tapped the colors that I wanted to use out on my paper and then I used a new to me product called Ink Potion #9 by Tsukineko to spray the ink powders. This spray is supposed to be good for blending inks and paint but also to help combat the warping of paper caused by spraying with water. It did seem to help quite a bit with keeping the paper flat. I continued spraying and adding more of the Color Bursts until I was satisfied with the color blending and then I allowed them to dry. I created two different color combos using Turquoise, Ultramarine Blue and Indigo for the blues and Lime Green, Terre Verte, and Pthalo Green for the greens.
Once these were completely dry, I used two sizes of Stitched Shapes Framelits to cut out circles. I then used the Delicate Ornaments Thinlits (which were in the first 24 Hour Sale for Online Extravaganza) to cut ornament toppers from Silver Foil. I used liquid adhesive to attach the toppers to the two stitched shapes to form Christmas ornaments.
I threaded a length of the now retired silver cording through each ornament topper. The ornaments were adhered to the card front using Dimensionals and the cording adhered using Glue Dots.
Sprigs of pine were die cut from Dazzling Diamonds Glimmer paper as well as little berries from Real Red Glimmer paper using the Pretty Pines Thinlits. These were adhered at the top of the card using more Glue Dots. A bow from the now retired 1/8" Real Red Ribbon was adhered on top.
The sentiment from the Thoughtful Banners stamp set was stamped on Basic Gray using Versamark and then heat embossed using White Stampin' Emboss Powder. It was punched with the Classic Label Punch and then adhered to the card front to complete this simple but cheery seasonal thank you card!
Posted by Linda Vich at 11:48 AM 1 comments
Labels: color bursts, delicate ornaments thinlits dies, inka gold, pretty pines thinlits, sparkle embossing folder, stitched shapes framelits, thoughtful banners
Friday, November 18, 2016
Merry Mice
For those of you unfamiliar with Viva Decor's Inka Gold, it is a fast drying metal gloss paint that contains natural Bees Was. You can apply it to a number of surfaces like wood, cardboard, unglazed pottery, metal and paper. It can be applied with a sponge or even your finger; buffing it will bring out its shine.
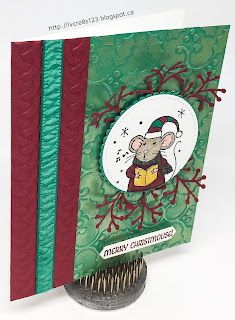
Before potentially messing up my card, I tested the Inka Gold by trying it on various colors of card stock to see what would work best. I embossed scrap pieces in a variety of colors and found that the Emerald Envy card stock gave me the look I wanted–a kind of patina.
I cut a standard card base from Thick Whisper White and a matte to fit the card front from Emerald Envy. After dry embossing the matte with the Holly Embossing Folder, I rubbed the Inka Gold over the embossing and then polished it with a paper towel. The embossed matte was then adhered to the card front with Fast Fuse.
Next, a strip of Cherry Cobbler was embossed with the Cable Knit Folder and adhered as a border on the left of the card front. A strip of the Emerald Envy Ruched Ribbon was also added.
Basic Black Archival ink was used to stamp one of the mice from the Merry Mice stamp set onto Thick Whisper White. It was colored using Stampin' Write Markers and then die cut using one of the Stitched Shape Framelits. It was adhered to an Emerald Envy matte die cut using a scalloped circle from the Layering Circle Framelits. The mouse was adhered to the card front using Dimensionals.
Cherry Cobbler berries were die cut using a die from the Pretty Pines Thinlits and adhered around the mouse using Glue Dots. The sentiment was stamped with Cherry Cobbler onto Thick Whisper White and then die cut using the Classic Label Punch. It was adhered to the card front using Foam Adhesive Strips.
I think it is fun to experiment with all kinds of media because you never know what you can create until you try it!
Posted by Linda Vich at 8:58 PM 0 comments
Labels: cable knit embossing folder, holly embossing folder, layering circles framelits, merry mice, pretty pines thinlits, stitched shapes framelits
Thursday, November 17, 2016
Sheltering Tree and a Joyful Wreath
The first card I designed was actually made last, just so we could all keep our hands and work stations clean so as not to contaminate the second card!
The emboss resist card was CASEd from Lisa Brown.
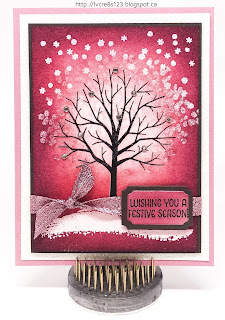
To create this card, a standard card base was cut from Sweet Sugarplum card stock. Two mattes were cut, one from Dazzling Diamonds Glimmer paper and one from Early Espresso. A piece of Watercolor paper was also cut.
The MISTI was used to stamp the tree, from the Sheltering Tree stamp set, three times with Early Espresso on the Watercolor paper and then it was heat set.
The paper was placed back into the Misti and the Embossing Buddy was used. The stamp was cleaned and then the tree stamp was re-inked using Versamark. The image was then heat embossed using Clear Stampin' Emboss Powder.
The Embossing Buddy was used again before stamping both the snowdrift and snowflake stamps using Versamark. The images were heat embossed using White Stampin' Emboss Powder.
Once again, the Embossing Buddy was used and then the leaf canopy stamp was used with Versamark. It was then heat embossed with the now retired Iridescent Stampin' Emboss Powder. The purpose of this stamp step was to create ice crystals in the tree.
It was very important to use the Embossing Buddy before inking each time because with using so many embossing powders, it would be very easy to end up with a "blob" on your paper!
The next step was to sponge color onto the image. A sponge was used first with Sweet Sugarplum to cover the entire paper with ink. Next, Rose Red was sponged everywhere except within the branches themselves. Lastly, Rich Razzleberry was sponged on the very edges and deep into the corners. The result of all this inking was a wonderful glowing image that softened from light to dark.
The completed image was adhered to the Early Espresso matte and then some Sweet Sugarplum Glitter Ribbon knotted around it. This was then adhered to the Dazzling Diamonds matte using Dimensionals. Finally, the whole thing was adhered to the Sweet Sugarplum card front.
The sentiment, from the Merry Mice stamp set, was stamped on Sweet Sugarplum and then die cut with a die from the Tags & Labels Framelits. Early Espresso was also die cut to act as a matte. The sentiment was inked with Rose Red and Rich Razzleberry and then adhered to the Early Espresso matte. The tag was adhered over the ribbon using Dimensionals.
To complete the card, rhinestones were added to the branches of the tree.
The second card only involved a little bit of stamping but it used a lot of texture from both die cuts and dry embossing. It was CASEd from Mary Fish.
I think that this card is exceptionally pretty because of all the texture and the wonderful color scheme. Feel free to steal this color scheme if you'd like to use it!
I hope you've enjoyed viewing these card projects! Drop me a note below to let me know what you think!
Posted by Linda Vich at 12:05 AM 0 comments
Labels: emboss resist, misti, pretty pines thinlits, seaside embossing folder, sheltering tree, swirly scribbles thinlits, wonderful wreath thinlits dies
Sunday, November 6, 2016
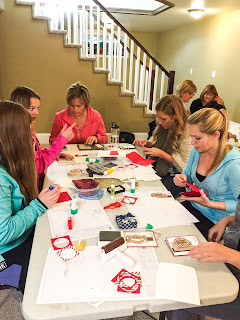
Christmas Crafting in Unseasonable November Heat
In preparing for my card class, I created some little treat boxes using the Pyramid Pals Thinlits CASEd from Linda Parker. If you haven't used these yet, you will want to give them a try! They are so very easy to put together and they make lovely boxes for tiny treats such as a Ferrero Rocher.
I die cut twelve boxes in jewel tones and used my MISTI to simplify the job of stamping one of the trees from the Totally Trees stamp set on each of the four panels of the pyramid boxes. I heat embossed six of them with Silver Embossing Powder and six with Gold.
The 1/8" Circle Punch was used to punch was used to punch two holes in both the front and back panels. I inserted either gold or silver cording through the back holes and into the front ones.
Tear & Tape was used to adhere the panels, leaving the front panel open. I inserted the Ferrero Rocher and then tied the box closed.
The cards we made were so much fun to make!
The first card was CASEd from Chiaki Haverstick. A Real Red standard card base was cut and a Whisper White matte was embossed with the Softly Falling Embossing Folder and then adhered to the card front.
The Gingerbread Boy, from the Cookie-Cutter Christmas stamp set, was stamped on Thick Whisper White using Tip Top Taupe. It was punched with the coordinating punch and then heat embossed with a non-Stampin' Up Clear Embossing Powder from WOW. This particular powder was used because the proper "baked" color could not be achieved in any other way. If the Clear Embossing Powder from Stampin' Up had been used, the boy would have had a glossy appearance–definitely not cookie-like! Instead, this embossing powder had a matte finish that gave the boy just the right look!
The Layering Circle Framelits were used to die cut both Real Red card stock and a striped piece of the Candy Cane Lane DSP. Strips of first Early Espresso, then a different piece of the Candy Cane Lane DSP was layered on the card front. The circles were adhered together and then layered with the Gingerbread Boy adhered on top with Dimensionals.
The sentiment from the Merriest Wishes stamp set was stamped on the bottom right of the card front to complete the card.
The second card was CASEd from Inking Idaho. A standard card base was cut from Very Vanilla and two mattes, one from Real Red, one from Sahara Sand.
The sentiment, from the Christmas Pines stamp set, was stamped on the bottom right of the Sahara Sand matte using Emerald Envy. The Sahara Sand and Real Red mattes were adhered together and then adhered to the Very Vanilla card front.
The Brick Wall Embossing Folder was inked up with Sahara Sand using the now retired brayer. A strip of Very Vanilla card stock was laid inside the folder and then run through the Big Shot. This gave the bricks a lovely dirty looking grout. The bricks were further "dirtied" up using a sponge and ink. Another small piece of Very Vanilla was "dirtied up" and adhered to the top of the larger brick piece with Dimensionals. This piece of "fireplace" was then adhered at the left of the card front.
Real Red was used to stamp the stocking and the berries on Thick Whisper White and then die cut. The top for the stocking and the holly was also die cut. These pieces were adhered to the stocking and then adhered to the fireplace using Dimensionals.
The merry sentiment was die cut from Red Glimmer Paper using the Christmas Greetings Thinlits. To adhere the sentiment, a new technique was used. A sponge, attached to a binder clip, was used to "pounce" glue onto the back of the sentiment which was laying on a silicone matte; a pair of tweezers was already in place ready to place the sentiment on the card front.
Two pine sprigs were die cut from Emerald Envy using the Pretty Pines Thinlits and adherd to the top of the fireplace. The Blossom Builder Punch was used to punch to blossoms from Real Red. These were adhered together, offset, and glued on top of the pine sprigs. To complete the card, Gold Glitz Dazzling Details was added to the centre of the Poinsettia.
A lot of fun was had by all today!
 |
| Our lovely hostess Amy! |
Posted by Linda Vich at 9:06 PM 2 comments
Labels: christmas greetings thinlits, christmas stockings thinlits, cookie cutter builder punch, cookie cutter christmas, misti, pretty pines thinlits, pyramid pals thinlits, totally trees, treat box
Sunday, October 23, 2016
Pretty Pine Bough
 Gold is in the house!
The card I started the other day–but couldn't complete because I actually ran out of both Gold Foil and Gold Glimmer paper and had to order more–could now be completed!
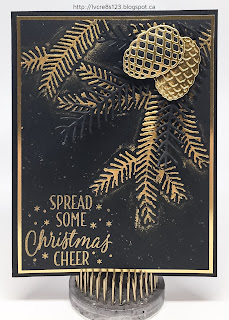
I started by embossing a Basic Black matte with the Pine Bough Embossing Folder. I got to use my Viva Decor Inka Gold Old Gold! I used my finger to apply the metal gloss paint to the embossed pine bough. Though I tried initially to avoid smearing the paint on the matte itself, in the end I decided that I didn't mind the additional smears! After applying, I buffed the paint with a paper towel.
Next I stamped the sentiment from the Tin of Tags stamp set in Versamark and heat embossed it with Gold Stampin' Emboss Powder. To add even more gold to this matte, I "flicked" my Gold Wink of Stella pen to add several gold sparkles.
This matte was adhered to a Gold Foil matte with Fast Fuse and then adhered to a standard Basic Black card front using Dimensionals.
The Pretty Pines Thinlits were used to die cut pine pieces from Basic Black and pine cones from both Gold Foil and Basic Black. The pine pieces were adhered to the embossed matte using Glue Dots and the pine cones were adhered over top of them using Dimensionals.
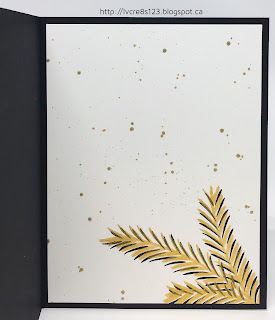
A Whisper White matte was cut for the inside of the card and two of the pine stamps from the Christmas Pines stamp set were used to stamp on the bottom of the matte using both Basic Black and Tsukineko Delicata Golden Glitz ink. Since Stampin' Up no longer carries gold or silver inks, the Delicata inks are the ones I love to use when I need metallic ink! Both the gold and silver are very rich and metallic! I flicked my Gold Wink of Stella over this matte as well before adhering it with Fast Fuse to complete the card.
I love the drama of the black and gold in this card!
Posted by Linda Vich at 12:30 PM 2 comments
Labels: christmas pines, pine bough embossing folder, pretty pines thinlits, tin of tags
Thursday, October 20, 2016
Merry Medley in Rustic Tones
How does this happen??? So . . . that card is on hold until my gold arrives! In its place, I am offering this rustic holiday card.
After first determining that I would need a 4.75 x 6" card for my design, I cut a card base from Basic Black. I then cut a matte from Kraft card stock and using my MISTI, I stamped the Merry Medley background stamp using Basic Black Archival ink three times to get a very black image.
A one inch strip of Basic Black was cut and crimped with my paper crimper. This was adhered to the stamped matte using liquid adhesive and the excess was trimmed with scissors. Linen thread was wrapped around the strip and then the matte was adhered to the card front using Dimensionals.
I punched 8 small petals from Kraft and then 4 of the double centre petals from Basic Black. I used a sponge dauber with Soft Suede to ink the edges of the Kraft petals and then used my scoring stylus to score down the centre of each petal, and then shaped them slightly with my fingers.
A one inch circle was punched from Kraft and then used the glue gun to glue the Kraft petals to it. I then added the four double black petals to the flower. The Pretty Pines Thinlits were used to die cut three pine sprigs from Basic Black.
After determining the ideal placement, I decided to add a dash of sparkle to the card. I used Wink of Stella to detail the black petals and the pine sprigs and then adhered the sprigs in place with Glue Dots and the flower with Dimensionals. I also used Wink of Stella to color the word Christmas on the stamped matte. For the centre of the flower, I used a retired Antique Brad and heat embossed it with Copper Embossing Powder. After cutting off the prongs with metal cutters, I adhered the brad to the flower centre using Crystal Effects.
For inside the card, I cut a matte from the now retired Naturals Ivory card stock. I used the pine stamps from the Christmas Pines stamp set to stamp in the bottom left corner using Sahara Sand, Crumb Cake and Soft Suede. The sentiment was stamped with Crumb Cake.
Posted by Linda Vich at 10:49 PM 0 comments
Labels: christmas pines, merry medley, pretty pines thinlits


