Showing posts with label thoughtful banners. Show all posts

Sunday, May 7, 2017

Watercoloring With The Eastern Palace Suite

Have you purchased your Eastern Palace Bundle yet? No? Then what are you waiting for?

I have been having all kinds of fun with this bundle that is now available for you to purchase but only until May 31! There are two bundles to choose from and here is what you get:

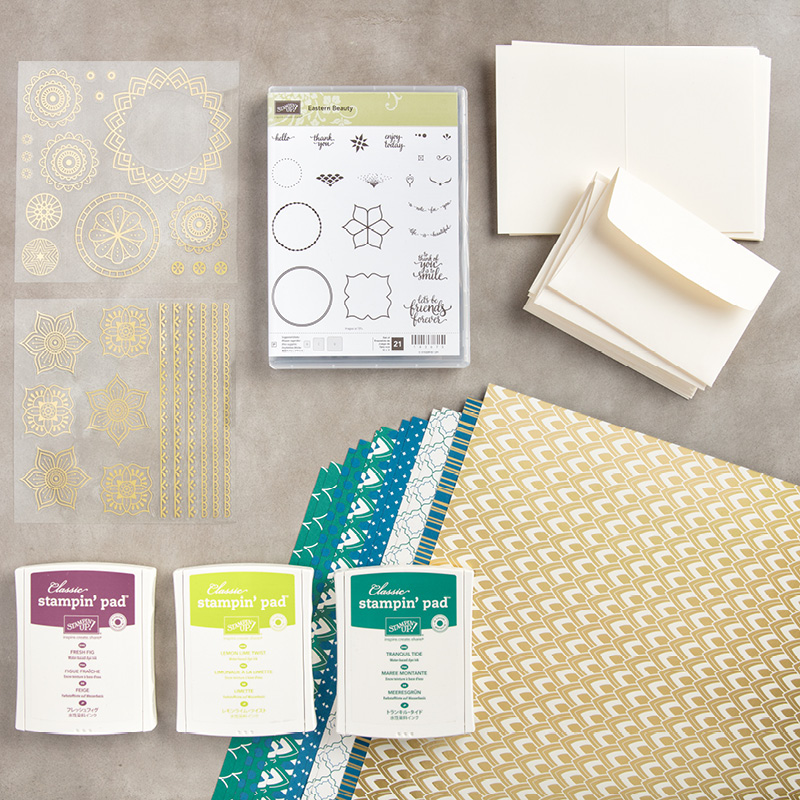
Eastern Palace Starter Bundle $77.75
The Eastern Palace Starter Bundle is for those of you who just can't wait to get your hands on some of the new catalog offerings and must get a taste!

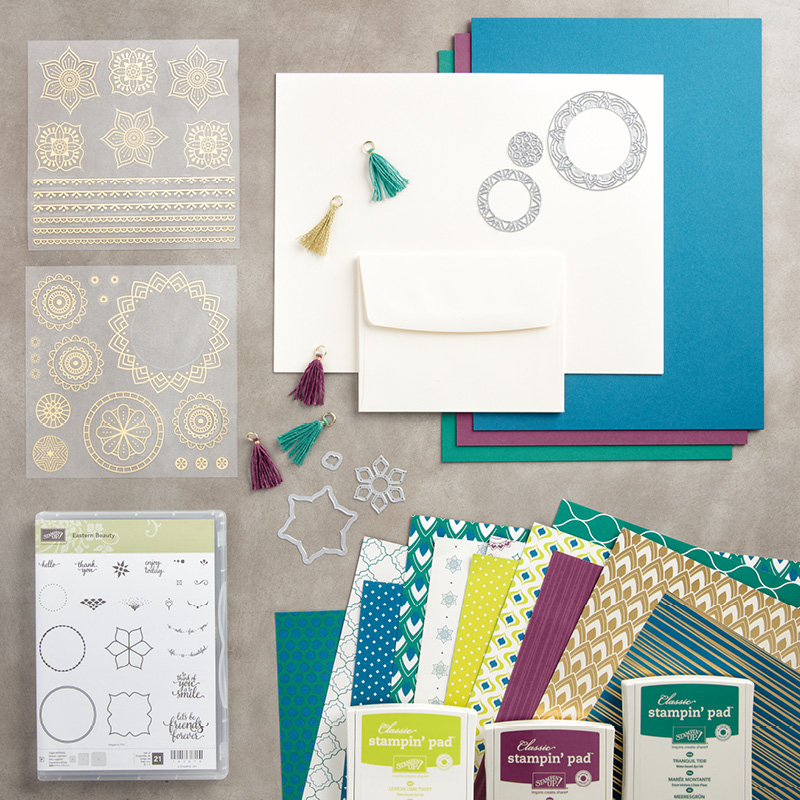
Eastern Palace Premier Bundle $134.75
The Eastern Palace Premier Bundle is for those of you who want it ALL! In my experience, this is the bundle that you want because the Starter Bundle does not include the Thinlits which MAKE this bundle the fun that it is!

Both bundles contain FREE product! The Starter Bundle offers the Very Vanilla Notecards and Envelopes for FREE while the Premier Bundle gives you the new Very Vanilla Thick Card Stock and the Very Vanilla Envelopes for FREE.

These bundles are only available until May 31 so purchase yours from my online store now!

Now let's take a look at the card I have for you today!

Linda Vich Creates: Watercoloring With The Eastern Palace Suite. A watercolored panel is die cut using the Eastern Medallions Thinlits and then embellished with more die cuts for a stunning result.

In creating this card, I started by cutting a matte from Watercolor Paper and then used combinations of the Eastern Medallions Thinlits to cut openings in the matte.

Next, I cut open a Ziplock bag and cut it in half. The resulting piece was larger than my matte. I pressed three ink pads down onto the plastic: Pool Party, Lemon Lime Twist, and Bermuda Bay. I then sprayed the plastic which caused the ink to bead.

I pressed my matte face down onto the plastic and then flipped the plastic over. By flipping it over, I was able to see where the ink was and I could "smoosh" it around while looking at the matte. I like this method better than just smooshing the matte down onto color and hoping for the best!

I used my heat tool to dry the matte and then kept repeating this process until I had the coloring the way that I wanted it. I then adhered the matte to a Basic Black matte of the same size by using liquid adhesive. This was then matted with Lemon Lime Twist.

My next step was to stamp the flower image from the stamp set onto a piece of Bermuda Bay using Basic Black. This was then die cut using die pieces #10 and #11 and the petals bent upwards. I also die cut a Basic Black piece using die #3. After die cutting, I used scissors to snip the medallion from the card stock since this die does not completely cut out the shape.

A piece of the new Finely Woven Ribbon in Lemon Lime Twist was knotted vertically on the right of the matte and then the matte was adhered to a 4.75 x 6" Bermuda Bay card base using Dimensionals.

The flower was adhered to the black medallion and then onto the card front using Dimensionals. One of the new Clear Faceted Gems was added to the centre of the flower.

The sentiment, from the Thoughtful Banners stamp set, was stamped in Versamark and heat embossed with White Stampin' Emboss Powder and then adhered to the card front.

For the inside of the card, a small stamp was used with Bermuda Bay to stamp in all four corners. Lemon Lime Twist was then sponged around the matte. It was adhered with Fast Fuse to complete the card.

Linda Vich Creates: Watercoloring With The Eastern Palace Suite. A watercolored panel is die cut using the Eastern Medallions Thinlits and then embellished with more die cuts for a stunning result.

Linda Vich Creates: Watercoloring With The Eastern Palace Suite. A watercolored panel is die cut using the Eastern Medallions Thinlits and then embellished with more die cuts for a stunning result.

Linda Vich Creates: Watercoloring With The Eastern Palace Suite. A watercolored panel is die cut using the Eastern Medallions Thinlits and then embellished with more die cuts for a stunning result.


I just love how the colors turned out on this card!

Special Note: I will be numbering the dies in the more complex sets to make it easier for you to follow which die I used in my blog posts. For future reference, you can check the die sets and their numbering by visiting my Numbered Die Sets page on my blog. I will update it as I use and add more sets.


Saturday, November 26, 2016

ColorBurst and Stitched Shapes Thank You

Linda Vich Creates: ColorBurst and Stitched Shapes Thank You. Stampin Up Pretty Pines and Stitched Shapes Framelits combine with Color Bursts and Inka Gold in this seasonal card.
Today's card share uses a mix of Stampin' Up and some of my mixed media supplies.

I started by cutting a standard card base from Thick Whisper White as well as a matte, to completely cover the card front, from Basic Gray.

Using the Sparkle Embossing Folder, I dry embossed the Basic Gray matte and then used my fingers to stroke on Silver Inka Gold. I was not overly particular about they way it went on because I wanted a kind of rustic finish to the matte. After the Inka Gold had been applied, I used a paper towel to buff it to bring out the shine. The matte was then adhered to the card front using Fast Fuse.

Next, I used my Ken Oliver Color Bursts on Watercolor paper. I tapped the colors that I wanted to use out on my paper and then I used a new to me product called Ink Potion #9 by Tsukineko to spray the ink powders. This spray is supposed to be good for blending inks and paint but also to help combat the warping of paper caused by spraying with water. It did seem to help quite a bit with keeping the paper flat. I continued spraying and adding more of the Color Bursts until I was satisfied with the color blending and then I allowed them to dry. I created two different color combos using Turquoise, Ultramarine Blue and Indigo for the blues and Lime Green, Terre Verte, and Pthalo Green for the greens.

Once these were completely dry, I used two sizes of Stitched Shapes Framelits to cut out circles. I then used the Delicate Ornaments Thinlits (which were in the first 24 Hour Sale for Online Extravaganza) to cut ornament toppers from Silver Foil. I used liquid adhesive to attach the toppers to the two stitched shapes to form Christmas ornaments.

I threaded a length of the now retired silver cording through each ornament topper. The ornaments were adhered to the card front using Dimensionals and the cording adhered using Glue Dots.

Sprigs of pine were die cut from Dazzling Diamonds Glimmer paper as well as little berries from Real Red Glimmer paper using the Pretty Pines Thinlits. These were adhered at the top of the card using more Glue Dots. A bow from the now retired 1/8" Real Red Ribbon was adhered on top.

The sentiment from the Thoughtful Banners stamp set was stamped on Basic Gray using Versamark and then heat embossed using White Stampin' Emboss Powder. It was punched with the Classic Label Punch and then adhered to the card front to complete this simple but cheery seasonal thank you card!

Linda Vich Creates: ColorBurst and Stitched Shapes Thank You. Stampin Up Pretty Pines and Stitched Shapes Framelits combine with Color Bursts and Inka Gold in this seasonal card.


Sunday, October 30, 2016

Clean and Simple Thank You

Linda Vich Creates: Clean and Simple Thank You. An elegant mandala-stamped card trimmed with Copper Foil.
The card I have to share with you today is a very clean and simple card made using one of the In Colors and Copper Foil.

I cut a standard card base from Dapper Denim and then stamped the mandala, from the Moroccan Nights stamp set, in Dapper Denim. I offset each of the two stamps. Using my MISTI allowed me to stamp each mandala twice. I also stamped an offset mandala on a Whisper White matte for inside the card; this time I stamped with Marina Mist.

I cut two strips of paper, one Dapper Denim, one Marina Mist, and flagged the ends manually and by using the Triple Banner Punch. Using Versamark, I stamped the sentiment, from the Thoughtful Banners stamp set, on the Dapper Denim strip and then heat embossed it using Copper Embossing Powder. The strips were attached to the card front using Fast Fuse.

I used liquid adhesive to adhere a thin strip of Copper Foil to the bottom of the card front and then adhered the stamped matte to the inside to complete the card.

Linda Vich Creates: Clean and Simple Thank You. An elegant mandala-stamped card trimmed with Copper Foil.

Linda Vich Creates: Clean and Simple Thank You. An elegant mandala-stamped card trimmed with Copper Foil.


I think that sometimes simplicity can be very sophisticated. What do you think?


Wednesday, September 21, 2016

Thoughtful Branches in Copper

Linda Vich Creates: Thoughtful Branches in Copper. Masculine birthday card using Thoughtful Branches with copper foil and copper embossing.
I needed a masculine birthday card for my brother's birthday this week and decided that I could use the Thoughtful Branches set again but with a more masculine color scheme.

A card base was cut from Pacific Point card stock for a 5.5 x 5.5" card. On this I adhered a copper foil matte with Dimensionals and cut another matte from Cajun Craze. I dry embossed the Cajun Craze matte using the Woodland Embossing Folder and adhered it to the foil matte using Dimensionals.

I used Versamark to stamp the leaf canopy from the Thoughtful Branches stamp set on Very Vanilla and then heat embossed them with Copper Embossing Powder. I die cut the leaves using the coordinating die. I also die cut the tree trunk from Pacific Point.

Pieces of Adhesive Strips were used to adhere the tree to the Cajun Craze matte and then adhered the leaf canopy over it, using more Adhesive Strips.

I stamped two banners from the Thoughtful Banners stamp set on Pacific Point and heat embossed with copper, and stamped the sentiment from the Sweet Cupcake stamp set on one, heat embossing also with copper.

The Duet Banner Punch was used to punch the two banners and then I trimmed the one with the sentiment and layered it on top of the other with Dimensionals. The complete banner was then adhered with Dimensionals over the base of the tree.

Using Pacific Point, I stamped the bird on Very Vanilla and die cut it with the matching die. It was adhered to the tree using rolled up glue dots. Clear Wink of Stella gave the bird a little shimmer.
I used Versamark to stamp three of the leaves from the Thoughtful Branches on Very Vanilla and heat embossed them with copper. They were die cut with the matching die.

A Very Vanilla matte was cut for inside of the card and the edges inked with Cajun Craze. The sentiment was stamped in Basic Black and then the leaves adhered to the matte using both liquid adhesive and Dimensionals.

Linda Vich Creates: Thoughtful Branches in Copper. Masculine birthday card using Thoughtful Branches with copper foil and copper embossing.

Linda Vich Creates: Thoughtful Branches in Copper. Masculine birthday card using Thoughtful Branches with copper foil and copper embossing.

I really like the Pacific Point blue with the Cajun Craze and the copper! I think that the card has a definite masculine feel to it though I believe this card would also appeal also to females! What do you think? Leave me a comment below!


Monday, August 22, 2016

Always An Adventure Bendy Card

Linda Vich Creates: Always An Adventure Bendy Card. Three dimensional camping scene created by using the Outdoors Adventures Thinlits with a bendy card.
For some time now I have wanted to make a bendy card. This is a card that allows you to construct a 3D kind of scene yet allow the card to be flattened for inserting into an envelope.

When I saw the Outdoors Adventures Framelits and the Always An Adventure stamp set, I knew that they would be wonderful for using in a bendy card.
In preparing to make my card, I consulted two video tutorials from The Mad Stamper. The first, a tutorial on how to make bendy cards, and the second, a tutorial on how to make a template for making bendy cards.

After viewing both tutorials, I started by making the template for bendy cards by using the Grid Paper. Once I had that done I realized that the scene I wanted to create would look better if the bendy card opened towards the left so I made another template for that type of bendy card! After sketching out my design for the card, I set to work.

I cut one piece of Old Olive at 5.5 x 8.5". I then made two additional cuts to end up with three pieces–4.25 x 5.5", 2.5 x 5.5", and 1.75 x 5.5". Using my template, I cut slots in two of the pieces and tabs in two of the pieces. I also scored the two smaller pieces at .5" from the end opposite the tab.
I used the Outdoors Adventures Framelits to cut some mountains from Smoky Slate (and the tops from Whisper White) and then used the Always An Adventure stamp set to stamp the other items–trees, bear, tent and lake–in Garden Green, Chocolate Chip, Tempting Turquoise and Island Indigo. I used Stampin' Write Markers in Crushed Curry, Tangerine Tango, and Early Espresso to color and stamp the campfire. Each item was die cut except for the campfire and lake which were fussy cut.

I used liquid adhesive to adhere the "snow" to the mountains only to realize later that the little die in the set that I couldn't figure out was actually for the snow caps! I used an Early Espresso Stampin' Write Marker to color the trunks of the trees.

In planning to use the trees edgelit in the die set, I did not allow enough paper to include the trees so I had to discard the 2.5 x 5.5" piece and substitute one that was 3.5 x 5.5"; I also had to prepare the slot and tab on it using the template. I was then able to die cut the piece so that I had the pine trees at the top of a curvy piece of land.

The next step was to adhere a strip of Night of Navy card stock for the sky to the 4.25 x 5.5" card base. I used the retired 1/2" Circle Punch to punch a circle and then re-punch it to create a crescent moon and glue it to the sky. I also adhered the mountains.

I used the Fine-Tip Glue Pen to add dots of glue which I then sprinkled with Dazzling Diamonds Stampin' Glitter to create the stars. I then set this card base aside to dry.

I used liquid adhesive and a few Dimensionals to glue the pine trees, lake, bears, tent and campfire to the other two pieces of the card, being sure that they were adhered well because I did not want them to pop up when the pieces of the card were bent. I used a sponge dauber to color the die cut strip of trees using Garden Green ink.

Finally it was time to adhere each of the two panels to the card base using Tear & Tape on the 1/2" scored ends. The sentiment, from the Thoughtful Banners stamp set, were stamped on both Tempting Turquoise and Whisper White using Basic Black Archival Ink. The longer sentiment was punched with the Classic Label Punch. The shorter sentiment was punched, trimmed in length and then one end stuck in through the top of the punch to create a shortened sentiment in the same punch style. These were adhered to the card using Dimensionals.

To display the card, the middle section is slotted into the card base and then the smallest front section is slotted into the middle section. The rounded look is caused from the pieces of the card being put into slots at a shorter distance than the length of the pieces. This results in a nice 3D appearance.

Linda Vich Creates: Always An Adventure Bendy Card. Three dimensional camping scene created by using the Outdoors Adventures Thinlits with a bendy card.

Linda Vich Creates: Always An Adventure Bendy Card. Three dimensional camping scene created by using the Outdoors Adventures Thinlits with a bendy card.
Shows the curvature of the card when it is placed flat on a table.

Linda Vich Creates: Always An Adventure Bendy Card. Three dimensional camping scene created by using the Outdoors Adventures Thinlits with a bendy card.

Linda Vich Creates: Always An Adventure Bendy Card. Three dimensional camping scene created by using the Outdoors Adventures Thinlits with a bendy card.
Space was left on the right inner panel for a note to the recipient of the card.

I am pleased that my first bendy card turned out so well! The card t took a long time to create because I planned as I designed the card but I think my effort paid off!