Showing posts with label pyramid pals thinlits. Show all posts

Tuesday, December 20, 2016

Christmas Decor and Gift Card Holder

Linda Vich Creates: Christmas Decor and Gift Card Holder. Christmas decor item CASEd from Connie Collins.
For the last class of the year for my Country Villas Stamp Group, we worked on a decor project cased from Constantly Stamping. Though I had intended to create the project using alternate colors, as a traditional red & green Christmas lover, I decided to follow Connie's color choices. I mean, why reinvent the wheel?

To begin, the Pyramid Pals Thinlits were used to cut two of each color, of both Old Olive and Always Artichoke.

Next, the Festive Flower Punch was used to punch petals from Cherry Cobbler and leaves from Old Olive and Always Artichoke. Then, using a leaf from Vintage Leaves, the leaf veins were stamped on each petal and leaf, using coordinating ink. The 1 1/4" Circle Punch was also used to
punch one circle from Cherry Cobbler.

A glue gun was used to adhere each petal to the 11/4" circle and then further petals were added, working toward the centre. The leaves were added behind the flower petals.

The stamens were cut from Glimmer Paper using the Botanical Builder Framelits and then adhered with the glue gun. Additional "greenery" was die cut from Gold Foil and Gold Glimmer using the Pretty Pines Thinlits. These were also adhered to the flower using the glue gun.

For the Pyramid Pal pieces, the tabs were cut off and then they were adhered together as per usual, using Fast Fuse.

Using the MISTI, they were each stamped with the large medallion from the Frosted Medallions stamp set using the matching ink. Once the ink had dried, each piece was scored from point to point and from corner to corner using the Simply Scored. A bone folder was used to burnish each fold well and each piece then formed a 3D, four-pointed star.

The two stars were placed one on top of the other, offset, and a pencil was used to mark the point where the top star sat on the bottom star. The glue gun was then used to place glue behind the pencil lines and the glue was allowed to cool. More glue was added to give additional height and the top star was adhered to the bottom. In the same way, the finished poinsettia was adhered to the top of the completed eight-pointed star.

To complete the fancy star-poinsettia, a rhinestone was added to the centre of the flower and a length of the Cherry Cobbler from the Silky Taffeta Combo Pack was knotted and glued into the back of one of the star points.

Linda Vich Creates: Christmas Decor and Gift Card Holder. Christmas decor item CASEd from Connie Collins.


Linda Vich Creates: Christmas Decor and Gift Card Holder. Christmas decor item CASEd from Connie Collins.

Linda Vich Creates: Christmas Decor and Gift Card Holder. Christmas decor item CASEd from Connie Collins.

I love how this turned out! The colors are so rich and festive. I hung mine on my tree while one member of our group decided to showcase hers in a shadow box frame.

Linda Vich Creates: Christmas Decor and Gift Card Holder.


Our second project was simple by comparison but still produced a pleasing and useful Gift Card Holder.

We used the Envelope Punch Board to create a small envelope using a piece of Candy Cane Lane DSP. A sentiment from the Tin of Tags stamp set was stamped on a piece of Whisper White using Real Red and the MISTI. A second stamping with Versamark allowed the sentiment to be heat embossed using the Real Red Glitter Embossing Powder. The paper was then adhered inside the envelope.

A strip of Cherry Cobbler was cut and wrapped around the envelope to create a belly band. The little house adhered to the belly band was fussy cut from another piece of the Candy Cane Lane DSP. The now retired 2-Way Glue Pen was used on the snow parts and then Dazzling Diamonds was added for a sparkly finish. To another touch of shimmer, a Clear Wink of Stella pen was used to trace over all the white and candy parts on the house.

To complete the gift card holder, a tag was die cut from Crumb Cake using the Tags & Labels Framelits and then stamped with a stamp from the Hang Your Stocking stamp set. It was hung from the belly band using a length of twine from the Candy Cane Lane Baker's Twine.

Linda Vich Creates: Christmas Decor and Gift Card Holder. Christmas gift card holder using Candy Cane Lane DSP.

Linda Vich Creates: Christmas Decor and Gift Card Holder. Christmas gift card holder using Candy Cane Lane DSP.

I hope you've enjoyed these little Christmas projects!


Sunday, November 13, 2016

Stamp Club November Projects

Linda Vich Creates: Stamp Club November Projects. Santa's Sleigh Z fold card in dramatic tones of Whisper White and Night of Navy with accents of silver foil and both silver and dazzling diamonds glimmer paper.
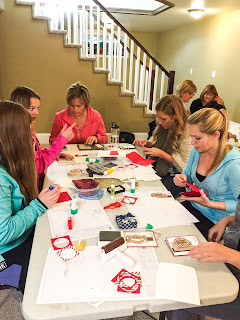
I kept my stamp club ladies were very busy on Friday night assembling their card projects! Due to the complexity of one of the cards, I die cut all but the sentiment pieces for both cards–my Big Shot was smoking!

Our first card was CASEd from Olga Cavanaugh and the idea of using acetate for the z fold strip was CASEd from Chlo's Craft Closet. A Night of Navy card base was cut at 4.25 x 11" and scored at 2.75" and 5.5". A 1 x 11" strip of Whisper White was also cut and scored in the same way. (Note that the example photos here show an acetate strip in use but a Whisper White strip was used in class so it was easier with which to work.)

Using the MISTI, the sentiment from the Christmas Pines stamp set was stamped with Night of Navy on Thick Whisper White. The stamp was then cleaned and the sentiment re-stamped using Versamark. It was heat embossed using the now retired Iridescent Embossing Powder. The sentiment was then die cut using one of the ovals from the new Stitched Shapes Framelits.

I absolutely LOVE these new stitched framelits! The stitching is so crisp looking and I even saw that in one post on Pinterest, a demo had actually stitched with thread using one of these dies–totally amazing! If you haven't yet bought them, contact me to order yours today–you won't regret it!

This Z Fold card required four Whisper White mattes in total–two, 4 x 5.25" and two, 2.5 x 4". On one of the smaller ones, the clump of birch trees from the Thoughtful Branches stamp set were stamped. On one of the larger panels, the two-step stamping of five pine trees from the Thoughtful Branches stamp set was done. The last large matte, which is used for the back of the card to give the sender a place to write, was stamped also with the pine trees, but this time there were only two, offset to the bottom right of the matte. All stamping was done with Night of Navy. All four mattes were then adhered to the card base. The die cut sentiment was adhered to the panel with the five pines using Dimensionals.

The sleigh from the Santa's Sleigh Framelits was die cut from Night of Navy and the ornate sleigh overlay was cut from Silver Foil paper. The dryer sheet method was employed and worked beautifully to successfully cut and remove these fragile die cuts from the dies.

To adhere the foil overlay to the sleigh die cut, Connie Stewart's "Sponge in Tupperware Gluing System" (this is what I am calling it until I find a better name!) worked great! No mess, no fuss, and easily adhered! If you haven't yet tried this technique, you need to because it is fantastic!

Next, six deer were die cut from Dazzling Diamonds Glimmer paper and then six wreaths to clothe the necks of the deer were die cut from Night of Navy. The wreaths were slipped over the necks of the deer, eased past the nose, and adhered with a glue dot.

Two, 1 x 1" presents were cut from both Night of Navy and Silver Glimmer Paper. Matching bows were die cut and then adhered to the presents using glue dots. The present stack was designed and adhered together and then adhered to the sleigh.

The 1 x 11" strip of Whisper White–or in the card shown here acetate–was laid across the closed card. The 5.5" scored section was adhered only to the small front panel section of the card. The other end of the strip was then adhered to the back panel of the card.

The sleigh was adhered to the strip on the front panel and two deer followed it, all adhered with glue dots. The remaining deer were adhered to the middle and end sections of the strip.

To complete the card, a retired Winter Wonderland embellishment was adhered to the front of the card to act as a star.

Linda Vich Creates: Stamp Club November Projects. Santa's Sleigh Z fold card in dramatic tones of Whisper White and Night of Navy with accents of silver foil and both silver and dazzling diamonds glimmer paper.

Linda Vich Creates: Stamp Club November Projects. Santa's Sleigh Z fold card in dramatic tones of Whisper White and Night of Navy with accents of silver foil and both silver and dazzling diamonds glimmer paper.

Linda Vich Creates: Stamp Club November Projects. Santa's Sleigh Z fold card in dramatic tones of Whisper White and Night of Navy with accents of silver foil and both silver and dazzling diamonds glimmer paper.

Linda Vich Creates: Stamp Club November Projects. Santa's Sleigh Z fold card in dramatic tones of Whisper White and Night of Navy with accents of silver foil and both silver and dazzling diamonds glimmer paper.

I was pleased with how the card turned out and each stamp club member seemed delighted with their own constructed version!


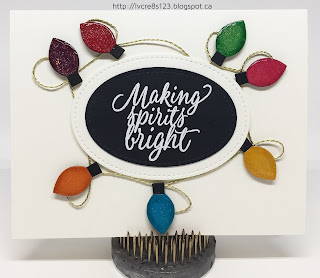
Our second card was CASEd from Katina Martinez. This card is a one layer standard sized card with the card base cut from Thick Whisper White.

Using the MISTI, the sentiment, from the Tin of Tags stamp set, was stamped on Basic Black using Versamark and then heat embossed using White Stampin' Emboss Powder. The Embossing Buddy was used before stamping to ensure a "clean" emboss. The sentiment was then die cut using the 2nd largest oval from the Stitched Shapes Framelits. A second oval, using the largest stitched oval die, was die cut from Thick Whisper White. The two ovals were adhered together using liquid adhesive.

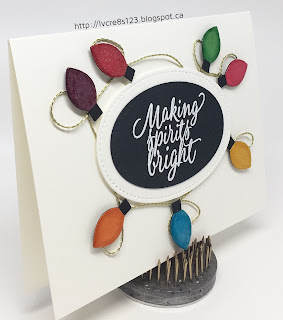
A small die from the Pyramid Pals Framelits was used to die cut seven Basic Black "light bulbs". In addition, seven more bulbs were die cut from Real Red, Melon Mambo, Pumpkin Pie, Crushed Curry, Cucumber Crush, Tempting Turquoise and Rich Razzleberry.

On each of the colored bulbs, the bottom section was snipped off with scissors and then the colored bulbs were adhered to the black bases using liquid adhesive. Matching ink was used to ink the edges of each light bulb using sponge daubers to create a glow effect. Each light bulb was given a coat of Clear Wink of Stella and then a Dimensional was applied to its back.

The die cut sentiment was adhered to the card front and then the positioning of the bulbs around the sentiment was pre-planned. A glue dot was used to anchor one end of gold twine (from the Baker's Twine Trio Pack) under the edge of the oval die cut and then the twine was twisted to form a loop. A glue dot was affixed to the card front and the twine adhered and a bulb adhered on top to hide the glue dot. This process was repeated around the sentiment until all the bulbs had been used. Another glue dot secured the end of the twine under the die cut sentiment.

Using a small paint brush, Crystal Effects was brushed liberally onto each light bulb by first tracing the edges of the bulb and then filling in the middle. The card was then set aside to dry thoroughly.

A matching envelope was made by drawing a curling "wire" along the edge of the envelope using a Gold Wink of Stella and then stamping the tiny "bulb" stamp from Tin of Tags along the wire, using the ink colors used previously on the card.

Linda Vich Creates: Stamp Club November Projects. Whimsical Christmas card featuring Christmas lights created from a Pyramid Pals die.

Linda Vich Creates: Stamp Club November Projects. Whimsical Christmas card featuring Christmas lights created from a Pyramid Pals die.

Isn't this a fun little holiday card? So easy and fun to create but so festive and colorful in all its sparkly goodness!

Have you started making Christmas cards yet? Maybe this year I'll get mine all done before Christmas!


Sunday, November 6, 2016

Christmas Crafting in Unseasonable November Heat

Linda Vich Creates: Christmas Crafting in Unseasonable November Heat. Pyramid Pals Thinlits were used to create jewel-toned treat boxes.
Though the last few days have been an unseasonable heat wave, today I had a sweet afternoon crafting Christmas cards with twelve lovely ladies!

In preparing for my card class, I created some little treat boxes using the Pyramid Pals Thinlits CASEd from Linda Parker. If you haven't used these yet, you will want to give them a try! They are so very easy to put together and they make lovely boxes for tiny treats such as a Ferrero Rocher.

I die cut twelve boxes in jewel tones and used my MISTI to simplify the job of stamping one of the trees from the Totally Trees stamp set on each of the four panels of the pyramid boxes. I heat embossed six of them with Silver Embossing Powder and six with Gold.

The 1/8" Circle Punch was used to punch was used to punch two holes in both the front and back panels. I inserted either gold or silver cording through the back holes and into the front ones.

Tear & Tape was used to adhere the panels, leaving the front panel open. I inserted the Ferrero Rocher and then tied the box closed.

Linda Vich Creates: Christmas Crafting in Unseasonable November Heat. Pyramid Pals Thinlits were used to create jewel-toned treat boxes.

Linda Vich Creates: Christmas Crafting in Unseasonable November Heat. Pyramid Pals Thinlits were used to create jewel-toned treat boxes.


The cards we made were so much fun to make!

The first card was CASEd from Chiaki Haverstick. A Real Red standard card base was cut and a Whisper White matte was embossed with the Softly Falling Embossing Folder and then adhered to the card front.

The Gingerbread Boy, from the Cookie-Cutter Christmas stamp set, was stamped on Thick Whisper White using Tip Top Taupe. It was punched with the coordinating punch and then heat embossed with a non-Stampin' Up Clear Embossing Powder from WOW. This particular powder was used because the proper "baked" color could not be achieved in any other way. If the Clear Embossing Powder from Stampin' Up had been used, the boy would have had a glossy appearance–definitely not cookie-like! Instead, this embossing powder had a matte finish that gave the boy just the right look!

The Layering Circle Framelits were used to die cut both Real Red card stock and a striped piece of the Candy Cane Lane DSP. Strips of first Early Espresso, then a different piece of the Candy Cane Lane DSP was layered on the card front. The circles were adhered together and then layered with the Gingerbread Boy adhered on top with Dimensionals.

The sentiment from the Merriest Wishes stamp set was stamped on the bottom right of the card front to complete the card.

Linda Vich Creates: Christmas Crafting in Unseasonable November Heat. Cookie Cutter Christmas was used to create this fun Christmas card!

Linda Vich Creates: Christmas Crafting in Unseasonable November Heat. Cookie Cutter Christmas was used to create this fun Christmas card!


The second card was CASEd from Inking Idaho. A standard card base was cut from Very Vanilla and two mattes, one from Real Red, one from Sahara Sand.

The sentiment, from the Christmas Pines stamp set, was stamped on the bottom right of the Sahara Sand matte using Emerald Envy. The Sahara Sand and Real Red mattes were adhered together and then adhered to the Very Vanilla card front.

The Brick Wall Embossing Folder was inked up with Sahara Sand using the now retired brayer. A strip of Very Vanilla card stock was laid inside the folder and then run through the Big Shot. This gave the bricks a lovely dirty looking grout. The bricks were further "dirtied" up using a sponge and ink. Another small piece of Very Vanilla was "dirtied up" and adhered to the top of the larger brick piece with Dimensionals. This piece of "fireplace" was then adhered at the left of the card front.

Real Red was used to stamp the stocking and the berries on Thick Whisper White and then die cut. The top for the stocking and the holly was also die cut. These pieces were adhered to the stocking and then adhered to the fireplace using Dimensionals.

The merry sentiment was die cut from Red Glimmer Paper using the Christmas Greetings Thinlits. To adhere the sentiment, a new technique was used. A sponge, attached to a binder clip, was used to "pounce" glue onto the back of the sentiment which was laying on a silicone matte; a pair of tweezers was already in place ready to place the sentiment on the card front.

Two pine sprigs were die cut from Emerald Envy using the Pretty Pines Thinlits and adherd to the top of the fireplace. The Blossom Builder Punch was used to punch to blossoms from Real Red. These were adhered together, offset, and glued on top of the pine sprigs. To complete the card, Gold Glitz Dazzling Details was added to the centre of the Poinsettia.


Linda Vich Creates: Christmas Crafting in Unseasonable November Heat. Pretty Pine Thinlits combine with Christmas Stocking Thinlits to create this lovely Christmas vignette.

Linda Vich Creates: Christmas Crafting in Unseasonable November Heat. Pretty Pine Thinlits combine with Christmas Stocking Thinlits to create this lovely Christmas vignette.

A lot of fun was had by all today!


Our lovely hostess Amy!


Thursday, October 6, 2016

A Halloween Treat, A Ghost, and Other Creepy Stuff

Linda Vich Creates: A Halloween Treat, A Ghost, and Other Creepy Stuff. A ghastly group of Halloween projects created with Swirly Scribbles Thinlits, Pyramid Pals Thinlits, Cookie Cutter Halloween and the Cookie Cutter Builder Punch.
Today I'm sharing with you a few of the 3D projects that I displayed for my new stamping group.

First up is a little Halloween Treat Box. This project was CASEd from Lisa's Christmas project. I used a piece of Basic Black card stock to make the box itself and then the belly band was cut from a sheet of the Halloween Night Specialty DSP.

To embellish the box with pumpkins, I cut two of the circles from Pumpkin Pie using the Swirly Scribbles Thinlits and used both the Petite Petals and Blossom Bunch Punches to punch leaves from Garden Green.

I used the Tags & Labels Framelits to cut a tag from Thick Whisper White and then used the stamps from the Spooky Fun stamp set with Basic Black and Pumpkin Pie.

One of our clear bags was used for candy and I tied it off with our now retired Pumpkin Pie 1/4" Cotton Ribbon.

Linda Vich Creates: A Halloween Treat, A Ghost, and Other Creepy Stuff. A Halloween treat box made with Halloween Night Specialty DSP and the Swirly Scribbles Thinlits.

Linda Vich Creates: A Halloween Treat, A Ghost, and Other Creepy Stuff. A Halloween treat box made with Halloween Night Specialty DSP and the Swirly Scribbles Thinlits.


For my ghost, I used the Pyramid Pals Thinlits to cut vellum for the ghost's body. All but the back of the ghost was adhered with Fast Fuse. For the back I used glue dots to allow the ghost to be opened to insert and turn on the tea light. To complete the ghost, I simply added googly eyes.

Doesn't he look cute? I think a grouping of these would look lovely in a dark corner for Halloween!

Linda Vich Creates: A Halloween Treat, A Ghost, and Other Creepy Stuff. A ghost created by using vellum, a tea light and the pyramid pals thinlits.

Linda Vich Creates: A Halloween Treat, A Ghost, and Other Creepy Stuff. A ghost created by using vellum, a tea light and the pyramid pals thinlits.


Lastly, I made three sets of Halloween earrings. These are really a lot of fun to make!

I used Jet Black Stazon ink and my MISTI to stamp onto Frosted Ruff N' Ready Shrinky Dinks plastic. After I was sure that they were dry, I used a sharpie marker to color red onto the Vampire while leaving the skeleton and mummy as they were stamped.

I used the 1/4" Circle Punch to put holes at the top of each and then used my piercing tool to hold each piece, through the hole, on a heat resistant surface. I heated each piece with my Heat Tool. While heating, the plastic billows and curves and then eventually shrinks and flattens into the final size, one-third the size of the original and nine times thicker!

To complete the earrings, I used 4 and 6 mm jump rings and earring wires.

Linda Vich Creates: A Halloween Treat, A Ghost, and Other Creepy Stuff. Halloween earrings made by using Cookie Cutter Halloween, Cookie Cutter Builder Punch, and Shrinky Dinks plastic.

Linda Vich Creates: A Halloween Treat, A Ghost, and Other Creepy Stuff. Halloween earrings made by using Cookie Cutter Halloween, Cookie Cutter Builder Punch, and Shrinky Dinks plastic.

Linda Vich Creates: A Halloween Treat, A Ghost, and Other Creepy Stuff. Halloween earrings made by using Cookie Cutter Halloween, Cookie Cutter Builder Punch, and Shrinky Dinks plastic.


I look forward to making more earrings in the future by using other stamps and dies!