Showing posts with label layering circles framelits. Show all posts

Tuesday, January 8, 2019

Crackled Gold Foil Birthday Card

Linda Vich Creates: Crackled Gold Foil Birthday Card. Black and gold combine to create a "wow" card that uses the Crackle Paint stamp on gold foil.
Happy 2019!

It's been awhile since I posted but I created a a card for my son-in-law's birthday and thought I would share it with you.

Starting with a Basic Black card base of 4.75 x 6", I cut a 4.25 x 5.5" matte from Gold Foil and stamped it with the Crackle Paint stamp and Stazon and then set it aside to dry. I also stamped the sentiment, from Cake Soirée on a scrap of the foil.

Using the #5 Scalloped Circle from the Layering Circles Framelits, I die cut a piece of Basic Black. After the sentiment was dry, I die cut it using the #2 circle from the Stitched Shapes Framelits. These two pieces were glued together with liquid adhesive.

Once the gold matte was dry, I dry embossed it using the Corrugated Embossing Folder. This was then adhered to the card front, at an angle, using Dimensionals.

I used dies from both the Bouquet Bunch and Petals & More Thinlits to die cut some Basic Black leaves. I also cut a branch from the now retired Black Glimmer paper.

After determining placement with the sentiment, I used some of the now retired Fast Fuse as an anchor for the leaves and then adhered the sentiment using Dimensionals.

For inside the card, I used Versamark and the Crackle Paint stamp to stamp randomly around a Thick Whisper White matte. I did not use a block for the stamp, preferring to manipulate the stamp the way I needed to stamp it. I then heat embossed using Gold Stampin' Emboss Powder. The matte was then adhered inside the card.

I used my Envelope Punch Board to create my own envelope from a 12 x 12" sheet of Basic Black. After the envelope was assembled, I stamped and heat embossed random areas using the Gold Stampin' Emboss Powder.

Linda Vich Creates: Crackled Gold Foil Birthday Card. Black and gold combine to create a "wow" card that uses the Crackle Paint stamp on gold foil.

Linda Vich Creates: Crackled Gold Foil Birthday Card. Black and gold combine to create a "wow" card that uses the Crackle Paint stamp on gold foil.

Linda Vich Creates: Crackled Gold Foil Birthday Card. Black and gold combine to create a "wow" card that uses the Crackle Paint stamp on gold foil.


I am pleased with the results and think it even has a slight Asian design to it! I'm going to enjoy that Crackle stamp!


Product List


Saturday, August 25, 2018

Petal Promenade Wedding Wallet

Linda Vich Creates: Petal Promenade Wedding Wallet. Petal Promenade DSP takes centre stage on this gorgeous, belly band-encircled wedding wallet.
My project today gave me great pleasure to make.

Over the years I have watched my niece, Nicole, grow into a beautiful young woman and today she takes the next step in her life to marry the man of her dreams!

I knew that I wanted something very special for Nicole and Brad and along came Trayce Bauer with a stunning wedding wallet and video tutorial!

Though I had wanted to do something in Turquoise and/or Rose Gold (their wedding colors), I settled instead for using some of the gorgeous Petal Promenade DSP. If you haven't yet bought this, run to my online store now and pick some up! It is stunning paper and will be essential for all your summer projects and weddings!

I won't recreate Trayce's great tutorial here . . . better for you to watch her video. Suffice to say that I created the initial wallet piece using Thick Whisper White card stock and then added Petal Promenade mattes that were cut 1/8" smaller than the sections in which they were adhered.

Other card details:

  • For the flap of the wallet card, the corners were rounded using the Detailed Trio Punch. The DSP matte also had the corners rounded.
  • For the inside piece where the sentiment was stamped, a piece of Gold Foil, 1/8" smaller than the section to which it was adhered, was topped with another piece of Thick Whisper White, the corners which had been punched with the Detailed Trio Punch to let the Gold Foil show through.
  • The stamp set for both the sentiment on the belly band and inside the card were from the now retired Falling For You stamp set but there are many other current stamp sets you could use.
  • The belly band measured 2 x 11" and was cut from Blackberry Bliss. Using the Tufted Embossing Folder gave it a touch of elegance. The band was spritzed with water and then embossed at one end. The band was removed and the other end placed inside, carefully lining up with the previous embossed pattern, and then embossed again. It was folded around the completed wallet and adhered using Tear & Tape, leaving a little "give" to allow the belly band to be easily removed and replaced.
  • The front sentiment was stamped with Blackberry Bliss on Thick Whisper White and then die cut using the #3 circle in the Stitched Shapes Thinlits. The #7 scalloped circle from the Layering Circles Framelits was used to die cut a matte from Gold Foil. The two were adhered using liquid adhesive. (See my Numbered Dies Sets.)
  • Fast Fuse was applied to the back of the sentiment circle and then a nest of Rose Metallic Thread was adhered. Also adhered to the back were Mossy Meadow die cut leaves (Petals & More Thinlits) and Gold Glimmer leaves (Leaf Punch). The circle was then adhered over top of the belly band, at the front of the wallet, using Dimensionals.

Linda Vich Creates: Petal Promenade Wedding Wallet. Petal Promenade DSP takes centre stage on this gorgeous, belly band-encircled wedding wallet.

Linda Vich Creates: Petal Promenade Wedding Wallet. Petal Promenade DSP takes centre stage on this gorgeous, belly band-encircled wedding wallet.
Please don't think I'm cheap—I only had some $20 bills on hand to photograph this card! :)

Linda Vich Creates: Petal Promenade Wedding Wallet. Petal Promenade DSP takes centre stage on this gorgeous, belly band-encircled wedding wallet.


The pictures of this card really don't do it justice! The DSP is just so rich and glamourous and the wallet is very sturdy and substantial. It will be a joy to present to Nicole and Brad!


Product List


Monday, July 23, 2018

Best Wishes with Subtle Texture

Linda Vich Creates: Best Wishes with Subtle Texture. Bold and bright and full of best wishes, this card uses the Subtle Embossing Folder as well as Love What You Do and Colorful Seasons.
Yesterday I shared a wreath card with you, built using wreath builder templates. The card I have for you today was intended to be another wreath but my stamping got a little out of hand and turned into DSP!

Like yesterday, I started with a 4 x 4" piece of Thick Whisper White and my Gina K. Designs Wreath Builder Templates. Because I already had these, I didn't feel the need to recreate my own. If you need your own templates, check out my Tropical Chic Wreath Card for links to tutorials for creating your own templates.

I taped the 4 x 4" template into my Stamparatus using Washi Tape and then set in my Whisper White. I used the flower from Colorful Seasons to stamp with Gorgeous Grape to form the initial wreath shape, placing my stamp at a corner, about 1/2" from each side. I then used stamps from the Love What You Do stamp set to fill in the rest of the design using both Bermuda Bay and Shaded Spruce.

The sentiment, from the stamp set that comes in the Darling Label Punch Box, was stamped on Shaded Spruce and heat embossed with White Stampin' Emboss Powder. It was then die cut using the #5 circle from Layering Circles Framelits and a matte was cut using the #5 scalloped circle. (Be sure to check out my Numbered Die Sets.)

The stamped piece was mounted on a thin Shaded Spruce matte. I decided then to add in some actual die cut pieces so used both Sweet Cake Framelits and Petals & More Thinlits with Bermuda Bay and Silver Glimmer. These pieces were arranged on top and then glued before adding the sentiment with Dimensionals.

A 4.75 x 6" card base was cut from Shaded Spruce and a matte from Gorgeous Grape. The matte was embossed using the new Subtles Embossing Folder. This is a wonderful folder for adding just a hint of texture but its use can take a card from "ok" to "WOW!" You'll definitely want to add it to your collection!

Before adhering the matte to the card front, and for a little more glitz, a length of silver ribbon, from the now retired Glitter Ribbon Combo Pack, was tied in a bow around the matte.The matte was then adhered to the card front with Dimensionals and the stamped piece on top.

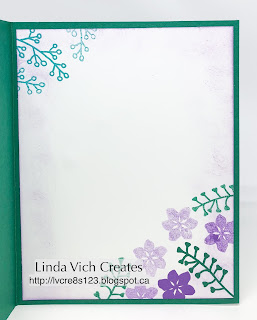
A Whisper White matte was stamped with a few branches and flowers and then sponged with a little Highland Heather before adhering inside the card.

Linda Vich Creates: Best Wishes with Subtle Texture. Bold and bright and full of best wishes, this card uses the Subtle Embossing Folder as well as Love What You Do and Colorful Seasons.

Linda Vich Creates: Best Wishes with Subtle Texture. Bold and bright and full of best wishes, this card uses the Subtle Embossing Folder as well as Love What You Do and Colorful Seasons.

Linda Vich Creates: Best Wishes with Subtle Texture. Bold and bright and full of best wishes, this card uses the Subtle Embossing Folder as well as Love What You Do and Colorful Seasons.


Do you like the color combo for this card? Feel free to save and use it for your own projects!

Linda Vich Creates: Best Wishes with Subtle Texture. Bold and bright and full of best wishes, this card uses the Subtle Embossing Folder as well as Love What You Do and Colorful Seasons.


Product List