Showing posts with label hexagons dynamic embossing folder. Show all posts

Tuesday, June 6, 2017

2017 Catalog Launch Prep Part 3: First Prize

Linda Vich Creates: 2017 Catalog Launch Prep Part 3: First Prize. Delightful Daisy DSP teams up with the Daisy Punch for this lovely card set and portfolio.
Today brings us to the third and final part of my Catalog Launch Prep series. If you missed the two earlier parts, you can reach them here: 2017 Catalog Launch Prep Part 2: Second Prize and 2017 Catalog Launch Prep Part 1: Third Prize. You can also read about the actual 2017 Catalog Launch Party.

Today I feature the card set that was the First Prize at my Catalog Launch.

I started by creating the cards for the card set. I chose a 4.75 x 6" card base and cut it from Thick Whisper White. I cut a matte from Daffodil Delight and embossed it using the Hexagons Dynamic Embossing Folder and adhered it to the card front using Dimensionals.

I next cut a panel of the Delightful Daisy DSP and
matted it with some Night of Navy. I used half of a Delicate White Doily and adhered it under the Daisy panel which was adhered to the left side of the card front.

Using Night of Navy, the sentiment was stamped on a strip of Thick Whisper White and then it was punched with the Banner Triple Punch. It was adhered to the Daisy Panel with Fast Fuse and to the embossed matte using a Dimensional.

The Daisy Punch was used to punch two Night of Navy Daisies which were curled slightly using a bone folder and then adhered together using liquid adhesive. The 1/2" Circle Punch was used to punch a Daffolil Delight Circle which was adhered to the centre with a Clear Faceted Gem, colored with a sharpie, adhered over top of it. The daisy was adhered to the card front using a Dimensional.

The Envelope Punch Board was used with Daffodil Delight card stock was used to create matching envelopes for the cards.

Linda Vich Creates: 2017 Catalog Launch Prep Part 3: First Prize. Delightful Daisy DSP teams up with the Daisy Punch for this lovely card set and portfolio.


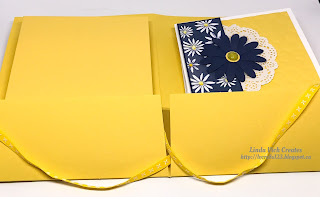
For the card portfolio, I used a 12 x 12" sheet of Daffodil Delight card stock trimmed to 11 x 9.5". I scored the long side at 2.5" from the bottom and at 5.5" on the short side and used a bone folder to really burnish the folds. Inside, I cut on the centre score line for the 2.5" piece and then cut slivers from each side to reduce the bulk when folding the portfolio.

For the front, I matted two pieces of the Delightful Daisy DSP with Night of Navy. Before adhering the mattes to the front and back covers of the portfolio, I used Tear & Tape to adhere a length of Daffodil Delight 1/4" Double Stitched Ribbon across the middle of the back and front. I then adhered the mattes using liquid adhesive.

Three additional daisies were punched, curled, and assembled as for the cards and then adhered to the front cover of the portfolio. The cards and envelopes were added inside and the portfolio tied up with the ribbon.

Linda Vich Creates: 2017 Catalog Launch Prep Part 3: First Prize. Delightful Daisy DSP teams up with the Daisy Punch for this lovely card set and portfolio.

Linda Vich Creates: 2017 Catalog Launch Prep Part 3: First Prize. Delightful Daisy DSP teams up with the Daisy Punch for this lovely card set and portfolio.

I really had a lot of fun preparing these prizes for my Catalog Launch and it was even more fun to share them with the ladies who won them!

I hope you've enjoyed reading about my preparations for the 2017 Catalog Launch. If you have visited, drop me a line below to let me know you stopped by–I'd love to hear from you!




Monday, May 8, 2017

Eastern Palace Suite and Stitched Shapes Framelits

Linda Vich Creates: Eastern Palace Suite and Stitched Shapes Framelits. Very Vanilla and Gold showcase the ornate beauty of the Eastern Palace Suite in this card.
The Eastern Palace Suite is the epitome of ornateness. The dies are so intricate and the number of different combinations for using them is simply mind boggling!

For today's card, I decided to limit the colors and let the dies shine through with the help of a little gold foil!

I started by cutting a card base of 4.75 x 6" from the new Thick Very Vanilla Card Stock. I then cut two mattes–one from Gold Foil and one also from the Thick Very Vanilla.

The Hexagons Dynamic Embossing Folder was used to emboss the Very Vanilla Matte and then it was adhered to the gold matte using liquid adhesive.

I used the largest square from the Stitched Shapes Framelits to die cut a piece of Gold Foil. Using the Eastern Medallions Thinlits, I used a combination of dies #3 and #5 to cut a medallion from Thick Very Vanilla. Liquid glue was used to adhere these. Be sure to check my Numbered Die Sets blog page (located at the top of my blog) to see which dies I am using.

Die #8 was used to cut a piece of the Gold Foil. After the sentiment was stamped in Basic Black on Thick Very Vanilla, it was die cut with the #1 Stitched Circle die. These two pieces were adhered with liquid glue and then stacked onto the other two die cuts using Dimensionals. One of the gold tassels was sandwiched between them.

Dimensionals were used to adhere the set of die cuts to the hexagon matte and then the whole thing was adhered to the card front.

To add a little touch of gold to the inside of the card, one of the gold vinyl stickers from the Eastern Palace Bundle was adhered down the right side.

Linda Vich Creates: Eastern Palace Suite and Stitched Shapes Framelits. Very Vanilla and Gold showcase the ornate beauty of the Eastern Palace Suite in this card.

Linda Vich Creates: Eastern Palace Suite and Stitched Shapes Framelits. Very Vanilla and Gold showcase the ornate beauty of the Eastern Palace Suite in this card.


Doesn't this card look ornate in the Very Vanilla and gold?

Be sure to purchase your Eastern Palace Bundle in my online store before May 31! You will have lots of fun using all the parts of this suite!


Tuesday, April 4, 2017

Floating Reinker and Watercolored Rose Wonder

Linda Vich Creates: Floating Reinker and Watercolored Rose Wonder. A vibrantly watercolored Rose Wonder sits atop a hexagon-embossed Blushing Bride background.
For my daughter's birthday, I chose to work with a rose theme since she loves roses. Because of this, I chose to use the Rose Wonder stamp set and the Rose Garden Thinlits.

I started by stamping the rose image on Shimmery White card stock using Versamark. I also stamped the leaves, but did them separately because I knew I would be cutting them out separate from the rose. I heat embossed the images using White Stampin' Emboss Powder.

The Floating Reinker Technique seemed to be a nice fit for this card so I got out my Aqua Pen and added water to all the spaces in the rose, making sure that they weren't too wet or too dry but just right :) I then picked up Blushing Bride reinker on my Aqua Pen and touched it to the water in various spots on the rose. This caused the ink to fill the sections with color. After cleaning my pen, I repeated this process using Rose Red to fill the remaining sections.

In working with the leaves, I also used my Aqua Pen but this time I chose to paint with the Cucumber Crush reinker. Because of the nature of the paper, the ink dried quickly so I was able to paint over sections to intensify the color in places, making the leaves look more realistic. I zapped both the leaves and the rose with my heat tool to be sure they were completely dry before continuing.

My next step was to use the Rose Garden Thinlits to cut out the rose and leaves using the now retired 6 x 6" Glimmer paper in Sweet Sugarplum and Mint Macaron. I used Connie Stewart's method of adhering detailed die cuts to glue the die cuts to the rose and leaves. After I was sure they were well adhered, I fussy cut around them, snipping off any extra pieces that were not needed.

Two mattes were die cut, one Mint Macaron and one Blushing Bride. I used the Hexagons Dynamic Embossing Folder to emboss the Blushing Bride matte and then adhered it to the Mint Macaron one using liquid adhesive.

After determining the correct placement, I used Dimensionals for the leaves and Foam Adhesive Strips for the rose and adhered them to the embossed matte. I wrapped Thick Cucumber Crush Baker's Twine around the bottom of the matte, securing it to the back with Fast Fuse. The matte was then adhered to a Rose Red card front using Foam Adhesive Strips.

Using the MISTI, the sentiment from the Rose Wonder stamp set was stamped in Cucumber Crush on Mint Macaron and then stamped again with Versamark so that it could be heat embossed using Clear Stampin' Emboss Powder. An oval from the Stitched Shapes Framelits was used to die cut the sentiment. It was adhered to the card front using Foam Adhesive Strips.

A Thick Whisper White matte was cut for inside the card. The Rose Wonder stamp was used to stamp offset on the right side of the matte using Versamark. It was heat embossed using White Stampin' Emboss Powder. Blushing Bride and Mint Macaron inks were sponged over the embossing and then the matte was adhered inside to complete the card.

Linda Vich Creates: Floating Reinker and Watercolored Rose Wonder. A vibrantly watercolored Rose Wonder sits atop a hexagon-embossed Blushing Bride background.

Linda Vich Creates: Floating Reinker and Watercolored Rose Wonder. A vibrantly watercolored Rose Wonder sits atop a hexagon-embossed Blushing Bride background.

Linda Vich Creates: Floating Reinker and Watercolored Rose Wonder. A vibrantly watercolored Rose Wonder sits atop a hexagon-embossed Blushing Bride background.

I'm very pleased with how it turned out and my daughter loved it! If you would like to use the color scheme from this project, feel free to save the following image.

Linda Vich Creates: Floating Reinker and Watercolored Rose Wonder. A vibrantly watercolored Rose Wonder sits atop a hexagon-embossed Blushing Bride background.

I am definitely going to miss Cucumber Crush! I love its vibrancy and find that it works well, in small doses, with several of our Stampin' Up! colors. If you love it too, be sure to stock up on it before it's too late! Place an order today in my online store.


Friday, January 6, 2017

One In A Million Tee Shirt Birthday

Linda Vich Creates: One In A Million Tee Shirt Birthday. Vibrant birthday card created using Custom Tee Bundle and the new Hexagons Dynamic Embossing Folder.
Well, our house is quiet again now that Courtney, Steffan, Raine, and the three cats have moved back to their own house! It was so nice to have them here yet sometimes difficult for both them and us as we all have our own routines and they don't always mesh well!

Because I wouldn't be seeing him on Monday, I wanted to send a card with Steffan for his 25th birthday.

Steffan is definitely a person who marches to his own drummer and his trademark is the black t-shirts that he wears. I knew that as soon as I saw the Custom Tee Bundle that I would use it on cards for him!

I started by using Versamark to stamp the t-shirt and its sentiment on Basic Black. I heat embossed using Gold Stampin' Emboss Powder and then die cut with the matching framelits.

After cutting a standard card base from Basic Black, I cut a matte from Real Red. To create the effect on the matte, I used a now retired Brayer to ink up the top of the new Hexagons Dynamic Embossing Folder with Basic Black Archival ink and then inserted the matte and ran it through the Big Shot. Not only did I get that fabulous 3D embossing but the "chicken wire" effect added to the gritty, urban look that I wanted.

I then proceeded to wrap a combo of Basic Black Baker's Twine with the now retired Gold Baker's Twine from the Baker's Twine Trio Pack from the Holiday Catalog around the matte, securing at the back with tape. Please note that I did try both the Black and the Gold twines on their own but only the combo produced this dynamic effect!

I used Dimensionals to adhere the matte to the card front as well as to pop up the t-shirt on the front of the card. I did adhere a white matte to the inside of the card but kept the sentiment to a simple Happy 25th Birthday created by using both the Number of Years and the Project Life Day to Day stamp sets.

Here's one of my favorite photos of Steffan from Christmas–a photo of Steffan is a rarity. He was really enjoying himself on Christmas Eve!


I am sure that Steffan will enjoy this card and I am pleased with the final result!

Linda Vich Creates: One In A Million Tee Shirt Birthday. Vibrant birthday card created using Custom Tee Bundle and the new Hexagons Dynamic Embossing Folder.