Tuesday, November 17, 2015

90th Birthday Bash

On Saturday, we had a 90th Birthday Party for my mother, Joyce. Besides our immediate family, also attending the party was my mother's cousin, also named Joyce, who was also born on the same day!

Though at times my mother was quite confused, she seemed to enjoy herself and the party. I was in charge of food for the event, though my brother had been in touch with people regarding what we could use at my mother's nursing home.

When we got there, of course, things weren't exactly as we had anticipated and I ended up running around like a chicken with her head cut off! Suffice it to say, the food was later than we had planned it to be! Grrrr! Luckily, my brother snapped lots of pictures because I didn't have the chance to do so. I'll be getting some of those from him in time.

The card I designed for my mother was cased from the card in this video by Becca Feeken. Because we had decided to use the colors of purple, silver, and white for the theme of my mother's party, I altered the colors in the card accordingly.

I used Elegant Eggplant to create a gate fold card base, 5 x 6" in size. I cut the decorative panels from Silver Foil and embossed them using the Leafy Vine Embossing Folder from Taylored Expressions. Almost any type of embossing folder produces amazing results when you use foil paper but this turned out especially nice! The panels were adhered to the "gates" using Fuse Fast Adhesive.

Using the Banners Framelits dies, I cut the largest banner from Whisper White Thick card stock and a smaller one from Vellum card stock. On the vellum banner, using Versamark, I stamped the sentiment using both the Project Life Day to Day and the Four You stamp sets. I heat embossed using Silver Stampin' Emboss Powder. I also used a Versamark pen around the edge of the banner and heat embossed that with silver.

I used the Bow Builder Punch to punch out the bow pieces and also heat embossed the edges using the Silver Stampin' Emboss Powder. For the tails and the centre of the bow, I used Silver Foil paper.

A trick I used for the centre piece for the bow was to punch out a foil piece using the Word Window punch and trim it down a bit. I have always found the centre of the bow piece just a little small to work with but the Word Window punch worked great for a centre piece!

I adhered the vellum banner to the white one using glue dots which I then hid by mounting the bow on top. The banners were adhered to one side of the gate fold using Dimensionals. I placed Dimensionals on the opposite side as well so that the popped up banner would look equal but I did not remove the paper piece from the Dimensionals.

I cut a matte of Whisper White for the inside of the card and use the "swoosh" stamp from Everything Eleanor to stamp the edges in both Perfect Plum and Elegant Eggplant. I used sponge daubers to ink the edges in the corresponding inks.


Built for Free Using: My Stampin Blog


For my mother's cousin, Joyce, I created a card using one of my favorite patterned papers from the now retired, Fresh Prints Designer stack.

I cut two balloons using the Balloon Framelits Dies, one from Coastal Cabana and one from Real Red to match the designer paper. After establishing the placement I wanted, I used the framelits again to cut an opening in the designer paper for a "shaker" balloon.

Using my Fuse Tool and a page protector, I created a balloon filled with sequins that coordinated with the designer paper. I taped the shaker piece to the back of the designer paper and then adhered the panel to a piece of Baked Brown Sugar card stock. This was first inked with Bermuda Bay ink and then mounted on a Real Red matte that had been inked with a fine line of Basic Black Archival ink. This was then mounted onto a Coastal Cabana card base using Dimensionals.

Using a Two-Way Glue Pen, I ran a fine line around each balloon die cut and then added Dazzling Diamonds glitter. I then tied a piece of thick Coastal Cabana twine to each die cut and used a glue dot to attach a third piece to the "shaker" balloon.

I used "Celebrate" from the Expressions Natural Elements and used a paint dauber to paint it Real Red. I covered it with Versamark, half at a time, and heat embossed it with Clear Stampin' Emboss Powder to make it shiny. The strings from the balloon were tied to the "C" and the sentiment was adhered to the card front using the Fine Tip Glue Pen.

On a Whisper White matte I stamped the balloon from the Celebrate Today stamp set using Coastal Cabana and my MISTI. MISTI definitely came in handy because I had to re-stamp a few times to get the balloon to be completely stamped. I stamped the string in Smoky Slate.

I then stamped in Versamark, using the project Life Day to Day set, and heat embossed in silver. I inked the edges of the matte with Real Red and adhered the matte inside the card.


Built for Free Using: My Stampin Blog


Two totally different birthday cards but I loved creating each of them. Hope you have enjoyed reading about my process!

Friday, November 13, 2015

Who's Hiding In The Woods?

Have you been lamenting the long list of back orders at Stampin' Up? It has been a frustrating few months for customers and demonstrators alike but stock is slowly being replenished and back orders are being filled.

The other day I received my long awaited Woodlands Embossing Folder. Yippee!

I had been viewing pin after pin on Pinterest showing all the neat ways Woodland could be used. I was specially intrigued by the technique of stamping "behind" the tree trunks.

I didn't have any of the old car stamps but I did have a deer stamp. What would be more apt than a deer in the woods?

I watched two really good video tutorials on the technique, one by a demonstrator nicknamed, Frenchie, and one by Dee Slater. The technique involves applying ink to the inside of the top piece of the embossing folder, either directly (by stroking the embossing folder with the ink pad) or with a sponge. Then the image that you want behind the trees get stamped on the embossing folder as well.

Next, a piece of card stock is placed in the folder, the folder is closed and then the folder is run through the Big Shot as usual.

I tried a few test pieces using various ink colors before deciding on using Soft Sky for the background and Baked Brown Sugar for the deer.

As per the tutorials, I applied Soft Sky ink to the inside of the Woodland folder and then stamped the deer from the now retired hostess set, Warmth & Wonder, using Baked Brown Sugar. I wasn't totally pleased with my results—the background was a touch streaky, and the deer was a little splotchy. The streaky background didn't bother me too much but the deer needed some help. I carefully touched up the deer using my Baked Brown Sugar Stampin' Marker.

Next, I applied some Smoky Slate ink to the tree trunks using a sponge dauber. I trimmed the panel to 3.75 x 5" and then inked the edges using both Baked Brown Sugar and Soft Suede inks.

I inked the edges of a Soft Sky matte using Lost Lagoon and then adhered the embossed panel. I taped a length of 3/8" Lost Lagoon ribbon around the left side and then tied a short piece in a knot around it.
I adhered this panel to a card base of Baked Brown Sugar.

Using a piece of Gold Cording Trim, I threaded on a Basic Gold Metal Button and tied it onto the ribbon.

On a piece of Whisper White I stamped the "merry" sentiment, from the now retired Pennant Parade stamp set, using Lost Lagoon and then die cut it using the smallest tag die from the Tags & Labels Framelits. I inked the edges of the tag and then used some more Gold Cording to hang it from the button.

I cut another Soft Sky matte for the inside of the card, inking the edges with Lost Lagoon. I stamped a deer in the bottom left corner using Soft Suede and then adhered the matte using Fuse Fast Adhesive.


I must say that I'm liking the color combo of Soft Sky and Baked Brown Sugar! What do you think? Drop me a comment below!

Built for Free Using: My Stampin Blog

Thursday, November 12, 2015

Don't Make THIS Craft Organizing Mistake!

Are you a craft organization junkie? Do you spend a lot of time pinning organization techniques on Pinterest and watching YouTube videos about organizing your supplies?

I think a lot of us crafters are on a never ending quest for the ultimate craft organization Grail. We worship at the feet of the organizing gurus like Jennifer McGuire with the hopes that one day we will reach the Nirvana of craft organization.


Like you, I am constantly in search of a way to "do it better" but I also want to do it inexpensively, or let's be truthful, cheaply.

For a long time now I have lusted after the way the big name crafters use these cute little containers for their often-used embossing powders and glitter instead of keeping them stored in their respective bottles. What could be better than having containers with inch-deep embossing powders and glitter? Being able to lovingly ladle these powders over my inked creations using a tiny spoon always seemed like the ultimate in crafting heaven.

So, I ordered multiple bottles of my favorite embossing powders and went in search of some storage containers. My first and last stop was Dollarama. I picked up several 4.5 x 6.5" containers for about $5.00! Woohoo!

At home in my craft room I poured jar after jar of powder into my new containers and meticulously labelled each one. I stacked them in my embossing drawer, awaiting their virgin voyage.

This method for embossing or glitterizing (is that a word?) worked swimmingly! Now, instead of dumping embossing powder on my cards over a piece of scrap paper, and trying to pour it all back in the little bottle but always having a lot of powder escape, I was able to emboss my card within the bounds of the container and contain the mess! Hallelujah! Life was good until . . .

. . . the other day.

I was going to emboss the card I had made for my aunt's 90th birthday. I got out my container of silver embossing powder and was taking off the lid when it happened.

The bottom of the container came away in my hand and at least half of the powder fell out!

OMG!

So, a lot of clean up and a few choice words later, lesson learned. Off I drove to Walmart and purchased some heavy duty containers to stow my stash of embossing powders and glitters.

So, take it from me . . . if you want to try this wonderful method of powder storage . . . spend a little money and purchase your containers at somewhere other than the dollar store!

You can thank me later!

Wednesday, November 11, 2015

Wonderland: My Go-To Stamp

Even though you may have purchased several stamps from the Holiday Catalog, do you find yourself constantly reaching for the same stamp again and again? I do!

Lately, my favourite stamp is Wonderland. I just love this stamp! Is it just a coincidence that wonderful and Wonderland have the letters W-O-N-D-E-R in common? It's obvious that it is not only me that thinks this stamp is wonderful—just look at the many cards using it on Pinterest! It's a stamp that can be stamped in any color, on any card stock, be stamped off and be embossed in any way you cam dream of to use it. In short, it's magical!

Today, I knew I wanted to showcase these trees in white against the richness of Cherry Cobbler.
Rather than simply heat emboss the trees in white, I decided to create a custom embossing powder mix by combining equal parts of White Stampin' Emboss Powder and Dazzling Diamonds Glitter.

After stamping the trees with Versamark on Cherry Cobbler card stock, I heat embossed using my new concoction. I was so pleased with the result! I loved the rich contrast between the white and the Cherry Cobbler, and the added sparkle from the Dazzling Diamonds was sweet!

I decided to push the contrast even more by framing the trees with a die cut window frame in a piece of Whisper White Thick card stock. I used one of the Window Frame Collection Framelits to cut an opening in the matte. I used one size larger framelits to cut the trees.

I inked the edges of the matte with Cherry Cobbler and then taped the trees behind the white matte. I taped a length of the Cherry Cobbler linen ribbon around the bottom of the matte and then tied a short lie ever of the ribbon in a knot in the middle of the ribbon. I then adhered the matte to a card base of Whisper White Thick card stock.

For the sentiment, I used Noel from the Happy Scenes stamp set. I stamped it in Cherry Cobbler on a strip of Vellum card stock and heat embossed it using Clear Stampin' Emboss Powder. I used the Triple Banner Punch to flag both ends.

To complete the card, I used glue dots to fasten the sentiment across the window and then covered the glue dots with Cherry Cobbler Candy Dots.


For another Wonderland card, be sure to check out Color Burst Christmas and Wonderful Wonderland. Watch for more Wonderland cards from me in the near future! What have you created with Wonderland? Leave me a link in the comments below!

Built for Free Using: My Stampin Blog


Monday, November 9, 2015

Color Burst Christmas and Wonderful Wonderland

Wow! We had a crazy, jam-packed stamping class on Friday night! Sixteen ladies in attendance and stamping–it got a little warm in the room with so many bodies present but we persevered to create some spectacular cards!

I had been wanting to give my group the chance to try working with the Color Bursts and I knew that our last class before Christmas would be busy with our tag exchange so I went ahead with my plan on Friday.

As this was their first chance to play with the Color Bursts, I decided to keep things simple.

I demonstrated how to achieve both smooth and more distressed looking effects using just two colors of Color Bursts. I had hoped that they would be able to experiment and make two background panels but because they were having so much fun playing, most only got to make one.


After their Color Burst background panel was completed and dry, they trimmed up the panels to make a 4 x 5.25" matte and inked the edges. It was then adhered to a Thick Whisper White card base.

They had previously chosen a color of card stock that would coordinate with the Color Bursts they were using. From this card stock they used the Festive Flower Punch to punch small petals (8), double petals (2) and the 3/4" Circle Punch to punch a circle to use for a poinsettia embellishment. They also punched three small petals and two centres from either gold or silver Glimmer Paper.

They folded each petal in half lengthwise to give it some dimension and then inked the edges of each using either Basic Black Archival or Early Espresso ink. They used glue guns to assemble the poinsettias and then adhered them to their Color Burst panels using Dimensionals.

They stamped a sentiment from the Happy Scenes stamp set on a strip of Whisper White and inked the edges with either Basic Black Archival or Early Espresso. One end was flagged and then the sentiment was adhered to the card front. A few sequins were added for some extra sparkle!

It's here that I would love to have posted pictures of the lovely cards they made but once again I forgot to take photos! If I get the ladies to send pictures of their cards, I will edit this post to include them and let you know!

The second card that we made was cased entirely from the lovely card designed by LeeAnn Greff. LeeAnn has a video tutorial on her blog that shows how to construct this card.

We started by brayering the lovely sky using both Island Indigo and Rich Razzleberry inks. We then used Basic Black Archival ink to stamp two clumps of trees using the Wonderland stamp set. A strip of Whisper White as stamped with the sentiment from the same stamp set. The strip was then ripped to simulate the edge of a snowbank and then adhered to the bottom of the inked background.

The completed panel was mounted on a Whisper White matte which in turn was mounted on a Rich Razzleberry card base using Dimensionals.

A white gel pen was used to create stars and add snow to the tree branches. Once dry, a Two-Way Glue Pen was used over these spots and Dazzling Diamonds added. The glue pen and Dazzling Diamonds were also added to the edge of the snowbank.

A Whisper White matte was stamped with the trees for the inside of the card.

Such a lovely result and fun techniques used to create the card. Thank you LeeAnn for designing this wonderful card!

I hope you will get a chance to try the Color Bursts, creating a Poinsettia and brayering to create the beautiful Wonderland card!


Built for Free Using: My Stampin Blog

Tuesday, November 3, 2015

Halloween Round Up

Halloween was a real whirlwind this year! It seemed that no sooner were the candy, costumes, and decorations on the shelves at Walmart when Halloween night had come and gone!

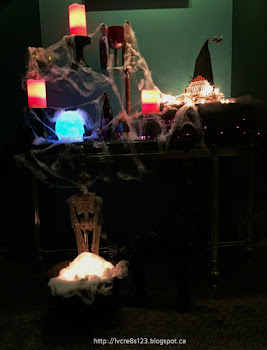
I had been looking forward to creating the Halloween Decor Project from Stampin Up and I was able to incorporate it into a spooky little scene in our hallway entrance that totally captivated my granddaughter, Raine!

For the first couple of times she was over, she would not walk past it at all, even if I held her! Gradually, she was able to go by if I was holding her and by Halloween night, she walked past it herself a couple of times!

Here's the hat by itself after I completed it:


And here it is in the Halloween display I created:


Luckily, I had a day off prior to Halloween in order to create some cards and gift bags.

For Steffan, I used my Zig Clean Color Real Brush Markers to color in a stamp from the Happy Witches stamp set by Hampton Art. I die cut the stamp as well as a Black Glimmer paper using the Lots Of Labels Framelits.

The sentiment from Halloween Expressions Mini from Inkadinkado was stamped with Archival ink on Cucumber Crush card stock. The edges were inked with the archival ink and then the matte was mounted on a Rich Razzleberry card base.

The die cuts were adhered to each other and then popped up on the matte using Dimensionals.


For Courtney, I cased this card. I used the wonderfully spooky stamp set, Witches' Night, to stamp the main image on Whisper White card stock using Basic Black Archival ink. I used Pumpkin Pie and Rich Razzleberry inks to sponge the image and then die cut it using the Lots of Labels Framelits, cutting a larger one from Black Glimmer paper. The colored image was also stamped with Versamark and then heat embossed with Clear Embossing Powder to make it shiny. The die cuts were adhered to each other.

On a strip of Rich Razzleberry I stamped the zig zag pattern stamp from the same stamp set and then adhered a strip of Black Glimmer paper over top. On a Pumpkin Pie matte, I stamped bats in each corner and then it was adhered to a Rich Razzleberry card base using Dimensionals.

The strips of Rich Razzleberry and Black Glimmer were adhered in the centre of the matte and then a black Spiderweb Doily was cut in half and adhered to the back of the die cut. The die cut was then adhered to the card front using Dimensionals.


 For Raine's gift bag, I used a piece of paper from the Happy Haunting DSP pack and the Gift Bag Punch Board to create her treat bag. To decorate it, I used a stamp from the Witches' Night stamp set to stamp on Pumpkin Pie card stock and then die cut it using the Lots of Labels Framelits. It was attached to the bag with a black spiderweb doily cut in half behind it.

I used both the Boo To You and the Seasonal Frame Thinlits Dies to die cut Boo! and Spooky from Pumpkin Pie card stock, three copies of each. The words were glued together using the Fine Tip Glue Pen. I used Versamark and Clear Embossing Powder to heat emboss the words to make them shiny.


Steffan's bag was made the same way but I used a different stamp on Real Red card stock and it was heat embossed to make it shiny. The stamp was die cut and adhered to Black Glimmer paper die cut and then adhered over a spiderweb showing the white side.

I used the Howl-o-ween Treat stamp set with StazOn ink to stamp the skull and bone on Dazzling Diamonds Glimmer paper. They were die cut using the Boo To You Framelits.


Finally, for Courtney's gift bag, I stamped the image from the Happy Witches stamp set on Rich Razzleberry card stock and die cut it. It was edged with Basic Black Archival ink. A larger die cut label in Pumpkin Pie was used behind it, with a black Spiderweb Doily sandwiched between.


Here's a picture of Raine in her costume taken by her daycare provider. They had a party that day and took their costumes to put on there. Prior to this, Raine had not been persuaded to try on her costume but when she saw all the other kids getting into their costumes, she figured it was ok to do the same!


Here's Raine after returning from walking door-to-door for over 1 1/2 hours! She had a ball and got a Walmart bag full of goodies!


Here she is, enjoying some of her candy stash!
 Hope you all had a good Halloween!

Built for Free Using: My Stampin Blog

Color Burst Projects

As you should be able to tell from the date of my last post, babysitting and working are taking the majority of my time these days. Don't get me wrong—I'm loving the time I get to spend with my granddaughter! However, by the time she gets picked up and we get supper done with, I'm about DONE for the evening!


However, I have had the odd moment to create but just haven't had the chance to blog about it. Today, I have two projects, both using Color Bursts.

My first card is a card that I designed for my friend, Charlene.


I started by using the Earth Tone set of Color Bursts on a piece of watercolor paper.

I sprinkled tiny bits of Merlot, Burnt Orange, and Yellow Ochre on the paper and then spritzed them with water. I tilted the paper to make the paint run in different directions, adding more powder and water until I was pleased with how it was taking shape. I then added in some Terre Verte (green) to increase the richness of the colors. Once I was totally pleased with the effect, I dried the piece with my heat tool.

I then mounted the oak leaf from the Vintage Leaves stamp set on an acrylic block and sprayed it with water. I pressed it down onto the colored watercolor panel and held it in place for about 30 seconds. When I removed the stamp, there was a little bit of pooled water which I absorbed with a paper towel. I then repeated this procedure on the rest of the panel.

I dried the panel again and then threw a few droplets of water onto the panel as well, letting them sit for a few seconds before blotting with a paper towel.

Because I was planning to use Embossing Paste on top of the watercolors and I wasn't sure if the paste would reactivate the watercolors, I decided to use Ranger Distress Micro Glaze to seal the surface. Just a little bit goes a long way with this stuff! You simply get a little bit on your finger and then rub it into the surface of your work. After it is completely covered, you take a paper towel and just buff the piece, removing any excess.

The next step was to lay my Garden Leafy Stems stencil, from Memory Box, across my watercolor piece and secure both it and my watercolor paper to my craft mat using some washi tape. I then applied Dreamweaver Gold Embossing paste with a palette knife. When complete, I simply lifted the stencil off of my work and set it aside to dry.

The next day, (it didn't take that long to dry but I didn't have time to get back to the card until then!) I inked the edges of the watercolor piece with Black Soot Distress Ink and then finished with a fine line of Ranger Archival Ink.

I stamped the sentiment using the same archival ink and the Endless Birthdays stamp set. I then knotted a piece of Cherry Cobbler Sheer Linen ribbon around the panel and also added a length of Gold Sequin Trim. I then mounted the panel, using Foam Tape, to a Cherry Cobbler card base.

Around the edges of a matte of Natural Ivory card stock I stamped the oak leaf, using Delightful Dijon. I then inked the edges of the matte using Cherry Cobbler ink.


I love the richness of the colors in this card, especially accompanied by the gold embossing paste!

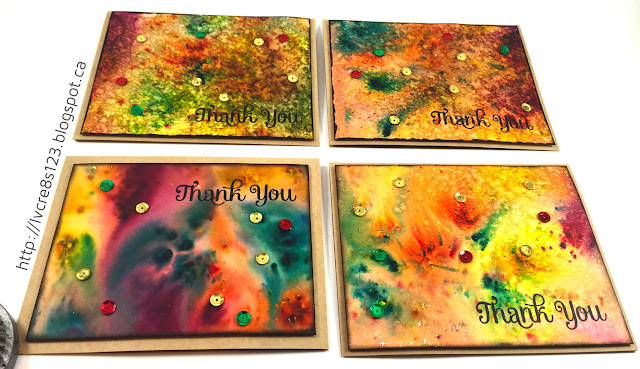
My next Color Burst project was thank you cards for my stamping group. For these, I used Color Bursts on 9 x 11" sheets of watercolor paper and then cut them down to size as mattes.

For the blue set, I used Indigo and Terre Verte for the colors, finishing with some green, blue and crystal sequins. The color on these is very smooth in appearance as I let the colors dry naturally after moving the watercolor paper to get the paint to flow.


For this second set of cards, I used Merlot, Burnt Orange, Yellow Ochre and Terre Verte. The color in these cards is rougher in appearance, except for two, because I dried and then spritzed again with water, creating a droplet pattern. To these cards I added green, red, and gold sequins.


Both sets of watercolors were trimmed to matte size and edged with Ranger Archival Ink. The sentiment was also stamped with archival ink, using the now retired Four You stamp set. The blue set of cards were mounted on Night of Navy card bases and the fall color set were mounted on Kraft card bases, using Foam Tape.

Have you tried Color Bursts yet? I just love playing with them and next time I use them, I want to try using stencils with them. I'm looking forward to the results!


Built for Free Using: My Stampin Blog