Though today's card uses a number of the same elements as the card from Part One, the feel of this card is punchier and more dynamic because the colors I have chosen are complementary colors ie. they are opposite each other on the color wheel. Part One's card used analogous colors or colors that are side-by-side on the color wheel. This leaves the viewer with a much mellower or comfortable feeling.
In Part One, I described how Jennifer's technique was used to stamp the leaf clusters. I colored those leaves using Watercolor Pencils and blended them with the Wink of Stella pen.
For today's card, I used the Poppy Parade Blends to color the leaves. I simply colored each leaf with the lighter color, then outlined the markings on the leaf with the darker marker. To blend everything together, I again used the lighter marker over the whole leaf. I repeated this process for each leaf. The colored leaves were then matted with a thin, Basic Black matte.
With the coloring finished, I set about to embellish my card. I embossed a piece of Granny Apple Green card stock using the Basket Weave Embossing Folder. I spritzed the card stock front and back with water first and then ran it through and back the Big Shot a couple of times to achieve a very deep embossing.
Next, I die cut the piece with the middle size of the stitched die from the Blended Seasons Bundle. I wasn't sure that the die cut would be successful because of the deep embossing of the Basket Weave embossing folder but I was absolutely amazed at the stitched detail, even on top of the embossing!
I adhered the shape to the colored leaves matte using Dimensionals.
I cut a length of the Gold Metallic Edge Ribbon and used my Dark Poppy Parade Blend to color it, both front and back. It took no time at all and dried almost instantly. I tied the ribbon around the middle of the matte and then adhered the matte to a 4.75 x 6" Granny Apple Green card front using Dimensionals.
The sentiment, from the Enjoy Life stamp set, was stamped on Basic Black with Versamark (I made sure to use my Embossing Buddy before stamping to avoid any stray embossing powder.) and then heat embossed with White Stampin' Emboss Powder. I trimmed it down with a pair of scissors and then it was adhered with Dimensionals.
As a final touch for the front of the card, I used a die from the Petals & More Thinlits to die cut some leaves from the now retired Dazzling Diamonds Glimmer paper. I used Glue Dots to attach this under the ribbon.
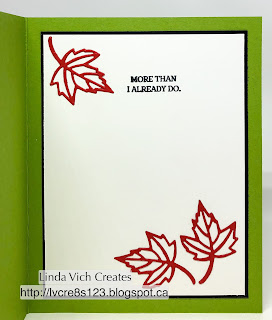
For the matte inside the card, I simply matted a piece of Thick Whisper White with Basic Black card stock and then used liquid adhesive to glue three leaves, die cut from Poppy Parade card stock, to the matte before adhering it inside the card.
I hope you'll try the Edge Stamping Technique for yourself! If you need to order a Stamparatus, you can do so in my online store. You will find many more uses for the Stamparatus and you will be amazed at how your stamping will improve and become more enjoyable!
Product List


2 comments:
It's lovely, Linda! Thanks for sharing! xx
Thanks Donna!
Post a Comment