Sunday, November 13, 2016

Stamp Club November Projects

Linda Vich Creates: Stamp Club November Projects. Santa's Sleigh Z fold card in dramatic tones of Whisper White and Night of Navy with accents of silver foil and both silver and dazzling diamonds glimmer paper.
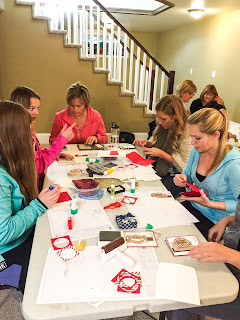
I kept my stamp club ladies were very busy on Friday night assembling their card projects! Due to the complexity of one of the cards, I die cut all but the sentiment pieces for both cards–my Big Shot was smoking!

Our first card was CASEd from Olga Cavanaugh and the idea of using acetate for the z fold strip was CASEd from Chlo's Craft Closet. A Night of Navy card base was cut at 4.25 x 11" and scored at 2.75" and 5.5". A 1 x 11" strip of Whisper White was also cut and scored in the same way. (Note that the example photos here show an acetate strip in use but a Whisper White strip was used in class so it was easier with which to work.)

Using the MISTI, the sentiment from the Christmas Pines stamp set was stamped with Night of Navy on Thick Whisper White. The stamp was then cleaned and the sentiment re-stamped using Versamark. It was heat embossed using the now retired Iridescent Embossing Powder. The sentiment was then die cut using one of the ovals from the new Stitched Shapes Framelits.

I absolutely LOVE these new stitched framelits! The stitching is so crisp looking and I even saw that in one post on Pinterest, a demo had actually stitched with thread using one of these dies–totally amazing! If you haven't yet bought them, contact me to order yours today–you won't regret it!

This Z Fold card required four Whisper White mattes in total–two, 4 x 5.25" and two, 2.5 x 4". On one of the smaller ones, the clump of birch trees from the Thoughtful Branches stamp set were stamped. On one of the larger panels, the two-step stamping of five pine trees from the Thoughtful Branches stamp set was done. The last large matte, which is used for the back of the card to give the sender a place to write, was stamped also with the pine trees, but this time there were only two, offset to the bottom right of the matte. All stamping was done with Night of Navy. All four mattes were then adhered to the card base. The die cut sentiment was adhered to the panel with the five pines using Dimensionals.

The sleigh from the Santa's Sleigh Framelits was die cut from Night of Navy and the ornate sleigh overlay was cut from Silver Foil paper. The dryer sheet method was employed and worked beautifully to successfully cut and remove these fragile die cuts from the dies.

To adhere the foil overlay to the sleigh die cut, Connie Stewart's "Sponge in Tupperware Gluing System" (this is what I am calling it until I find a better name!) worked great! No mess, no fuss, and easily adhered! If you haven't yet tried this technique, you need to because it is fantastic!

Next, six deer were die cut from Dazzling Diamonds Glimmer paper and then six wreaths to clothe the necks of the deer were die cut from Night of Navy. The wreaths were slipped over the necks of the deer, eased past the nose, and adhered with a glue dot.

Two, 1 x 1" presents were cut from both Night of Navy and Silver Glimmer Paper. Matching bows were die cut and then adhered to the presents using glue dots. The present stack was designed and adhered together and then adhered to the sleigh.

The 1 x 11" strip of Whisper White–or in the card shown here acetate–was laid across the closed card. The 5.5" scored section was adhered only to the small front panel section of the card. The other end of the strip was then adhered to the back panel of the card.

The sleigh was adhered to the strip on the front panel and two deer followed it, all adhered with glue dots. The remaining deer were adhered to the middle and end sections of the strip.

To complete the card, a retired Winter Wonderland embellishment was adhered to the front of the card to act as a star.

Linda Vich Creates: Stamp Club November Projects. Santa's Sleigh Z fold card in dramatic tones of Whisper White and Night of Navy with accents of silver foil and both silver and dazzling diamonds glimmer paper.

Linda Vich Creates: Stamp Club November Projects. Santa's Sleigh Z fold card in dramatic tones of Whisper White and Night of Navy with accents of silver foil and both silver and dazzling diamonds glimmer paper.

Linda Vich Creates: Stamp Club November Projects. Santa's Sleigh Z fold card in dramatic tones of Whisper White and Night of Navy with accents of silver foil and both silver and dazzling diamonds glimmer paper.

Linda Vich Creates: Stamp Club November Projects. Santa's Sleigh Z fold card in dramatic tones of Whisper White and Night of Navy with accents of silver foil and both silver and dazzling diamonds glimmer paper.

I was pleased with how the card turned out and each stamp club member seemed delighted with their own constructed version!


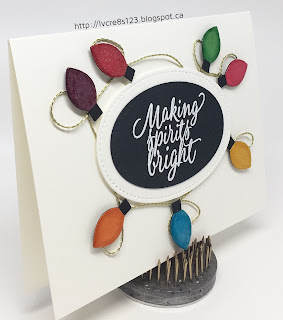
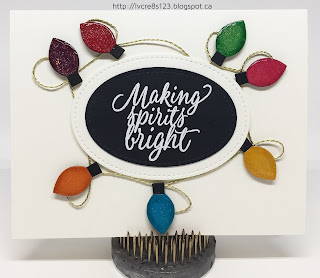
Our second card was CASEd from Katina Martinez. This card is a one layer standard sized card with the card base cut from Thick Whisper White.

Using the MISTI, the sentiment, from the Tin of Tags stamp set, was stamped on Basic Black using Versamark and then heat embossed using White Stampin' Emboss Powder. The Embossing Buddy was used before stamping to ensure a "clean" emboss. The sentiment was then die cut using the 2nd largest oval from the Stitched Shapes Framelits. A second oval, using the largest stitched oval die, was die cut from Thick Whisper White. The two ovals were adhered together using liquid adhesive.

A small die from the Pyramid Pals Framelits was used to die cut seven Basic Black "light bulbs". In addition, seven more bulbs were die cut from Real Red, Melon Mambo, Pumpkin Pie, Crushed Curry, Cucumber Crush, Tempting Turquoise and Rich Razzleberry.

On each of the colored bulbs, the bottom section was snipped off with scissors and then the colored bulbs were adhered to the black bases using liquid adhesive. Matching ink was used to ink the edges of each light bulb using sponge daubers to create a glow effect. Each light bulb was given a coat of Clear Wink of Stella and then a Dimensional was applied to its back.

The die cut sentiment was adhered to the card front and then the positioning of the bulbs around the sentiment was pre-planned. A glue dot was used to anchor one end of gold twine (from the Baker's Twine Trio Pack) under the edge of the oval die cut and then the twine was twisted to form a loop. A glue dot was affixed to the card front and the twine adhered and a bulb adhered on top to hide the glue dot. This process was repeated around the sentiment until all the bulbs had been used. Another glue dot secured the end of the twine under the die cut sentiment.

Using a small paint brush, Crystal Effects was brushed liberally onto each light bulb by first tracing the edges of the bulb and then filling in the middle. The card was then set aside to dry thoroughly.

A matching envelope was made by drawing a curling "wire" along the edge of the envelope using a Gold Wink of Stella and then stamping the tiny "bulb" stamp from Tin of Tags along the wire, using the ink colors used previously on the card.

Linda Vich Creates: Stamp Club November Projects. Whimsical Christmas card featuring Christmas lights created from a Pyramid Pals die.

Linda Vich Creates: Stamp Club November Projects. Whimsical Christmas card featuring Christmas lights created from a Pyramid Pals die.

Isn't this a fun little holiday card? So easy and fun to create but so festive and colorful in all its sparkly goodness!

Have you started making Christmas cards yet? Maybe this year I'll get mine all done before Christmas!


Tuesday, November 8, 2016

Irresistible Cupcake

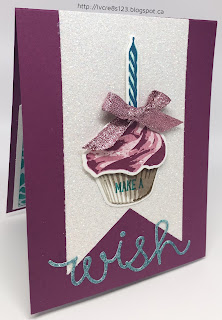
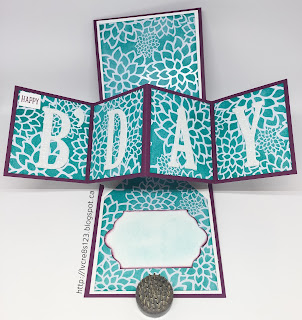
Linda Vich Creates: Irresistible Cupcake. A multi-step-stamped Sweet Cupcake graces the card front of this Pop Up Panel card while the inside flaunts a resist background brought to life by sponging with Bermuda Bay
It has been so hard waiting to blog about this card but I needed to wait until the recipient had received it! This is my very first Pop Up Panel card, AKA Pop and Twist card, AKA Twist and Pop card.

There are so many of these cards being displayed on the internet now and each one that I have seen has pushed me to try one of my own. Some of the cards are quite simply embellished and some are outright over-the-freakin'-top!

The tutorial that I chose to follow was one from Maymay Made It. I had previously looked at some other tutorials but found hers to be the easiest to follow.

There are three main pieces to this type of card: 1. card base 2. mechanism for the pop up and 3. the strip for the pop out panel.

I started by cutting a 4 1/4 x 11" card base from Rich Razzleberry. It was scored at 5 1/2". The mechanism for the pop up was cut from Whisper White at 8 1/2 x 10 3/4" and scored at 2 1/4", 4 1/4" and 6 1/4" on the short side and at 3 7/8", 5 3/8" and 6 6/8" on the long side. The strip for the pop out panel was cut at 3 x 11" from Rich Razzleberry. It was scored at 2 3/4", 5 1/2" and 8 1/4".

Four mattes for the pop out panel were cut from Irresistibly Floral DSP at 2 3/4 x 2 1/2". Two mattes, for the inside card panels were also cut at 3 3/4 x 5 1/2" before being trimmed to fit.

For each of the panels, I sponged them with Bermuda Bay ink to reveal the patterned resist. The two larger panels were trimmed to fit by tracing the mechanism for the pop up once it was created.

To create the pop up mechanism, after scoring, the four outer corners are cut away leaving a kind of T shape. The T has two wide pieces and two narrow pieces. Each of the narrow pieces had notches cut from each side to help get rid of some of the bulk from when the mechanism would be folded. Finally, using the score lines, the panels are folded to create an X at the centre. It is very hard to describe the actual construction of the pop out mechanism so you are best to view the video tutorial.

Once the pop out mechanism is created, the strip for the pop out panel is adhered to it. The four mattes were then adhered. Next, the two large panels for the inside of the card are trimmed by tracing the pointed shape of the pop out mechanism onto them. These mattes are then glued onto parts of the mechanism that actually form the white base matte inside the card. The mechanism was then glued to the inside of the Rich Razzleberry card base.

To finish embellishing the card, the large letters for the pop out panels were die cut from Dazzling Diamonds Glimmer paper using the Large Letter Framelits. "Happy" was stamped on a piece of Whisper White using Rich Razzleberry ink and a sentiment from the Sweet Cupcake stamp set.

Using the Lots of Labels Framelits, a tag was cut from Whisper White and edges inked with Rich Razzleberry. This was designed as a place to add greetings from the sender. Unfortunately, the Whisper White did not stay pristine! It picked up a smudge of Bermuda Bay so I compensated by lightly sponging more Bermuda Bay onto it!

For the front of the card, I cut a banner from Dazzling Diamonds Glimmer paper using the Banners Framelits. Using the Sweet Cupcake stamp set, I did multi-step stamping to create the cupcake, its wrapper and a candle. The cupcake used Sweet Sugarplum and Rich Razzleberry, the wrapper used Sahara Sand, Tip Top Taupe and Soft Suede, and the candle used Pool Party and Island Indigo. Each piece was die cut using the coordinating framelits.

"Make a" was stamped onto the cupcake wrapper and then the cupcake had a slit cut into it so the bottom of the candle could be inserted and taped to the back. The cupcake was popped up with Dimensionals onto the wrapper and adhered to the banner. Sweet Sugarplum Glitter Ribbon was tied in a bow and adhered to the base of the candle.

To complete the card, the "wish" sentiment was die cut from Dazzling Diamonds Glimmer paper using a die from the Cupcake Cutout Framelits. It was sponged with Bermuda Bay and adhered at the bottom of the banner.

Linda Vich Creates: Irresistible Cupcake. A multi-step-stamped Sweet Cupcake graces the card front of this Pop Up Panel card while the inside flaunts a resist background brought to life by sponging with Bermuda Bay

Linda Vich Creates: Irresistible Cupcake. A multi-step-stamped Sweet Cupcake graces the card front of this Pop Up Panel card while the inside flaunts a resist background brought to life by sponging with Bermuda Bay

This card was a joy to create, especially knowing that I would be sending it to my special online friend, Donna!


Sunday, November 6, 2016

Christmas Crafting in Unseasonable November Heat

Linda Vich Creates: Christmas Crafting in Unseasonable November Heat. Pyramid Pals Thinlits were used to create jewel-toned treat boxes.
Though the last few days have been an unseasonable heat wave, today I had a sweet afternoon crafting Christmas cards with twelve lovely ladies!

In preparing for my card class, I created some little treat boxes using the Pyramid Pals Thinlits CASEd from Linda Parker. If you haven't used these yet, you will want to give them a try! They are so very easy to put together and they make lovely boxes for tiny treats such as a Ferrero Rocher.

I die cut twelve boxes in jewel tones and used my MISTI to simplify the job of stamping one of the trees from the Totally Trees stamp set on each of the four panels of the pyramid boxes. I heat embossed six of them with Silver Embossing Powder and six with Gold.

The 1/8" Circle Punch was used to punch was used to punch two holes in both the front and back panels. I inserted either gold or silver cording through the back holes and into the front ones.

Tear & Tape was used to adhere the panels, leaving the front panel open. I inserted the Ferrero Rocher and then tied the box closed.

Linda Vich Creates: Christmas Crafting in Unseasonable November Heat. Pyramid Pals Thinlits were used to create jewel-toned treat boxes.

Linda Vich Creates: Christmas Crafting in Unseasonable November Heat. Pyramid Pals Thinlits were used to create jewel-toned treat boxes.


The cards we made were so much fun to make!

The first card was CASEd from Chiaki Haverstick. A Real Red standard card base was cut and a Whisper White matte was embossed with the Softly Falling Embossing Folder and then adhered to the card front.

The Gingerbread Boy, from the Cookie-Cutter Christmas stamp set, was stamped on Thick Whisper White using Tip Top Taupe. It was punched with the coordinating punch and then heat embossed with a non-Stampin' Up Clear Embossing Powder from WOW. This particular powder was used because the proper "baked" color could not be achieved in any other way. If the Clear Embossing Powder from Stampin' Up had been used, the boy would have had a glossy appearance–definitely not cookie-like! Instead, this embossing powder had a matte finish that gave the boy just the right look!

The Layering Circle Framelits were used to die cut both Real Red card stock and a striped piece of the Candy Cane Lane DSP. Strips of first Early Espresso, then a different piece of the Candy Cane Lane DSP was layered on the card front. The circles were adhered together and then layered with the Gingerbread Boy adhered on top with Dimensionals.

The sentiment from the Merriest Wishes stamp set was stamped on the bottom right of the card front to complete the card.

Linda Vich Creates: Christmas Crafting in Unseasonable November Heat. Cookie Cutter Christmas was used to create this fun Christmas card!

Linda Vich Creates: Christmas Crafting in Unseasonable November Heat. Cookie Cutter Christmas was used to create this fun Christmas card!


The second card was CASEd from Inking Idaho. A standard card base was cut from Very Vanilla and two mattes, one from Real Red, one from Sahara Sand.

The sentiment, from the Christmas Pines stamp set, was stamped on the bottom right of the Sahara Sand matte using Emerald Envy. The Sahara Sand and Real Red mattes were adhered together and then adhered to the Very Vanilla card front.

The Brick Wall Embossing Folder was inked up with Sahara Sand using the now retired brayer. A strip of Very Vanilla card stock was laid inside the folder and then run through the Big Shot. This gave the bricks a lovely dirty looking grout. The bricks were further "dirtied" up using a sponge and ink. Another small piece of Very Vanilla was "dirtied up" and adhered to the top of the larger brick piece with Dimensionals. This piece of "fireplace" was then adhered at the left of the card front.

Real Red was used to stamp the stocking and the berries on Thick Whisper White and then die cut. The top for the stocking and the holly was also die cut. These pieces were adhered to the stocking and then adhered to the fireplace using Dimensionals.

The merry sentiment was die cut from Red Glimmer Paper using the Christmas Greetings Thinlits. To adhere the sentiment, a new technique was used. A sponge, attached to a binder clip, was used to "pounce" glue onto the back of the sentiment which was laying on a silicone matte; a pair of tweezers was already in place ready to place the sentiment on the card front.

Two pine sprigs were die cut from Emerald Envy using the Pretty Pines Thinlits and adherd to the top of the fireplace. The Blossom Builder Punch was used to punch to blossoms from Real Red. These were adhered together, offset, and glued on top of the pine sprigs. To complete the card, Gold Glitz Dazzling Details was added to the centre of the Poinsettia.


Linda Vich Creates: Christmas Crafting in Unseasonable November Heat. Pretty Pine Thinlits combine with Christmas Stocking Thinlits to create this lovely Christmas vignette.

Linda Vich Creates: Christmas Crafting in Unseasonable November Heat. Pretty Pine Thinlits combine with Christmas Stocking Thinlits to create this lovely Christmas vignette.

A lot of fun was had by all today!


Our lovely hostess Amy!


Tuesday, November 1, 2016

Stitched From The Heart

What a wonderful day it is today! Starting today, you can purchase the set of 12 Stitched Dies that will be appearing in the 2017-2018 Annual Catalog!

What fun you will have die cutting your shapes and adding that little "something extra" to give your projects that special look.


To celebrate the release of these dies, Stampin' Up! is also offering special pricing on select stamp sets that coordinate with these dies during the month of November! You can purchase these stamp sets at 25% off!

Stitched From The Heart Dies and
Coordinating Stamp Sets, 25% off!


To take advantage of these specials, contact me today to place your order!

While waiting to receive your order, you will want to view the videos below.


Monday, October 31, 2016

Halloween Scenes Popcorn Treat Box

Linda Vich Creates: Halloween Scenes Popcorn Treat Box. Elegant Eggplant Popcorn Box embellished with spooky Halloween scenes.
Didn't think I'd actually get to make a treat box for Raine this year but I was able to do it today–just in time for Halloween!

This Halloween treat box was CASEd from a project made by one of my stamping class ladies, Carolyn. I also found a video tutorial by Connie Stewart very helpful for working with the Popcorn Box Thinlits.

I started by creating the popcorn box itself using Elegant Eggplant. I then used Connie's tip to use the Popcorn Box Thinlit to cut a piece which got used as a template for adding mattes to the sides of the box. I cut four mattes from Whisper White.

On each panel, I sponged on Crushed Curry, Pumpkin Pie, and Elegant Eggplant. I then used the 1 1/4" Circle Punch to punch four circles from Whisper White and sponged them with Crushed Curry and a little bit of Pumpkin Pie.

Using the Halloween Scenes Edgelits I die cut two witches and four trees from Basic Black and two fences from Silver Foil. I used Basic Black to stamp the tombstones 2X on Smoky Slate and the pumpkins 2X on Pumpkin Pie. These were die cut also using the Edgelits.

Before glueing anything to the panels, I played around with the best arrangements for all four of the panels. I then used liquid adhesive to attach all the items, stamping bats on two of the moons. Items that overhung the sides of the panels were trimmed off with the exception of the trees.

The tag sentiment was stamped with Basic Black on Pumpkin Pie card stock using the Halloween Scares stamp set. The tag was then die cut with a die from the Popcorn Box Thinlits. I used the 1/8" Circle Punch to punch a hole and then sponged the edges with Elegant Eggplant. The tag was threaded with a length of the Halloween Night Baker's Twine and also a tassel. More twine was strung around the top of the box and the tag attached to it. The candy was added and a non-Stampin' Up clothespin closed the treat bag.

Linda Vich Creates: Halloween Scenes Popcorn Treat Box. Elegant Eggplant Popcorn Box embellished with spooky Halloween scenes.

Linda Vich Creates: Halloween Scenes Popcorn Treat Box. Elegant Eggplant Popcorn Box embellished with spooky Halloween scenes.

Linda Vich Creates: Halloween Scenes Popcorn Treat Box. Elegant Eggplant Popcorn Box embellished with spooky Halloween scenes.

I'm pleased with how it turned out and Raine liked it!


Here she is in her Captain America costume ready to go trick-or-treating! Too bad it had to rain this year but "Raine" faced it like a trooper!


Sunday, October 30, 2016

Clean and Simple Thank You

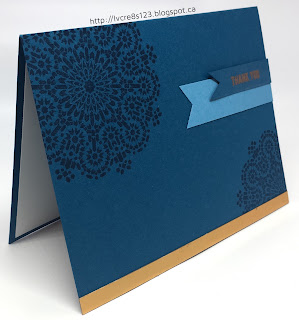
Linda Vich Creates: Clean and Simple Thank You. An elegant mandala-stamped card trimmed with Copper Foil.
The card I have to share with you today is a very clean and simple card made using one of the In Colors and Copper Foil.

I cut a standard card base from Dapper Denim and then stamped the mandala, from the Moroccan Nights stamp set, in Dapper Denim. I offset each of the two stamps. Using my MISTI allowed me to stamp each mandala twice. I also stamped an offset mandala on a Whisper White matte for inside the card; this time I stamped with Marina Mist.

I cut two strips of paper, one Dapper Denim, one Marina Mist, and flagged the ends manually and by using the Triple Banner Punch. Using Versamark, I stamped the sentiment, from the Thoughtful Banners stamp set, on the Dapper Denim strip and then heat embossed it using Copper Embossing Powder. The strips were attached to the card front using Fast Fuse.

I used liquid adhesive to adhere a thin strip of Copper Foil to the bottom of the card front and then adhered the stamped matte to the inside to complete the card.

Linda Vich Creates: Clean and Simple Thank You. An elegant mandala-stamped card trimmed with Copper Foil.

Linda Vich Creates: Clean and Simple Thank You. An elegant mandala-stamped card trimmed with Copper Foil.


I think that sometimes simplicity can be very sophisticated. What do you think?


Saturday, October 29, 2016

Exciting Stampin' Up! News and Stamp Class Projects


Have you heard the news??

As of November 1, you will be able to purchase stitched dies from Stampin' Up! A collection of 12 stitched dies, four each of ovals, squares, and circles will be appearing in the new annual catalog in June but you can purchase them early!

View the video below for a look at these lovely dies!


To celebrate the release of these dies, Stampin' Up is offering a 25% discount on select stamp sets which coordinate with these dies! These stamp sets will only be on sale during the month of November.

Click photo for full size listing of stamps on sale.

Contact me to place your order for both the stitched dies and matching stamp sets of your choice!

On Thursday, I met with my second stamp group and we had a ball chatting about crafting and making two lovely projects.

A standard card base was cut from Real Red card stock. Two mattes were cut from Whisper White. One matte was embossed using the Softly Falling Embossing Folder. The edges were inked with Pool Party using a sponge and then it was adhered to the card front.

The igloo was cut from Thick Whisper White using the Layering Ovals. A backing was cut from Pool Party. The white piece was embossed using the Brick Wall Embossing Folder and then the two pieces of the igloo were glued together with liquid adhesive.

The outside of the igloo was inked with Pool Party as well as the lines between the bricks. Liquid glue was applied to the edges, around the doorway, and random spots on the igloo itself and then Dazzling Diamonds Glitter was applied.

The Eskimo from the Cookie-Cutter Christmas stamp set was stamped on watercolor paper using Stazon ink. After setting the ink with a heat tool, the Eskimo was colored by using Stampin' Write Markers with a Blender Pen.

The igloo and Eskimo were adhered to the card front using Dimensionals. The sentiment, from the Santa's Sleigh stamp set, was stamped with Basic Black on a strip of Pool Party. One end was flagged with scissors and then the sentiment was adhered to the card front using Snail Adhesive.

The matte for the inside was stamped in Pool Party with a brick stamp from the Ghoulish Grunge stamp set. The edges of the matte were inked with Pool Party and then the matte was adhered inside to complete the card.

Linda Vich Creates: Exciting Stampin' Up! News and Stamp Class Projects.This card features an Eskimo cut with the Cookie Cutter Builder Punch and an igloo created with the Layering Ovals.

Linda Vich Creates: Exciting Stampin' Up! News and Stamp Class Projects.This card features an Eskimo cut with the Cookie Cutter Builder Punch and an igloo created with the Layering Ovals.

Linda Vich Creates: Exciting Stampin' Up! News and Stamp Class Projects.This card features an Eskimo cut with the Cookie Cutter Builder Punch and an igloo created with the Layering Ovals.


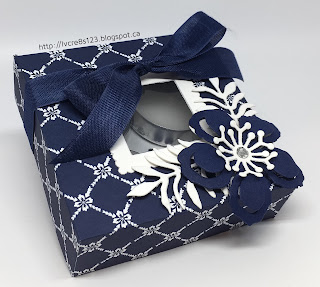
Our second project was a little box that holds four tea light candles. The project was CASEd from Square Fish Designs and there is a template there that shows the scoring lines for the project.

A piece of the Floral Boutique DSP was cut 9.5 x 5.25" and scored and cut according to the template mentioned above. The Layering Squares were used to cut a hole in the lid portion of the box and a piece of Window Sheet was adhered inside the lid using Snail Adhesive.

A frame for the outside was cut with the Layering Squares from Thick Whisper White. It was adhered outside the window using liquid adhesive. Tip: Apply liquid adhesive to the frame and lay it, glue side up on the desktop. Hold the unassembled box with the wrong side facing you. Look through the window in the lid to line up the frame and press to adhere.

The box was completed using liquid adhesive and the candles placed inside. The Botanical Builder Framelits were used to cut the flower, stamens, and leaves. These were attached to the box lid using liquid glue and Dimensionals. A rhinestone was added to the centre of the flower.

A piece of the now retired Night of Navy Seam Binding was tied in a bow around the box to complete it.

Linda Vich Creates: Exciting Stampin' Up! News and Stamp Class Projects. This box for four tea light candles is stunning when made from Floral Boutique DSP and embellished with flowers die cut with the Botanical Builder Framelits.

Linda Vich Creates: Exciting Stampin' Up! News and Stamp Class Projects. This box for four tea light candles is stunning when made from Floral Boutique DSP and embellished with flowers die cut with the Botanical Builder Framelits.

Linda Vich Creates: Exciting Stampin' Up! News and Stamp Class Projects. This box for four tea light candles is stunning when made from Floral Boutique DSP and embellished with flowers die cut with the Botanical Builder Framelits.

Fun was had by all and I look forward to our next class in November!