Tuesday, November 11, 2014

It's All About The Sparkle

Mojo Monday definitely is living up to its name for me! Did a quick review of the various Monday challenges and fell in love with this sketch.


I knew just what I wanted to do with it, other than picking the designer paper and deciding which card stock to use for the base and which for the matte. I also tried several different ribbon choices until I felt I had the best one. The card came together quickly after these decisions.


Linda Vich Creates: It's All About The Sparkle

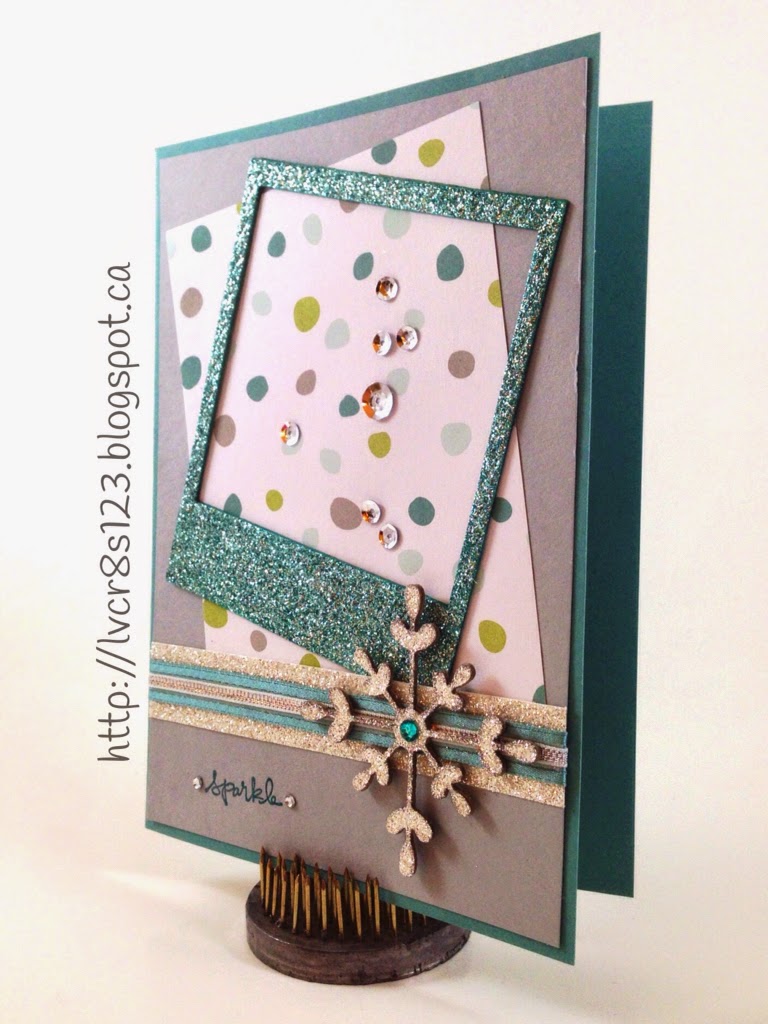
I started with a Lost Lagoon card base of 5 x 7." I cut a matte from Smoky Slate and a piece of All Is Calm Designer paper (love that stuff!).

I used the On Film framelits to cut a polaroid frame from Silver Glimmer paper. I also cut a 3/4" strip and a snowflake from the Glimmer paper. The snowflake is from the Snowflake Card Thinlits Dies, a beautiful set of framelits.

Because I found the frame and snowflake to be so flimsy, I also cut two snowflakes and two frames from Kraft card stock. I glued the two duplicate Kraft die cuts together and then glued the Glimmer paper die cuts on top. In retrospect, I should have cut the duplicates from Smoky Slate card stock instead of Kraft; because you could see some of the edge of the Kraft, I had to color it using a Smoky Slate Blendabilities marker.

I colored the frame using the darkest Coastal Cabana Blendabilities. I love how you can easily change the color of the Glimmer paper by using the Blendabilities and you still get that great glittery effect!

Look at that wonderful sparkle!

Linda Vich Creates: It's All About The Sparkle

I adhered the both Designer paper and the frame to the Smoky Gray matte. I then added the strip of Glimmer paper layered with first Lost Lagoon Ribbon and finally by Silver 1/8" Ribbon. I then adhered the matte to the card front.

I dropped a smattering of All Is Calm silver sequins within the polaroid frame, being sure I had an odd number. I find that dropping sequins from a height above the paper surface gives me a good random pattern, better than what I could come up with myself! I snapped a picture with my camera just to be on the safe side, and then adhered the sequins with a bit of Crystal Effects.

I adhered the snowflake and then added a rhinestone which I had colored with the Coastal Cabana Blendabilities marker.

Linda Vich Creates: It's All About The Sparkle

I chose the sentiment from the Good Greetings Hostess stamp set. I inked it first with Versamark and then Bermuda Bay before stamping it on the bottom left of the matte. I heat embossed it with clear embossing powder. I find that the new stamp pads dry too quickly to emboss well so I use a layer of Versamark and then the regular ink so that the stamped image catches more of the embossing powder.

The final touch was to add two small rhinestones on either side of the sentiment.

Linda Vich Creates: It's All About The Sparkle


I just love all the sparkles on this card–the frame, the snowflake, the sequins, the ribbon and the rhinestones bracketing the sentiment! Hope you like it too!
Linda Vich Creates: It's All About The Sparkle


Built for Free Using: My Stampin Blog

Frivolous Frippery

Once I get rolling, it's hard to stop! I'm submitting a card to the Can You Case It card challenge #44–a color challenge. It was hard to resist since one of the colors was Blackberry Bliss!

CYCI #44


I was excited about the colors and it didn't take me long to decide what I wanted to create. I decided on a gate fold design.

I cut a standard card base from Mossy Meadow but scored instead at 2 1/8" from each side. I cut panels to fit on each gate from Blackberry Bliss. I embossed these using the now retired Ornate Swirls embossing folder and then dabbed them with the now retired Frost White Shimmer Paint, using a sponge dauber. When they were dry I adhered them to the gates of the card base.

I used the now retired Dress Up Framelits to cut a dress form from Gold Foil and a dress from Very Vanilla card stock. I also cut the top part of the dress from Mossy Meadow and embossed it using the Fancy Fan embossing folder. I then adhered the Mossy Meadow top to the dress and the dress to the dress form. I wrapped a Mossy Meadow ribbon around the waist of the dress.

I used the now retired Vanilla Flower Trim to create the skirt of the dress, adhering it with Crystal Effects.

I adhered a piece of Gold Satin Ribbon around the card and trimmed it where the gates met. I followed this by adhering Gold 1/8" Ribbon on top of the Gold Satin Ribbon.

I used Dimensionals to pop up the Dress Form but only removed adhesive from one side. It was centred over the card front and adhered to one gate. This was done to allow the gate to open and to keep the Dress Form popped up evenly on both sides.

I stamped the sentiment from the Good Greetings Hostess set with Versamark and heat embossed it with Gold embossing powder. I used the Modern Label punch to cut it from Very Vanilla card stock. I inked the edges with Mossy Meadow.

The label was popped up with Dimensionals over the centre of the card base, using adhesive only on the side opposite to that of the Dress Form.

To complete the card, I adhered pearls to create a necklace on the Dress Form.

My card is a fait accompli!

Linda Vich Creates: Frivolous Frippery

Linda Vich Creates: Frivolous Frippery

Linda Vich Creates: Frivolous Frippery

Close up details.

Linda Vich Creates: Frivolous Frippery


Built for Free Using: My Stampin Blog

Monday, November 10, 2014

Fussy Cutting: Necessary Nightmare

I realized yesterday that I had a LOT of crafting to do in a very short time, the least of which was to create a card for my mother's birthday this week.

Luckily, I knew exactly what I wanted to use–the Corner Garden stamp. I had a brief play with it this week but nothing that was card worthy. However, I did find a technique done with the stamp that I thought would be perfect for my mother's card.

I started by cutting and scoring a Whisper White card base. I did not yet fold the card but I needed the score line so I could tell where the fold would be. I used a large post it note to mask off the back of the card so it would not get inked.

Because this stamp is large, I turned it on its back; after inking it up with Versamark I carefully placed my card front down onto the stamp and placed scrap paper over top to allow me to smooth over the entire surface of the stamp. I then heat embossed it with Whisper White embossing powder.

I used my Blendabilities to color in all the flowers and foliage. Because the spaces are so tiny, I did not worry about blending with the markers; I simply colored with them, like coloring in a coloring book, making sure I had scrap paper below my card stock.

As I colored, I realized that what was to be my card front would show the marks of the markers on the inside of the card. Due to this, I decided to create an inner card of Bermuda Bay which I adhered to the card base when it was completely colored and dry.

The next step in the technique was to fussy cut around the flowers where there was a large white space on the card.

Fussy cutting is definitely not for the faint of heart! You need to have a very good pair of sharp scissors (this is where my Stampin' Up! paper snips came in handy) a LOT of patience and a LOT of time.

Actually, I think that the term fussy cutting is a misnomer; the technique should really be called, Cutting Out Something That Was Never Meant To Be Cut Out!

Of course, I knew going in that this would be labor intensive and somewhat frustrating but I persevered, even using my favorite tool, the Fiskars Fingertip Craft Knife, to finish up the most difficult bits. I highly recommend this tool. The knife fits comfortably over your index finger, allowing you to wield it comfortably.

When I finished, I needed to add a few bits of glue to adhere the little bits of the front to the Bermuda Bay interior card. I was quite pleased with the results!

I then added the sentiment and a daisy-like flower from the Flower Patch stamp set to the inside of the card where it could be seen in the cut out area. These were both heat embossed with Whisper White.

I used a glue dot to adhere a bow made from the now retired Pumpkin Pie 1/8" ribbon (why do they retire this stuff?).

The finishing touch was to use the medium marker from the Mambo Melon Blendabilities to color a rhinestone for the centre of the flower.

Linda Vich Creates: Fussy Cutting: Necessary Nightmare

Linda Vich Creates: Fussy Cutting: Necessary Nightmare

Some close up details.

Linda Vich Creates: Fussy Cutting: Necessary Nightmare


I think my mother will enjoy the card. What do YOU think? Let me know in the comments below.

Built for Free Using: My Stampin Blog

Sunday, November 9, 2014

Making It Sparkle

Last night our stamping group met and we had a great time! It was my turn to sit back and have fun while one of the other members of our group, Shawna, taught the class. We got really inked up as we were playing with Alcohol Inks, both on foil and on vellum.

This is the card Shawna created using foil. It was inked and embossed. Beautiful!

Linda Vich Creates: Making It Sparkle

For this card, we stamped the butterfly on vellum and then colored it with Alcohol inks. After cutting it out, we mounted it on a card front that had been misted with ink and attached sequins and a word that had been cut out with the help of a Silhouette machine.

Linda Vich Creates: Making It Sparkle

Shawna is very talented and has just opened her Etsy store, Blue Painted Dragonfly Designs. You can check out her Facebook page as well–be sure to give her a like!

Today was great for me as well because I didn't have to work! In fact, I have the entire weekend off–woohoo!

I was up fairly early and sent in our Stampin' Up! order from last night. I then headed to Winnipeg for a bit of a haircut and on the way homeI decided to stop at Dollarama in Selkirk to pick up some foam tape.

BIG MISTAKE!

All of their Christmas decorations and crafting supplies were out so I had to buy the stuff while it was still available, of course! I walked out with two very full bags!

Back at home, I decided to choose a card challenge to get me started. I chose the Friday Mashup.


This was quite an interesting challenge because you could do one of three things:
  • create a project using the Diamond Dust Technique found here.
  • create a project using these colors: Island Indigo, Garden Green & Rich Razzleberry
OR
  • create a project using the technique and the colors.
I was a little leery of the color combo but decided to go with the flow and create a card following the third option.

The sparkle suggested Christmas to me and it also reminded me of the Bright & Beautiful stamp set. I mean, stars twinkle and when they do, they look like they're sparkling, right?

I chose the medium star and inked it up using my Stampin Write Markers in Garden Green and Island Indigo. I used the markers because I wanted to ink certain sections of the stamp and it has quite an intricate design.

If you recall from yesterday's post, when using markers on the stamps you need to huff on the stamp to refresh the ink before stamping it. I stamped it on Whisper White and the star looked fabulous just like that! However, I went ahead and used one of the Stars Framelits to die cut the star.

I thought that the starburst from Kinda Eclectic would look neat behind the star. That idea required a matte. I cut a square matte from Garden Green card stock and stamped the Starburst in Versamark. I heat embossed it using a Sparkly Silver embossing powder.

I used Island Indigo to ink the edges of the matte, using a sponge dauber. To enhance the embossing, I cut a second matte from Silver Glimmer paper and adhered the stamped matte to it. These eventually mounted on a Rich Razzleberry matte which would be adhered to a card base of the same color.

Following the tutorial, I completely covered the star with Versamark and heat embossed it with a Iridescent embossing powder. It got so vibrant and sparkly!

Then I made a pleasant discovery involving the book plate framelit from the Apothecary Accent Framelits. I'll share it with you in the form of a picture tutorial.

Here are what the framelits look like when cut. The book plate is on the top right.

Linda Vich Creates: Making It Sparkle

I cut a book plate from Garden Green.

Linda Vich Creates: Making It Sparkle


 Next, I grabbed my Tag Topper Scalloped punch.

Linda Vich Creates: Making It Sparkle

I centred the book plate and stuck it into the punch a far as it would go.

Linda Vich Creates: Making It Sparkle

After punching both ends, this is the result.

Linda Vich Creates: Making It Sparkle

Cool, huh? The reason I thought of this technique was because I knew you could modify one of the Chalk Talk Framelit tags in the same way but that tag doesn't look as ornate as this one.

I stamped the sentiment with Versamark and heat embossed with the same Sparkly Silver embossing powder. I then inked the edges of the book plate with Island Indigo.

Because I now had holes in the tag, I was able to add a a now retired Island Indigo ribbon to it and make it into a slider. The book plate was just a bit too wide for the front of the card so I trimmed it a bit. It still looked very ornate!

I played with the placement of the matte and the book plate and then adhered both to the Rich Razzleberry matte. I added some Dimensionals to the back of the book plate and some Sticky Strip to the ends of the ribbon, wrapping them around the back of the Rich Razzleberry matte.

A few rhinestones for added glitz and my card was complete!

Linda Vich Creates: Making It Sparkle


Linda Vich Creates: Making It Sparkle

A couple of close ups so you can see the effect of the Diamond Dust Technique.

Linda Vich Creates: Making It Sparkle

Linda Vich Creates: Making It Sparkle


I hope you'll try the Diamond Dust Technique–I know I'll be using it again!

Built for Free Using: My Stampin Blog

Friday, November 7, 2014

Stampin' Up! Giveaway and Fab Friday Challenge

Project Life fans and those who should be fans will want to enter the contest that Stampin' Up! is hosting. Simply click the image below to enter and have a chance at winning either your choice of Card & coordinating Accessory Pack or the grand prize of every current Project Life by Stampin' Up! product available!

WOW!

Don't miss your chance–register to win before November 30 by clicking the image below.

Linda Vich Creates: Stampin' Up! Giveaway and Fab Friday Challenge

Other than the above announcement, it was kind of a dreary day today. It only got worse as the day went on . . . rain, wind . . . the dogs didn't even want to venture outside!

To stoke my creative juices, I opted for the color challenge at the Fab Friday Stampin Challenge blog.

Linda Vich Creates: Stampin' Up! Giveaway and Fab Friday Challenge


Small wonder, right? Blackberry Bliss was on the menu! (Have I mentioned that is my FAVORITE color?)

I gathered some scraps of each color and played around to see which I would use for the card base, which would be accent colors, etc. I also decided to use the now retired Sunflower stamp which lent itself nicely to stamping with all three of the colors.

Because the Sunflower is a HUGE stamp, I turned it on its back to ink it. I used a sponge daubers to ink the outer petals with Crushed Curry, the ring around the flower centre with Cajun Craze, and finally the centre with Blackberry Bliss.

I decided that the Crushed Curry petals might need a bit more life to them so I used the Thumping Technique. This technique requires you to ink up a stamp normally and then use a darker color of one or more Stampin Write Markers to tap on the stamp (sort of like beating with a drumstick on a drum) using the painting tip of the marker. Finally, I huffed (technical term) on the stamp to refresh the applied ink.

I left the stamp on its back and carefully laid Whisper White card stock on top of it and then a sheet of scrap paper. This allowed me to smooth all over the surface of the stamp without inking up my hand on the exposed bits of it. I use this procedure for all large and/or background stamps.

The resulting print was quite to my liking and the thumping produced some interesting flecks in the petals.

I proceeded to cut the flower in half with my Stampin Trimmer and then fussy cut one of the halves.

I intended to mount the flower on the edge of a Cajun Craze matte but decided to add a strip of Designer Paper from the Color Me Autumn paper pack. That added additional interest to the design but I still needed more.

Out came the burlap ribbon but it looked too pristine so I cut off the sewn edges and removed some short strands to fray it out a bit. That helped. I layered the sunflower half on top of it and followed that with Blackberry Bliss ribbon. Better but still needed a bit more something.

I chose to distress the Cajun Craze matte by using Cajun Craze ink with the Gorgeous Grunge stamps. Much better! I added the Blackberry Bliss sentiment from the Kinda Eclectic stamp. but something still wasn't quite right.

I dug around in my embellishments drawer and twirled my Stack & Store Caddy till I found my Essential Wooden Elements. I chose a circle with a starburst edge and four chevrons.

I used my Stampin Write markers to color the wooden pieces. In coloring the starburst with Blackberry Bliss I inked up myself rather well. This ink then transferred itself to the chevrons when I colored them with Crushed Curry. I decided that it gave them a good grungy feel, in keeping with the style of the card. (Some mistakes actually turn out for the better!)

Because I wanted the embellishments to be held firmly, I used Crystal Effects to adhere them on top of the ribbon. They were the crowning touch to my card!

Linda Vich Creates: Stampin' Up! Giveaway and Fab Friday Challenge

Linda Vich Creates: Stampin' Up! Giveaway and Fab Friday Challenge


Here's a close up so you can see more details of the burlap.

Linda Vich Creates: Stampin' Up! Giveaway and Fab Friday Challenge


I think my card has a shabby chic style to it, don't you?

Built for Free Using: My Stampin Blog

Thursday, November 6, 2014

Autumn Thank You

The past few days it seems that I've been alternating between a parka and a fall-weight coat. Accordingly, I have been creating both Christmas and fall cards!

Today I created a card which allows me to enter it into two different card challenges.

Over at the Paper Craft Crew blog, they posted a sketch challenge today; at Stampin Up Only Challenges, the #109 challenge was a theme: "Thanks" or "Thanksgiving."

Paper Craft Crew Card Sketch 117

Because I wanted to use a particular color scheme, I focused on finding that first. I had pinned this color combo about a week ago:

Color combo I love

I love the contrast between these colors!

Once I knew my colors, it was simply a matter of deciding which color would go where. In the end, I stayed pretty true to the sketch and color scheme I had selected, with the exception of some Mossy Meadow on the pumpkins and the addition of Whisper White and the neutral tone of the Burlap Ribbon.

I used Tangelo Twist for the card base with a matte of Blackberry Bliss which I embossed with the now retired Vine Street Embossing Folder.

I mounted a piece of Back To Black Designer Paper on Basic Black card stock and adhered it to the embossed matte. Over that I ran a piece of Burlap Ribbon topped by the skinny Basic Black ribbon, complete with a bow.

The pumpkins were stamped with Tangelo Twist and the stems colored in with a Mossy Meadow Stampin Write Marker. I used the framelits to cut out the pumpkins and then popped them up with Dimensionals.

I used two different banner framelits–one from the Banners Framelits themselves and one from the Snowflake Card Thinlits Dies–for the sentiment. The sentiment was from the Lots Of Thanks stamp set, stamped in Blackberry Bliss.

To complete the card, I added three Candy Dots. Though they were Pumpkin Pie in color, they blended nicely with the Tangelo Twist.


What blogs host your favorite card challenges? Let me know in the Comments below!

Built for Free Using: My Stampin Blog

Tuesday, November 4, 2014

Trimming The Trees

We are having unseasonably warm weather, considering that it is now November. Let's hope it lasts for awhile!

Though the temperature has not dipped into the frosty temperatures, it is time to start thinking more and more toward Christmas. And that means Christmas cards will be spreading across the internet!

The card I have for you today is made using the Tree Punch and traditional Christmas colors.

I punched three trees from the Trim The Tree Designer Paper Stack and also punched three trees from Kraft card stock. I glued the patterned paper to the Kraft so they weren't quite so flimsy. I used a sponge dauber to edge each tree with Garden Green ink.

I then used the Little Letters Thinlits and the smallest of the Stars Framelits to cut the word Noel from a strip of Dazzling Diamonds Glimmer paper. Behind it I adhered a striped paper.

The card base was cut from Garden Green card stock and a matte from Cherry Cobbler. The matte was embossed using the Woodgrain Embossing Folder.

The Noel strip was adhered at an angle across the card front. I used a Cherry Cobbler Stampin Marker to trace each letter and the star to make them stand out more from the Glimmer paper.

The three trees were popped up on Dimensionals and tied together with twine (I used a Cherry Cobbler Blendabilities marker to color Whisper White twine). The trees were each topped with a star punched with the star punch from the now retired Merry Minis Punch Pack.

To finish off the card, I cut a strip of Cherry Cobbler Chevron Ribbon and then cut it down the centre of the ribbon. I adhered each piece on either side of the Dazzling Diamonds strip.

A simple but effective card I think!

Linda Vich Creates: Trimming The Trees


 Have you started making Christmas cards yet? Let me know in the Comments below!

Built for Free Using: My Stampin Blog