Monday, August 8, 2016

Z Fold Tuscan Vineyard Card

Linda Vich Creates: Z Fold Tuscan Vineyard Card. Blackberry Bliss and Rich Razzleberry team up with the Tuscan Vineyard stamp set to create this z fold card.
I have been missing my Blackberry Bliss dreadfully so for my brother's anniversary card, I dug out some retired card stock and DSP to make him and his wife a card. Since they will be spending their anniversary in the vineyard area in British Columbia, I thought that the colors of Blackberry Bliss and Rich Razzleberry would be appropriate.

I started with the focal image of the vineyards from the Tuscan Vineyards stamp set. I stamped it with Basic Black Archival onto Watercolor paper. I then used a variety of reinkers and an Aqua Painter to watercolor the image. It was then die cut using the Layering Ovals Framelits and matted with Blackberry Bliss.

I stamped the corks and corkscrew onto Crumb Cake using the retired Baked Brown Sugar. I ripped the edge around the images and set them aside. On a Crumb Cake matte for the inner part of the card, I stamped the image of the bottle and wine cask. To achieve the two color image, I colored on the stamp with both a Garden Green and a Baked Brown Sugar Stampin' Write Marker.

For the card base, I cut a 11 x 4.25" piece and a 11 x 1" strip of Rich Razzleberry and scored them both at 2.75 and 5.5". Both pieces were folded in a Z fashion. I also cut pieces of the now retired Farmers Market DSP for mattes for the front and back section of the card.

After adhering my mattes to the card base, I stamped the sentiment from the Best Birds stamp set on the long strip and then adhered the strip to the card by first folding up the strip and gluing to the back first and then to the front of the card. The cork and corkscrew images were also adhered and then the focal image to complete the card.

This type of card is not the easiest to photograph to fully show you all the parts of the card but I've done my best!

Linda Vich Creates: Z Fold Tuscan Vineyard Card. Blackberry Bliss and Rich Razzleberry team up with the Tuscan Vineyard stamp set to create this z fold card.

Linda Vich Creates: Z Fold Tuscan Vineyard Card. Blackberry Bliss and Rich Razzleberry team up with the Tuscan Vineyard stamp set to create this z fold card.

Linda Vich Creates: Z Fold Tuscan Vineyard Card. Blackberry Bliss and Rich Razzleberry team up with the Tuscan Vineyard stamp set to create this z fold card.

Linda Vich Creates: Z Fold Tuscan Vineyard Card. Blackberry Bliss and Rich Razzleberry team up with the Tuscan Vineyard stamp set to create this z fold card.

For my first Z Fold card, I am pleased with how this turned out. For my next one, I would like to experiment more with a 3D scene created by mounting various parts of the scene on the floating strip of the card.


Thursday, August 4, 2016

Thoughtful Branches Thank You

Linda Vich Creates: Thoughtful Branches Thank You. A lovely hydrangea blossom from Thoughtful Branches, in shades of Bermuda Bay and Island Indigo, rests against a grungy, Peekaboo Peach brick background.
When I sat down to design this card, I knew that I was going to use Bermuda Bay and Island Indigo, because they were favorites of the recipient, and I also added Cucumber Crush because the three colors produced a lovely analogous color scheme. However, I chose a complementary color, Peekaboo Peach, to really add some punch.

I started by stamping the blossoms, from the Thoughtful Branches stamp set, in both Bermuda Bay and Island Indigo on Thick Whisper White. They were die cut with the matching Thinlits. A set of leaves were also die cut from Cucumber Crush.

A matte was cut from Thick Whisper White and embossed with the Brick Wall Embossing Folder. I really love using the Thick Whisper White because it embosses so nicely! The Watercolor Wash stamp was used to stamp over the bricks using Peekaboo Peach to give them a nice grungy look. I also added in a few ink splatters by flicking the long end of a Tangerine Tango Stampin' Write Marker against its cap.

A 4.75 x 6" card base was cut from Peekaboo Peach as well as mattes from both Cucumber Crush and Bermuda Bay. I used a sponge dauber to ink the edges of all three mattes to provide separation of the colors and then Iadhered the embossed matte to the Cucumber Crush one with Fast Fuse. Dimensionals were used to adhere this combined matte to the Bermuda Bay one.

I chose the woodgrain stamp from Timeless Textures to add Tangerine Tango around the edges of the card base, echoing the splatters on the embossed matte. The mattes were then adhered with Dimensionals.

Using cut up Dimensionals, the two flower die cuts were adhered to one another, the Island Indigo one inverted under the Bermuda Bay one. The blossoms and the leaves were then adhered to the card front using Glue Dots.

The sentiment, from the Bunch of Blossoms stamp set, was masked so that I could stamp each part in different colors onto Thick Whisper White. The sentiment and a matte from Island Indigo was then die cut using the Tags & Labels Framelits. They were adhered to the card front and a small bow from Peekaboo Peach Ruched Ribbon was added to finish the card front.

A Whisper White matte was cut for the inside of the card. Stems were stamped in Cucumber Crush and the blossoms stamped three times in Island Indigo to provide some dimension.

Linda Vich Creates: Thoughtful Branches Thank You. A lovely hydrangea blossom from Thoughtful Branches, in shades of Bermuda Bay and Island Indigo, rests against a grungy, Peekaboo Peach brick background.

Linda Vich Creates: Thoughtful Branches Thank You. A lovely hydrangea blossom from Thoughtful Branches, in shades of Bermuda Bay and Island Indigo, rests against a grungy, Peekaboo Peach brick background.

Though I would not have immediately chosen this five color combo for a card, I believe that these colors work well together to provide a stand-out card! Feel free to save this color combo for your own creations.

Linda Vich Creates: Color Combo from Thoughtful Branches Thank You card.


Wednesday, August 3, 2016

Birthday In Blue With Thoughtful Branches

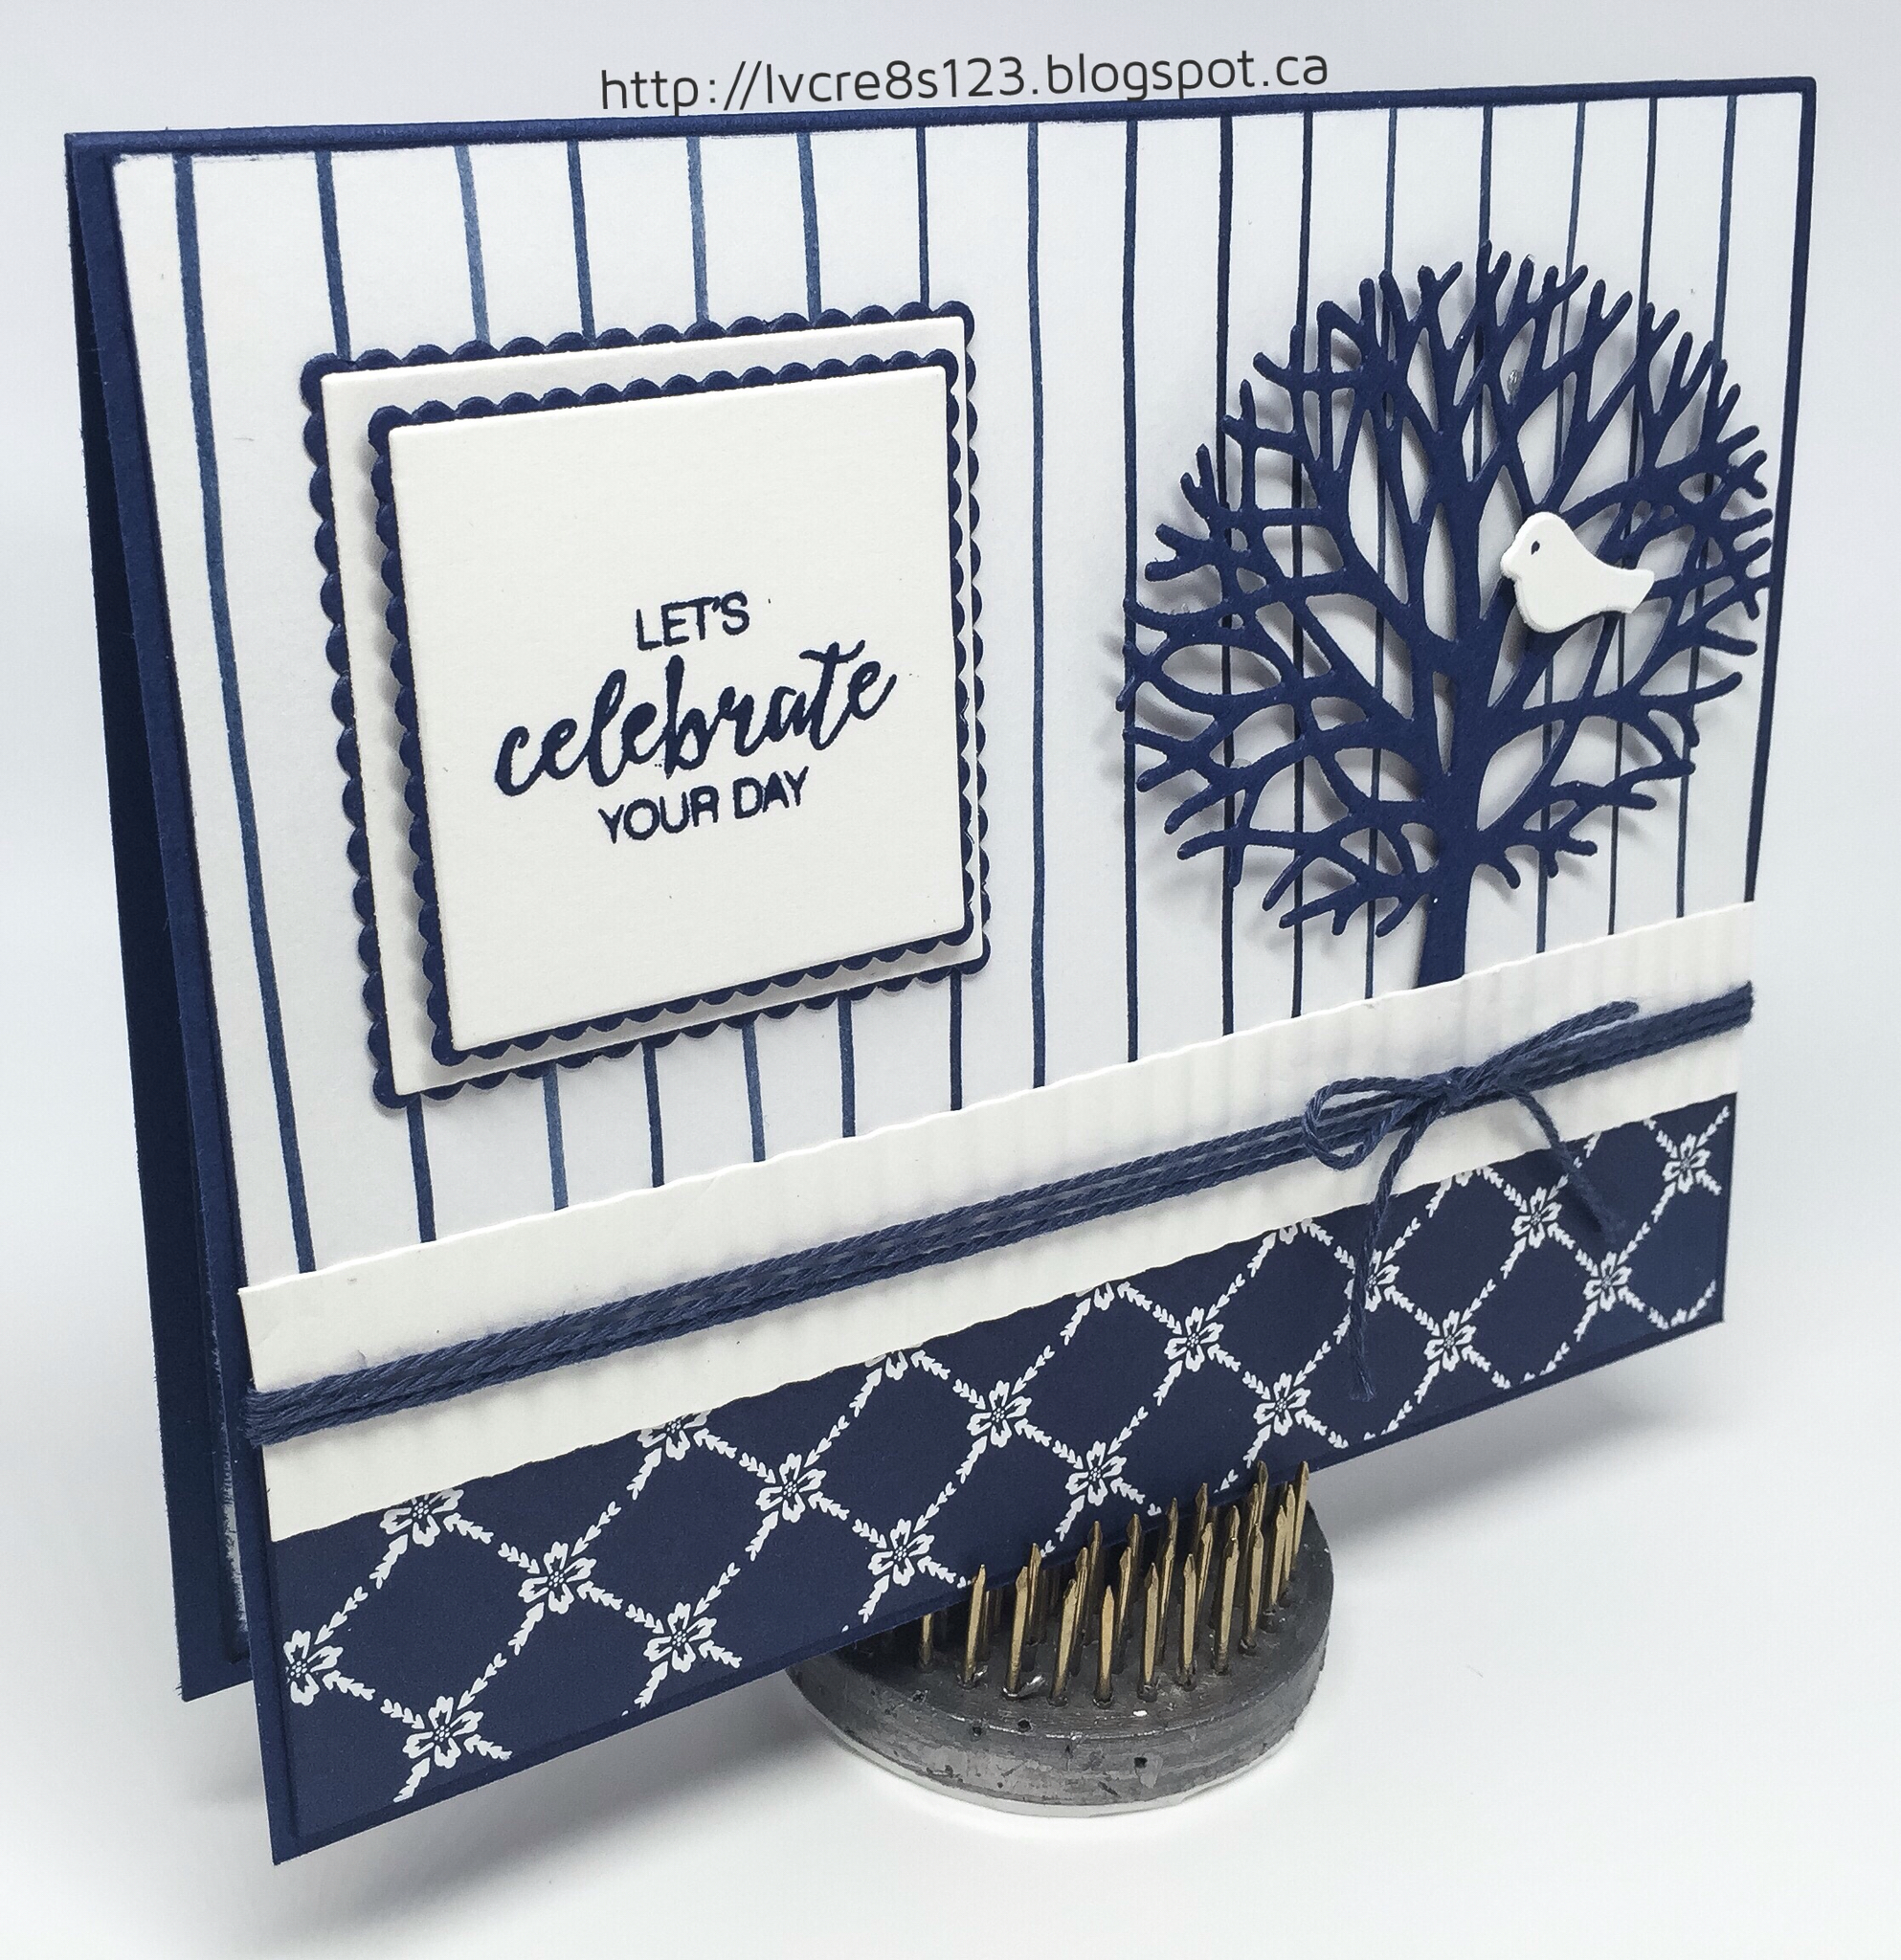
Linda Vich Creates: Birthday In Blue With Thoughtful Branches. Whisper White and Night of Navy combine in this card that showcases both the Floral Boutique DSP and the Thoughtful Branches Bundle.
My mother-in-law's birthday follows swift on the heels of that of my sister-in-law, so it was off to my craft room to create another card. I was drawn again to use the Thoughtful Branches bundle pairing it this time with the Floral Boutique DSP.

I started by cutting a 4.75 x 6" card base from Night of Navy. I cut a matte from a pin-striped paper from the Floral Boutique DSP and a smaller strip from a mostly navy design paper. These were adhered together using Fast Fuse.

Using the Beautiful Branches Thinlits, I die cut the tree from Night of Navy. I cut the bird from Thick Whisper White as well as a strip of paper which I ran through my paper crimper. It is hard to see in the pictures but it does add a nice bit of dimension to the card.

The tree was adhered to the matte using rolled up Glue Dots and then the crimped strip was adhered to the DSP matte and a length of Night of Navy Baker's Twine was tied around it. The matte was then adhered to the card front. I used a Night of Navy Stampin' Write Marker to give the bird a tree and then it was adhered to the tree using Glue Dots.

The sentiment from the Bunches of Blossoms stamp set was stamped in Night of Navy on Thick Whisper White. The Layering Squares Framelits were used to die cut the sentiment and other mattes from both Thick Whisper White and Night of Navy card stock. Each square and scalloped square were adhered using liquid adhesive and then adhered together using Dimensionals. They were adhered to the card front using Fast Fuse.

For the inside of the card, a leaf was stamped on Whisper White card stock and then a leaf die cut from Night of Navy was adhered beside it using Glue Dots. A sponge dauber was used to ink the edges before adhering the matte using Fast Fuse.

Linda Vich Creates: Birthday In Blue With Thoughtful Branches. Whisper White and Night of Navy combine in this card that showcases both the Floral Boutique DSP and the Thoughtful Branches Bundle.

Linda Vich Creates: Birthday In Blue With Thoughtful Branches. Whisper White and Night of Navy combine in this card that showcases both the Floral Boutique DSP and the Thoughtful Branches Bundle.

Linda Vich Creates: Birthday In Blue With Thoughtful Branches. Whisper White and Night of Navy combine in this card that showcases both the Floral Boutique DSP and the Thoughtful Branches Bundle.

Don't you just love the crisp quality of the card created by using white and navy together? I think that using the tree in navy really looks neat but I want to try a card that uses a white tree in the near future!

Be sure to place your order with me for the Thoughtful Branches Bundle! This limited edition bundle is available NOW until August 31 or while supplies last.


For further inspiration, check out my post from yesterday where I used the Thoughtful Branches Bundle on a pop-up card.


Tuesday, August 2, 2016

Thoughtful Branches Birthday

Linda Vich Creates: Thoughtful Branches Birthday. Pop-up card created with the Limited Edition Thoughtful Branches Bundle.
I know it's been awhile since I posted but with the hot weather we have been having, our house is HOT! The fan I have in my craft room is not enough to keep it cool in there so I have not been crafting. I am anxious to get back into it though so grabbed a little (sweaty) time to craft a birthday card for my sister-in-law.

This is pretty much a complete CASE of the card by Kelly Kent. It uses the Limited Edition Thoughtful Branches stamp set and matching Thinlits which is now available to order until August 31 while supplies last.

You won't want to pass up this stunning bundle! The stamp set itself is perfect for all year stamping with its selection of trees, trunks, and leaves and the included sentiments are simply BEAUTIFUL! They have used a lovely combination of script and sans serif fonts that can dress up almost any card whether it be casual or formal, and the sentiments can be used alone or you can pair up outside and inside sentiments.


Don't miss out on this extremely versatile set! If you received coupons for ordering in July, you can use them for your purchase of this set. Contact me to order it today!

I adapted the directions from Kelly to put them into inches and then proceeded with my card by cutting a 11 x 4.25" card base from Wild Wasabi. I scored it at 1, 2.5, 3.75, 5.5, 7.25, 8.25 and 10 inches. I also cut a strip that was 1 x 5 inches in length.

I folded the card on the score lines and then set the card base aside. Using the stamps, I stamped the tree trunk on Soft Suede, using matching ink and I stamped two sets of tree leaves on Sweet Sugarplum, one with Sweet Sugarplum and one with Rose Red.

I stamped the bird with Pacific Point on Marina Mist. Two leaves were stamped on Wild Wasabi, one with Wild Wasabi and the other with Garden Green. Three flowers, from the Best Birds stamp set, were stamped on Sweet Sugarplum using Rose Red. The sentiment was stamped with Soft Suede on Sweet Sugarplum.

All stamped images were die cut using the Beautiful Branches Thinlits, Birds & Blooms Thinlits, and the Layering Ovals Framelits. An extra tree trunk was also die cut. A scalloped oval matte was also die cut from Rose Red card stock.

I found the centre scored line of the card base and used my 1/8" Circle Punch to punch holes .5" in from each side. I then used my Stampin' Trimmer to cut on each side of the holes between them, leaving a slit between them. It is important not to make the slit too wide or the pop-up part of the card will not stay in place.

Using the 1 x 5" strip and the card base, I attached one end of the strip to the side of the card base (see photo above number 5 here for clarification) and then poked the other end through the slit that was cut in the card base. I used Fast Fuse to glue both folded ends together, sealing the end of the strip between them while creating the pop-up structure for the card.

I used the tree trunks and tree leaves die cuts to determine how long I needed the piece to be and how much to trim it so it would fit between the two tree trunks. When doing this step, it is important to determine the correct placement so that the flattened card will fit in your chosen envelope–mine fit into a standard envelope for a 4.25 x 5.5" card.

After using scissors to trim it both in length to taper the sides, I used liquid adhesive to glue the two tree trunks to it. The leaves were then also glued in place onto the trunk. Wink of Stella was added to the leaves and the bird was adhered.

With the pop-up set up, the leaves and flowers were added using Dimensionals. Wink of Stella was also added to the flowers. The sentiment was matted and also adhered to finish the card.

Linda Vich Creates: Thoughtful Branches Birthday. Pop-up card created with the Limited Edition Thoughtful Branches Bundle.

Linda Vich Creates: Thoughtful Branches Birthday. Pop-up card created with the Limited Edition Thoughtful Branches Bundle.
Side view showing how the pop-up is formed.

Linda Vich Creates: Thoughtful Branches Birthday. Pop-up card created with the Limited Edition Thoughtful Branches Bundle.

I'm delighted with how this card turned out and my sister-in-law loved it! I can see myself using this pop-up design for many more card designs in the future.

For further inspiration using the Thoughtful Branches Bundle, you will want to check out the Stamp Review Crew–Thoughtful Branches and the Thoughtful Branches Artisan Blog Hop.


Saturday, July 16, 2016

Sitting Here Retirement Card

Linda Vich Creates: Sitting Here Retirement Card. The hanging swing from Sitting Here is the focal image of this lively and bright color schemed retirement card.
With my brother and sister-in-law visiting from Calgary, I haven't had much time to craft this week. Today, we had a retirement party to go to for our neighbors so I had to get a card made for them this morning!

I chose to use the Sitting Here stamp set for my focal image. I stamped the wooden swing on Whisper White card stock using Basic Black Archival ink. I then used the leaves from the Sheltering Tree stamp set to stamp with both Cucumber Crush and then Wild Wasabi (turning the stamp upside down). The image was then die cut using the now retired Circles Collection Framelits.

I used two more circles to cut both a Cucumber Crush and a Pacific Point frame. The edges were inked with Basic Black and then they were layered over the stamped image, adhering them with liquid adhesive.

The pillows were stamped with Basic Black and then colored using Stampin' Write Markers in Pacific Point, Wild Wasabi, Cucumber Crush, and Bermuda Bay. A Basic Black marker was used to ink the edges of the fussy cut pillows. I then used a stylus from my McGill Paper Blossom Tool Kit to "puff up" the pillows like I did for the card in my Just Sitting Here post.

I cut a card base of 5.5 x 11" and then scored it at 2.75" from each end to create a gate fold card. I cut mattes from a piece of Cucumber Crush paper from the 2015-2017 In Color DSP Stack and adhered them to the front panels of the card after first inking the edges with Basic Black.

A Pacific Point 3/8" Stitched Ribbon was adhered to the back of the card and tied in a bow at the left side. Dimensionals were applied to the matted image but the adhesive was only removed from the side opposite the bow. This was done so that the card could be opened and also support the image on both sides.

The sentiment was cobbled together from two stamp sets–Wild About Flowers and Sweet Cupcake. It was stamped on Thick Whisper White using Basic Black. The sentiment was then die cut using a die from the Cupcake Cutout Framelits. A Pacific Point die cut was also made.

The Pacific Point die cut was cut in half, lengthwise, and then offset and glued to each side of the Whisper White die cut. It was adhered to the bottom of the stamped image on the card front.
The pillows were adhered to the stamped swing using doubled up Dimensionals.

For inside the card, a matte was cut from Thick Whisper White. The sentiment was stamped using Pacific Point and the tree was stamped using Soft Suede, Wild Wasabi and Cucumber Crush. The edges of the matte were inked with Wild Wasabi and then it was adhered with Fast Fuse Adhesive to complete the card.

A sheet of In Colors Envelope Paper was also used to create an envelope for the card, using the Envelope Punch Board. The envelope was not photographed.

Linda Vich Creates: Sitting Here Retirement Card. The hanging swing from Sitting Here is the focal image of this lively and bright color schemed retirement card.

Linda Vich Creates: Sitting Here Retirement Card. The hanging swing from Sitting Here is the focal image of this lively and bright color schemed retirement card.

I love the way this card came together and the color scheme really appeals to me! You can save it if you would like to use it for yourself!

Linda Vich Creates: Sitting Here Retirement Card. The hanging swing from Sitting Here is the focal image of this lively and bright color schemed retirement card.


Saturday, July 9, 2016

Brayered Glue Technique For Mass Producing Cards With Detailed Die Cuts

Linda Vich Creates: Brayered Glue Technique For Mass Producing Cards With Detailed Die Cuts.
Have you ever wanted to mass produce a card design that used a detailed die cut? Did you stop short of doing so because of the work involved in adhering the die cuts to the card front? I believe I have found a workable solution!

I am loving the new Flourish Thinlits because they are so lacy looking! However, sometimes all that laciness is hard to work with because if you overlap one die cut with another, it looks a little odd.

To combat this odd look, you can adhere a die cut to a card stock backing and then overlap it with another die cut. Because I needed multiple cards that used the Flourish Thinlits adhered to a background, I tried a gluing technique that worked remarkably well.

I used the Flourish Thinlits to die cut flowers from Melon Mambo card stock and leaves from Cucumber Crush. The bottom two leaves were removed from each leaf die cut. A standard card base was cut from Thick Whisper White card stock, a 5 1/8 x 3 7/8" matte from Whisper White and a 5 1/4 x 4" matte from Basic Black.

I played with the layout of the flower and leaves on the white matte, being sure to leave room for the sentiment. Once I was satisfied with my design, it was time to adhere the Melon Mambo flowers to a Whisper White backing.

For my Brayered Glue Technique, I placed some liquid glue on one side of my craft mat and rolled my brayer through it to completely coat it. I made sure to roll the brayer back and forth a few times to even out the glue and get rid of any blobs.

Linda Vich Creates: Brayered Glue Technique For Mass Producing Cards With Detailed Die Cuts.

Linda Vich Creates: Brayered Glue Technique For Mass Producing Cards With Detailed Die Cuts.

On the opposite side of my craft mat I flipped two flowers upside down. I held them in place just until the brayer had rolled over the edge of them. Once the glue was applied, I carefully placed the flowers on the Whisper White card stock background and smoothed them down with my hand.

Linda Vich Creates: Brayered Glue Technique For Mass Producing Cards With Detailed Die Cuts.

Linda Vich Creates: Brayered Glue Technique For Mass Producing Cards With Detailed Die Cuts.

I repeated this gluing process until all the flowers were glued. Immediately after smoothing down the last flower, I rinsed my mat and my brayer thoroughly under the tap. Unfortunately, because some of the glue dried on the mat while I was gluing additional flowers, I ended up with some sticky residue that would not come totally come off the mat. (I may still be able to scrub the glue off my matte but just in case I can't remove it, I recommend that you use a sheet of wax paper as your working surface.)

While my flowers were drying, I prepared my white matte by adding black splatters to it. I did this by dipping an Aqua Pen, filled with rubbing alcohol, into Basic Black Archival reinker and flicking the pen with my finger. Alcohol was used instead of water so that the drops would dry quicker.

To produce the largest drops, I made sure to squeeze my Aqua Pen until I had a large drop forming at the end and then flicked it. The finest splatter marks were made by using the Tim Holtz Splatter Brush.

To ensure that my matte was dry, I zapped it with my Heat Tool. Choosing a sentiment from the now retired Love You Sew stamp set, I used pieces of washi tape to mask off all but the "thanks" in the sentiment. I inked up the stamp with Basic Black, removed the washi tape and stamped. This matte was then adhered to the black matte with Fast Fuse and then adhered to the card front using Dimensionals.

I fussy cut the flower and then used Dimensionals to attach it to the card front. I used liquid adhesive to adhere the leaves just under the edge of the flower to complete the card.

Linda Vich Creates: Brayered Glue Technique For Mass Producing Cards With Detailed Die Cuts.

I hope you have enjoyed reading about my Brayered Glue Technique! If you use this technique, please let me know how it works for you!


Friday, July 8, 2016

Swirly Bird Wreath

Linda Vich Creates: Swirly Bird Wreath. Swirly Bird wreath card in neutrals, gold, and In Colors.
Have you been playing with the new In Colors? I can't get enough of them! I really like the way that they play so nicely with our other Stampin' Up colors.

Today's card started with neutrals–Basic Black and Very Vanilla–and touches of gold.

I cut a standard card base from Very Vanilla and topped it with a matte of Basic Black on the left side. Using the grunge stamp from the Swirly Birds stamp set, I stamped in Versamark and heat embossed with Gold Stampin' Emboss Powder. I added one more grunge stamp from the Touches of Texture stamp set and heat embossed it as well. To carry the gold theme a little farther, I added a thin strip of Gold Foil Paper down the right side of the Basic Black matte.

Using the Swirly Scribbles Thinlits, I die cut the largest swirly circle from Very Vanilla and adhered it to the card front using liquid adhesive. I then stamped three of the smallest swirls from the Swirly Birds stamp set with Sweet Sugarplum on Very Vanilla. I stamped two of the larger swirls in Mint Macaron and also two leaves in Emerald Envy. The bird was stamped in Rose Red. These were all die cut and then adhered to the card front using Dimensionals.

For the inside of the card, three of the larger swirls were stamped in Sweet Sugarplum and die cut. Two of the smaller leaves were stamped with Emerald Envy inside the card and the swirls adhered over them using Glue Dots.

Linda Vich Creates: Swirly Bird Wreath. Swirly Bird wreath card in neutrals, gold, and In Colors.

Linda Vich Creates: Swirly Bird Wreath. Swirly Bird wreath card in neutrals, gold, and In Colors.

I love how well the colors all worked together to create this simple yet effective card! Feel free to save this color combo if you would like to use it.

Linda Vich Creates: Swirly Bird Wreath. Swirly Bird wreath card in neutrals, gold, and In Colors.