Saturday, November 26, 2016
The Last 24 Hours
Posted by Linda Vich at 11:48 AM 1 comments
Labels: bell punch, magnetic platform, playful palette dsp, snow flurry punch bundle
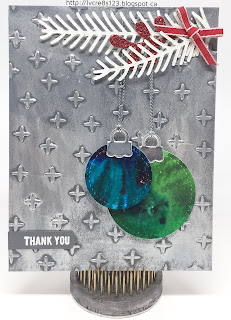
ColorBurst and Stitched Shapes Thank You
I started by cutting a standard card base from Thick Whisper White as well as a matte, to completely cover the card front, from Basic Gray.
Using the Sparkle Embossing Folder, I dry embossed the Basic Gray matte and then used my fingers to stroke on Silver Inka Gold. I was not overly particular about they way it went on because I wanted a kind of rustic finish to the matte. After the Inka Gold had been applied, I used a paper towel to buff it to bring out the shine. The matte was then adhered to the card front using Fast Fuse.
Next, I used my Ken Oliver Color Bursts on Watercolor paper. I tapped the colors that I wanted to use out on my paper and then I used a new to me product called Ink Potion #9 by Tsukineko to spray the ink powders. This spray is supposed to be good for blending inks and paint but also to help combat the warping of paper caused by spraying with water. It did seem to help quite a bit with keeping the paper flat. I continued spraying and adding more of the Color Bursts until I was satisfied with the color blending and then I allowed them to dry. I created two different color combos using Turquoise, Ultramarine Blue and Indigo for the blues and Lime Green, Terre Verte, and Pthalo Green for the greens.
Once these were completely dry, I used two sizes of Stitched Shapes Framelits to cut out circles. I then used the Delicate Ornaments Thinlits (which were in the first 24 Hour Sale for Online Extravaganza) to cut ornament toppers from Silver Foil. I used liquid adhesive to attach the toppers to the two stitched shapes to form Christmas ornaments.
I threaded a length of the now retired silver cording through each ornament topper. The ornaments were adhered to the card front using Dimensionals and the cording adhered using Glue Dots.
Sprigs of pine were die cut from Dazzling Diamonds Glimmer paper as well as little berries from Real Red Glimmer paper using the Pretty Pines Thinlits. These were adhered at the top of the card using more Glue Dots. A bow from the now retired 1/8" Real Red Ribbon was adhered on top.
The sentiment from the Thoughtful Banners stamp set was stamped on Basic Gray using Versamark and then heat embossed using White Stampin' Emboss Powder. It was punched with the Classic Label Punch and then adhered to the card front to complete this simple but cheery seasonal thank you card!
Posted by Linda Vich at 11:48 AM 1 comments
Labels: color bursts, delicate ornaments thinlits dies, inka gold, pretty pines thinlits, sparkle embossing folder, stitched shapes framelits, thoughtful banners
Wednesday, November 23, 2016
My Favorites From Online Extravaganza
Did you miss out on the 24 Hour Sale? Not to worry! There are plenty of products available to purchase for outstanding sale prices! I have shared with you some of the projects I made with products that are now on sale. Click on a product to be taken directly to my store!
40% Off
30% Off
Bloomin' Heart Thinlits

Solid Gold Tips For Using The Bloomin' Heart Thinlits Die

Bloomin' Masculine Valentine

The Sky Really Is The Limit!
Christmas Stockings Thinlits

Christmas Crafting in Unseasonable November Heat
Home Sweet Home Thinlits

First Play With Home Sweet Home
Pine Bough Embossing Folder

Pretty Pine Bough
Rose Garden Thinlits

Painted Rose For Global Design Project


I Never Promised You A Rose Garden, Or Did I?
20% Off
10% Off
Festive Flower Builder Punch

Rustic Poinsettias


Color Burst Christmas and Wonderful Wonderland
Be sure to take advantage of this wonderful sale–Shop Online NOW!
Monday, November 21, 2016
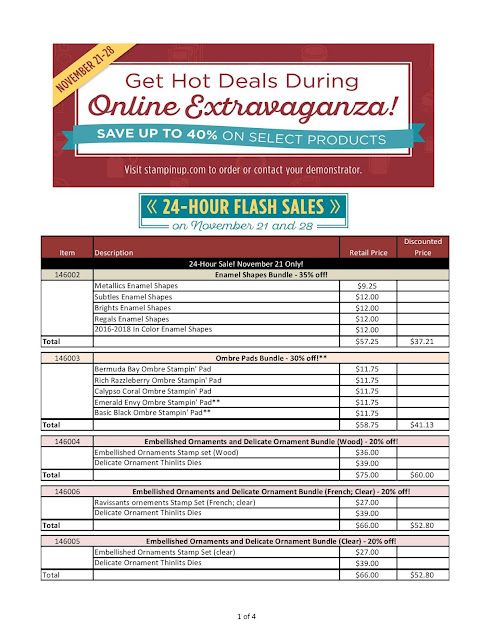
Online Extravaganza Continues–First 24 Hour Sale
You won't want to miss these products in the first 24 hour sale! These are available until 12:50 PM November 21 or while supplies last. Don't miss out–place your order NOW!
Look what you could make with some of these items!
With the Gift Bag Punch Board, you can make projects like this Glitzy Gift Bag.
Posted by Linda Vich at 9:58 AM 0 comments
Labels: embellished ornaments, gift bag punch board, gift box punch board, online extravaganza
Sunday, November 20, 2016
Online Extravaganza!
- 12:01AM to 11:50 PM on November 21.
- 12:01AM to 11:50 PM on November 28.
Posted by Linda Vich at 7:35 PM 0 comments
Labels: online extravaganza
Friday, November 18, 2016
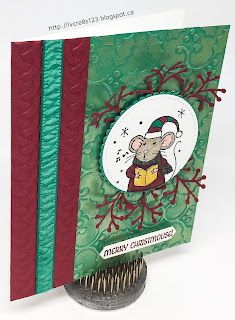
Merry Mice
For those of you unfamiliar with Viva Decor's Inka Gold, it is a fast drying metal gloss paint that contains natural Bees Was. You can apply it to a number of surfaces like wood, cardboard, unglazed pottery, metal and paper. It can be applied with a sponge or even your finger; buffing it will bring out its shine.
Before potentially messing up my card, I tested the Inka Gold by trying it on various colors of card stock to see what would work best. I embossed scrap pieces in a variety of colors and found that the Emerald Envy card stock gave me the look I wanted–a kind of patina.
I cut a standard card base from Thick Whisper White and a matte to fit the card front from Emerald Envy. After dry embossing the matte with the Holly Embossing Folder, I rubbed the Inka Gold over the embossing and then polished it with a paper towel. The embossed matte was then adhered to the card front with Fast Fuse.
Next, a strip of Cherry Cobbler was embossed with the Cable Knit Folder and adhered as a border on the left of the card front. A strip of the Emerald Envy Ruched Ribbon was also added.
Basic Black Archival ink was used to stamp one of the mice from the Merry Mice stamp set onto Thick Whisper White. It was colored using Stampin' Write Markers and then die cut using one of the Stitched Shape Framelits. It was adhered to an Emerald Envy matte die cut using a scalloped circle from the Layering Circle Framelits. The mouse was adhered to the card front using Dimensionals.
Cherry Cobbler berries were die cut using a die from the Pretty Pines Thinlits and adhered around the mouse using Glue Dots. The sentiment was stamped with Cherry Cobbler onto Thick Whisper White and then die cut using the Classic Label Punch. It was adhered to the card front using Foam Adhesive Strips.
I think it is fun to experiment with all kinds of media because you never know what you can create until you try it!
Posted by Linda Vich at 8:58 PM 0 comments
Labels: cable knit embossing folder, holly embossing folder, layering circles framelits, merry mice, pretty pines thinlits, stitched shapes framelits
Thursday, November 17, 2016
Stitched World of Thanks
Because this was to be a thank you card, I had already selected my stamp–A World of Thanks–and I decided that my color scheme would focus on Island Indigo and copper.
To be different, I decided not to use the entire background stamp. I stamped on a square of Island Indigo using Versamark and then heat embossed using the Copper Stampin' Emboss Powder. I then used a circle die from the new Stitched Shape Framelits to die cut the stamp. I also die cut a scalloped matte from Copper Foil using the Layering Circle Framelits. These were adhered together using liquid adhesive.
After cutting a card base for a 5.5 x 5.5" from Island Indigo, I used the Softly Falling Embossing Folder to add some texture to the card front.
I adhered the sentiment piece to the card front using Dimensionals and then die cut two of the Paisley Framelits from Copper Foil and adhered them to frame the sentiment. These were adhered using Connie Stewart's tip for Adhering Detailed Die Cuts.
For the inside of the card, I used Island Indigo ink to stamp a flower and leaves with the Paisleys & Posies stamp set on Whisper White.
What have you created with the Paisleys & Posies set? If you haven't yet bought it, contact me today to order your own!
Posted by Linda Vich at 10:18 AM 0 comments
Labels: layering circles framelits, paisley framelits dies, paisleys & posies, softly falling embossing folder, stitched shapes framelits, world of thanks
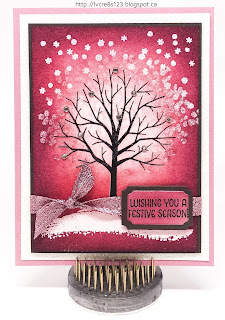
Sheltering Tree and a Joyful Wreath
The first card I designed was actually made last, just so we could all keep our hands and work stations clean so as not to contaminate the second card!
The emboss resist card was CASEd from Lisa Brown.
To create this card, a standard card base was cut from Sweet Sugarplum card stock. Two mattes were cut, one from Dazzling Diamonds Glimmer paper and one from Early Espresso. A piece of Watercolor paper was also cut.
The MISTI was used to stamp the tree, from the Sheltering Tree stamp set, three times with Early Espresso on the Watercolor paper and then it was heat set.
The paper was placed back into the Misti and the Embossing Buddy was used. The stamp was cleaned and then the tree stamp was re-inked using Versamark. The image was then heat embossed using Clear Stampin' Emboss Powder.
The Embossing Buddy was used again before stamping both the snowdrift and snowflake stamps using Versamark. The images were heat embossed using White Stampin' Emboss Powder.
Once again, the Embossing Buddy was used and then the leaf canopy stamp was used with Versamark. It was then heat embossed with the now retired Iridescent Stampin' Emboss Powder. The purpose of this stamp step was to create ice crystals in the tree.
It was very important to use the Embossing Buddy before inking each time because with using so many embossing powders, it would be very easy to end up with a "blob" on your paper!
The next step was to sponge color onto the image. A sponge was used first with Sweet Sugarplum to cover the entire paper with ink. Next, Rose Red was sponged everywhere except within the branches themselves. Lastly, Rich Razzleberry was sponged on the very edges and deep into the corners. The result of all this inking was a wonderful glowing image that softened from light to dark.
The completed image was adhered to the Early Espresso matte and then some Sweet Sugarplum Glitter Ribbon knotted around it. This was then adhered to the Dazzling Diamonds matte using Dimensionals. Finally, the whole thing was adhered to the Sweet Sugarplum card front.
The sentiment, from the Merry Mice stamp set, was stamped on Sweet Sugarplum and then die cut with a die from the Tags & Labels Framelits. Early Espresso was also die cut to act as a matte. The sentiment was inked with Rose Red and Rich Razzleberry and then adhered to the Early Espresso matte. The tag was adhered over the ribbon using Dimensionals.
To complete the card, rhinestones were added to the branches of the tree.
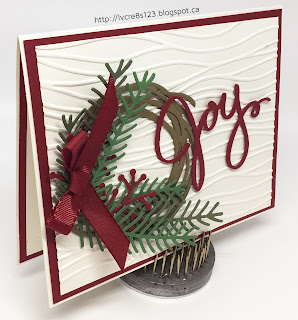
The second card only involved a little bit of stamping but it used a lot of texture from both die cuts and dry embossing. It was CASEd from Mary Fish.
I think that this card is exceptionally pretty because of all the texture and the wonderful color scheme. Feel free to steal this color scheme if you'd like to use it!
I hope you've enjoyed viewing these card projects! Drop me a note below to let me know what you think!
Posted by Linda Vich at 12:05 AM 0 comments
Labels: emboss resist, misti, pretty pines thinlits, seaside embossing folder, sheltering tree, swirly scribbles thinlits, wonderful wreath thinlits dies
Tuesday, November 15, 2016
Beautiful Butterfly Birthday
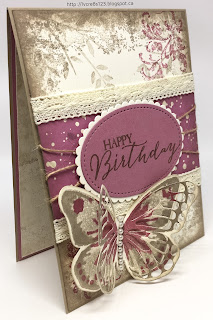
I started by cutting a 4.25 x 5.5" vertical card base from Crumb Cake. I also cut a Very Vanilla matte on which to stamp.
A stamp from the Number of Years stamp set was used to stamp a random leafy pattern all over the card stock using Sahara Sand. I then used an edge stamp from one of my all time favorite sets, Timeless Textures. I stamped this all around the edges of the card stock, again using Sahara Sand.
Choosing another stamp from the same set, I switched to Sweet Sugarplum and stamped in the top right and bottom left corners.
I cut a piece of the Playful Palette DSP and adhered it to the centre of the matte and then added some lace trim (it's a retired one from a Stampin' Up kit but it was unmarked so not sure which one) to the top and bottom of the DSP. Linen Thread was wrapped around the centre of the DSP and adhered to the back with Fast Fuse.
The sentiment, from the Butterfly Basics stamp set, was stamped with Crumb Cake on Sweet Sugarplum card stock and then die cut using an oval die from the Stitched Shapes Framelits. A scalloped oval from the Layering Ovals Framelits was die cut from Very Vanilla and adhered to the stamped oval. The finished piece was adhered over the linen thread using Dimensionals.
Next, I used my MISTI to stamp two butterflies using the Watercolor Wings stamp set. I used Sahara Sand and Sweet Sugarplum and stamped two of the same butterflies and then die cut one using the Bold Butterfly Framelits and one using the Butterflies Thinlits. The two were adhered together and then adhered to the card front using Glue Dots. A strip of pearls was added to the body.
For inside the card, I stamped a Very Vanilla matte using the same two stamps from Timeless Textures but stamped each in Sahara Sand after first stamping off. I also stamped the smaller butterfly, from the Butterfly Basics stamp set, two times using Sweet Sugarplum. One was die cut using the Bold Butterfly Framelits, and one using the Butterflies Thinlits. This was adhered near the top of the matte (not the best place as I discovered!) to complete the card.
I also decided to stamp the envelope and used my Envelopes Liners Framelits to line the envelope with matching paper.
All in all I think my mom had a happy day!
Posted by Linda Vich at 4:40 PM 2 comments
Labels: bold butterfly framelits, butterflies thinlits, butterfly basics, layering ovals, number of years, stitched shapes framelits, timeless textures, watercolor wings


