Thursday, October 12, 2017

Peace, Joy, and Love

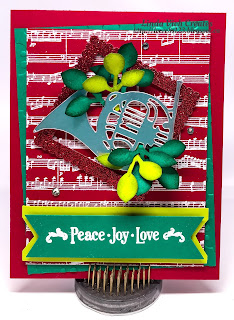
Linda Vich Creates: Peace, Joy, and Love. A colorful and festive card that uses the Musical Instruments Framelits and the Sheet Music stamp set.
When I created the card in my Rustic Musical Season blog post, I had actually planned to create two cards that day, using some of the same stamps and framelits. However, time got away from me and I didn't get the second card finished until now!

I started by using my MISTI to stamp the Sheet Music background stamp with Whisper White onto Real Red card stock. I heat embossed it with White Stampin' Emboss Powder.

Cutting a slightly larger matte from Emerald Envy, I dry embossed it using the Holly Embossing Folder. These were stacked and adhered, haphazardly, onto a Real Red 4.75 x 6" card front.

I used the Musical Instruments Framelits to die cut the French horn from Silver Foil as well as a few more horns from Whisper White. I stacked and adhered the horns together. I used a silver Sharpie to edge the horn.

On Red Glimmer paper I used my #9 scalloped square and #6 plain square from the Layering Squares Framelits to die cut a frame. I adhered the frame at an angle on the card front using Mini Dimensionals. The horn was adhered on top of the frame, again using the Mini Dimensionals.

Using Emerald Envy and Lemon Lime Twist card stock, I punched leaves and then sponged them with either Emerald Envy or Pear Pizzazz. I also shaped them a little with a bone folder. These were adhered around the horn using liquid adhesive.

The sentiment was stamped with Whisper White on Emerald Envy and then heat embossed using White Stampin' Emboss Powder. The Triple Banner Punch was used to flag the ends. A strip of Lemon Lime Twist was used to matte the sentiment and was hand trimmed after adhering it to the sentiment and then adhered to the card front with Dimensionals. A few rhinestones were added for a touch of bling.

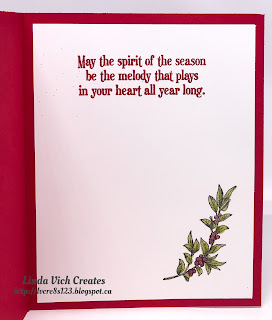
On the Whisper White matte inside the card, the sentiment was stamped with Real Red and heat embossed using the now retired Real Red Glitter Embossing Powder. The leaves were stamped with Memento and then colored using the new Stampin' Blends. Wink of Stella added some glitz to the leaves and berries to complete the card.

Linda Vich Creates: Peace, Joy, and Love. A colorful and festive card that uses the Musical Instruments Framelits and the Sheet Music stamp set.

Linda Vich Creates: Peace, Joy, and Love. A colorful and festive card that uses the Musical Instruments Framelits and the Sheet Music stamp set.


Love how this card turned out! The colors of Real Red, Emerald Envy and Lemon Lime Twist are such a fun combination! Be sure to save the color combo below if you'd like to use it for your own projects!

Linda Vich Creates: Peace, Joy, and Love. A colorful and festive card that uses the Musical Instruments Framelits and the Sheet Music stamp set.


>

Saturday, October 7, 2017

Fall Leaves Birthday

Linda Vich Creates: Fall Leaves Birthday. Multicolored and copper leaves seem to pop right off the embossed Very Vanilla matte on this fall birthday card.
Since the Autumn leaves are so inspiring, I have another fall card for you today!

I started by die cutting three leaves from Watercolor Paper using the Seasonal Layers Thinlits. I also die cut three of the detailed leaves from Copper Foil.

Using sponges, I added Real Red, Pumpkin Pie and Crushed Curry to the leaves. Because I really wanted the colors to pop from beneath the copper die cuts, I used Versamark to heat emboss them with Clear Stampin' Emboss Powder 2X to make them really shiny. I then used liquid adhesive to attach the copper die cuts to the colored leaves.

I cut two mattes–one Copper Foil, one Very Vanilla–and used the Petal Burst Embossing Folder to emboss the Very Vanilla matte. Liquid adhesive was used to adhere the embossed matte to the copper one and then to a Dapper Denim card front.

The Banner Triple Punch was used to flag a strip of copper and another of Dapper Denim. The sentiment from the Sunshine Sayings stamp set was stamped on the copper foil using Jet Black Stazon ink. The strips were adhered to the card front with Fast Fuse and the leaves with Dimensionals.

A Watercolor matte for the inside of the card had the smallest leaf from the Colorful Seasons stamp set stamped in Versamark and then heat embossed using Copper Embossing Powder. Sponges were used to ink the edges using Crushed Curry, Pumpkin Pie and Real Red. The matte was adhered inside the card with Fast Fuse.

Linda Vich Creates: Fall Leaves Birthday. Multicolored and copper leaves seem to pop right off the embossed Very Vanilla matte on this fall birthday card.

Linda Vich Creates: Fall Leaves Birthday. Multicolored and copper leaves seem to pop right off the embossed Very Vanilla matte on this fall birthday card.

I am so pleased with how this card turned out! So many ways to use leaves on a card. What have you created with leaves? Leave me a comment below!


Thursday, October 5, 2017

Thankful Vintage Leaves

Linda Vich Creates: Thankful Vintage Leaves. A non-traditional Night of Navy color scheme used for this fall card that showcases Vintage Leaves and the Layered Leaves embossing folder.
In creating today's card, I had planned to use a new technique but unfortunately, the technique did not produce the results that I wanted so I will save that one for another day! Luckily, I still had the color scheme and rough card design so I set forth to create it.

I started by stamping three oak leaves and one poplar leaf, from the Vintage Leaves stamp set, on Thick Whisper White using Night of Navy. These were die cut using the coordinating framelits.

Next, I stamped the sentiment from the Painted Harvest stamp set on Gold Foil with Jet Black Stazon and then die cut it using the #3 oval from the Stitched Shapes Framelits.

After cutting a Night of Navy matte, I used the Layered Leaves Embossing Folder to dry emboss it. My plan was to adhere this matte to the Thick Whisper White card front but it didn't look right so I decided that a little bit of gold would help. Instead of using a large piece of Gold Foil when only a tiny edge of it would be seen, I decided to use a trick that I learned.

I cut a second matte from Thick Whisper White and then dragged my Versamark along the edges. I heat embossed the edges using Gold Stampin' Emboss Powder. Now, when I placed my embossed matte on top, my design looked better but it still needed something else. While I thought about it, I adhered the embossed matte to the one with the gold edges and then tied a length of the Night of Navy Crinkled Seam Binding Ribbon around both mattes.

The three oak leaves were adhered using Dimensionals and a little bit of liquid adhesive. The gold oval was adhered over the leaves with the poplar leaf adhered on top of that. It was then that I realized that I had forgot to add some flecks of gold with my Gold Wink of Stella! Too late now.

After finishing with my mattes and sentiments, I decided to stamp leaves around the edge of the card front. With the mattes then adhered with Dimensionals, the card design was perfect!

Linda Vich Creates: Thankful Vintage Leaves. A non-traditional Night of Navy color scheme used for this fall card that showcases Vintage Leaves and the Layered Leaves embossing folder.
The Whisper White card front stamped

I stamped three offset oak leaves on the inside of the card and called it done!

Linda Vich Creates: Thankful Vintage Leaves. A non-traditional Night of Navy color scheme used for this fall card that showcases Vintage Leaves and the Layered Leaves embossing folder.

Linda Vich Creates: Thankful Vintage Leaves. A non-traditional Night of Navy color scheme used for this fall card that showcases Vintage Leaves and the Layered Leaves embossing folder.

I'm thrilled with how this card turned out! Love the navy and gold together. And what's not to like about leaves?

Hope YOU like my card! Would love to hear from you in the comments below!