Valentine's Day this year marked the day 30 years ago when my husband Bob proposed to me! Such a special day that was! We celebrated by going for supper at Jonesy's Restaurant in Bird's Hill. This was the first time we had eaten at this restaurant and it definitely won't be our last! It is a very small restaurant, and did not have a fancy decor, but the food was wonderful and I highly recommend the place.
Today I have for you a collection of items that I created for my family for Valentine's Day this year.
First up is a simple tea light holder for my daughter who likes candles. I added no extra embellishments to this box so that the light of the candle could shine through all the tiny die cut holes.
I simply used the largest of the Window Box Dies to cut out two pieces of card stock and then used a smaller die with a heart pattern to cut openings in the small sides of the box. A larger die was used to cut the holes in the top of the box. Liquid adhesive was used to assemble the box.
Next, I created an enlarged Window Box by using a tutorial from
Kirsteen Gill. I wanted a larger box that could hold more treats and this worked perfectly!
To create the box, you need to do some fancy cutting with your Big Shot. In order to make the box larger, you need to shift the top cutting plate so that it doesn't extend all the way across the Window Box Thinlits die. It is not a hard technique but I did need to refer to the tutorial in order to make it work for me!
Once the pieces were cut out, the box was assembled like the original version and I used liquid adhesive to adhere the card stock. I cut panels for the box using the Sending Love DSP and also used the Love Notes Framelits to cut tiny envelopes, hearts, arrows, and the banner for the top.
Using the Sealed With Love stamp set, I stamped the tiny notes within the envelopes. I used the Bloomin' Love stamp set for the sentiment on the banner which I embellished with rhinestones. I also used one of the Lace Doilies on the lid of the box. These doilies are really nice because they are Whisper White on one side and Very Vanilla on the other!
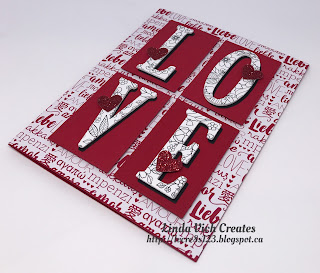
To create the card for my husband, I first die cut the four letters from the Sale-A-Bration Freebie, Inside The Lines DSP, using the Large Letters Framelits. I also cut three versions using Thick Whisper White and one from Basic Black for all four letters. These letters stacked and adhered using liquid adhesive, with the Basic Black layer being slightly offset to produce a shadow.
A 4.75 x 6" card base was cut from Real Red and then a sheet of the Sending Love DSP was cut and adhered to the front.
Next, I used one the squares from the Stitched Shapes Framelits to cut a rectangle on which to place each letter.
In order to cut a rectangle using a square die, the top cutting plate on the Big Shot must be placed so that the one edge of the die is not cut. The die is then moved, the platform rotated, and the cutting plate replaced so that the other side can be cut. To ensure that each of my rectangles was the same size, I cut one rectangle and then used the resulting "frame" as a template to place over each piece of card stock to be cut. The template ensured that the die could only be moved to the same place each time ensuring the same size of rectangle. For more information on this technique, check out the
video tutorial by Dawn Griffith.
 |
This shows the template on top with the square die
moved to create the second cut for the rectangle. |
 |
The top cutting plate is positioned so that the bottom
edge of the die does not cut through the card stock |
Each letter was adhered to its stitched rectangle using liquid adhesive. The rectangles were adhered to the card front using Dimensionals. Small hearts were punched from Red Glimmer paper and adhered to the letters using Glue Dots.
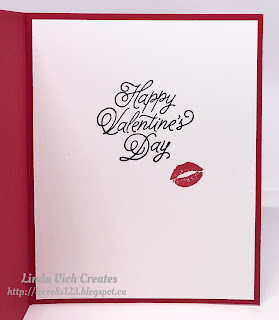
For inside the card, a white matte was stamped with a sentiment from the Sealed With Love stamp set using Basic Black and the lips were stamped with Real Red. The matte was adhered to complete the card.
Finally, I created a lidded box for my granddaughter using the Popcorn Box Thinlits. I referred to the tutorial by
Intatwyne Designs.
I created my box using Real Red card stock and adhered panels cut from the Sending Love DSP. I decorated each panel by adhering layered hearts cut from Red and Dazzling Diamonds Glimmer paper using the Sweet & Sassy Framelits.
I stamped the sentiment from the Sealed With Love stamp set using Real Red and then Versamark inks and heat embossed it using the Real Red Glitter Embossing Powder. This was die cut using a square from the Stitched Shapes Framelits and adhered to the lid of the box.
A length of ribbon was adhered at the back of the box with a glue dot and then tied in a bow to complete the box.
This completes my Valentine projects for 2017. I hope you enjoyed a lovely Valentine's Day!


