I was one of the lucky ones who ordered and received the mini egg cartons early into the Occasions Catalog. Today I got to use them and I'm so sorry I didn't buy more even though they are being retired!
Besides being just overly cute in their "mini-ness" they are so much fun to color using the Stampin' Spritzers!
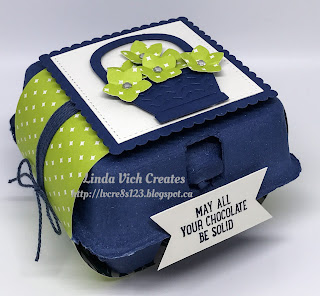
I started by filling a Stampin' Spritzer almost to the top with 70% alcohol and then added 40 drops of Night of Navy reinker (I wanted this color to be really dark rather than muted) and shook it up.
Placing an egg carton in my "spray booth" (an old shoebox) I proceeded to spray the outside of the box. I was surprised by how well it turned out! Spraying the outside of the egg carton took about 2/3 of the mixture.
I labelled the spritzer and then mixed up another one, this time using Sweet Sugarplum and using only 20 drops of reinker. After spraying, I mixed one more batch using Tempting Turquoise, again using 20 drops of reinker. This carton took pretty much the whole batch of color but since I couldn't seem to get all the color out of the Stampin' Spritzer, I labelled it and set it aside for another time.
The cartons dried quite quickly on their own while I cut up paper to embellish the boxes.
For the Night of Navy box I created a belly band using some of the new Eastern Elegance DSP. I also wound some Night of Navy Baker's Twine around the belly band, securing it with a little Fast Fuse Adhesive. I die cut a stitched square from some of the new Thick Very Vanilla using the Stitched Shapes Framelits and a scalloped square from Night of Navy using a die from the Layering Squares Framelits. These were adhered together using liquid adhesive.
The Basket Builder Framelits were used to cut the basket from Night of Navy and the flowers from the DSP. The basket was assembled using liquid adhesive and the flowers were shaped using a stylus from my Heartfelt Creations Deluxe Flower Shaping Kit.
The basket was adhered to the Very Vanilla square using Dimensionals and the flowers with Glue Dots. Rhinestones were added to the flower centres. The completed square was added to the belly band using Dimensionals. The sentiment was stamped on a strip of Thick Very Vanilla using Night of Navy and then the ends flagged using the Banner Triple Punch. It was adhered to the egg carton using Foam Adhesive Strips. I used Fringe Scissors on Night of Navy card stock to create my own fill for the egg carton.
For the Sweet Sugarplum egg carton, I started by stamping flowers on Watercolor paper using Basic Black Archival ink. After heat setting, I used my Watercolor Pencils and Clear Wink of Stella to color in the flowers, die cutting them using the Basket Builder Framelits.
The basket pieces were die cut from Tip Top Taupe and Early Espresso and assembled using liquid adhesive. The stitched square was die cut from the Succulent Garden DSP and the scalloped square from Mint Macaron. After adhering them with liquid adhesive, the basket was adhered with Dimensionals and the flowers with Glue Dots. Rhinestones were added to the centres.
Lace doily halves were added to the back of the scalloped square and then a length of the now retired Glitter Ribbon Combo was tied around the egg carton, anchoring the ribbon with a glue dot on top of the box. The squares were then adhered to the top of the box using Dimensionals. A strip of Sweet Sugarplum had its ends flagged and the sentiment was stamped with Tip Top Taupe. It was adhered to the top using Foam Adhesive Strips and rhinestones added. Fringe scissors and Mint Macaron was used for fill.


Finally, the Tempting Turquoise egg carton was created. It was done in the same way as the previous carton but Festive Birthday DSP and Tempting Turquoise was used for the squares, Melon Mambo and Pumpkin Pie for the basket, Pumpkin Pie, Melon Mambo, Tempting Turquoise, Crushed Curry and Emerald Envy for the eggs, Chocolate Chip for the bunny and Melon Mambo 3/8" Stitched Ribbon. The sentiment was stamped with Melon Mambo on Thick Whisper Whtie. Fill was created using Melon Mambo card stock and Fringe Scissors.
Here's a final look at all three projects, though it's hard to take a photo of all three together in my Foldio 2 setup!
I'm so pleased with how these all came together–I can't wait to give them to the recipients!


