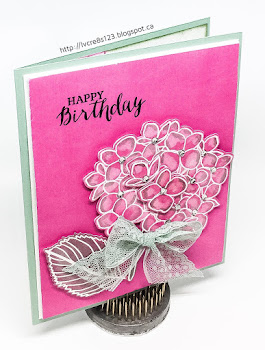
Not only did I use a new stamp and die but I chose to use a new technique–Distress Ink Lifting. Jennifer McGuire has a great video tutorial for this on her blog.
I chose to use the Mondo Hydrangea stamp set by Julie Ebersole and its matching die set, just like Jennifer used in her tutorial.
Because Jennifer said that this technique worked best on card stock, not watercolor paper, I chose a piece of the Thick Whisper White card stock. Using my MISTI, I stamped the hydrangea and leaf using Versamark Ink. On another piece of the paper, I stamped again and also stamped the two blossom images that could be die cut. The stamped images were heat embossed using White Stampin' Emboss Powder.
The next step was to take a distress ink, in my case Picked Raspberry–I wanted to create hydrangeas that were pink with a hint of green–and rub it entirely over the image. I did this for my first set of the stamped images. (For the second set of images, I knew I would be die cutting them so I concentrated on inking only the images and a thin halo around them. I did these images after totally completing the water part of the technique as I didn't want the ink to dry out.)
I love the vibrancy of this ink!
Immediately after inking the matte and images, I took a small paintbrush and dropped water into each section of the images, causing the ink to be lifted away, revealing a paler version of the ink. The ridges of the embossing work to corral the water in each section.
After completing this step, I took some Bundled Sage distress ink, smeared some on my craft mat and then took my wet paintbrush to it. I took this green and added it to the edges of the blossoms, the leaf, and the stem.
I repeated this entire process with the second set of images that I had stamped and then used my heat tool to dry them all thoroughly.
My main stamped panel was trimmed down and I stamped the sentiment from the Rose Wonder stamp set using Basic Black Archival Ink. The stamped matte was then mounted onto a piece of white, self-stick fun foam to help even out the surface. It was then mounted on a very thin matte of Thick Whisper White card stock and onto the front of a Mint Macaron card base.
The other stamped images were die cut and adhered onto the previously stamped image using Dimensionals.
This looked pretty enough but I knew how to pump it up a notch–Wink of Stella! The glimmer from that made it even more beautiful, especially against the Picked Raspberry background. The distress ink dried so well blended that it looked like it was card stock!
I added a bow made from the Minted Macaron 1" Dotted Lace Trim and some rhinestones to complete the card front.
For the inside of the card, I used Picked Raspberry to stamp portions of the hydrangea on a matte of the now retired Naturals White card stock. I inked the edges in both Picked Raspberry and Bundled Sage and adhered the matte with Fast Fuse to complete the card.
I'd love it if you'd take the time to leave me a comment below! See you next time.


