Basically, you score a piece of watercolor paper to look like planks, flip the sheet over and rub distress inks over it. You can add water to help the colors blend but that's it! I hadn't given my new mini distress inks a good work out yet so this was a good project for them!
I knew before starting that I would be using one of my panels to make a Valentine so for my first effort, I assembled a number of red inks as well as some of my neutrals. I used a strip of watercolor paper to swatch out my inks as a reference before beginning.
I wanted to use the rough side of the watercolor paper for my wood so I scored on the opposite side. I decided to use a score of every half inch.
I then started dragging my lightest red down the panel. I then alternated between my other reds, adding strips of color around the panel until I was totally satisfied. During the process, I also sprayed water a few times and blotted with a paper towel and then added more ink. I also added in some of my neutrals. In the end, I used all of these: Candied Apple, Barn Door, Fired Brick, Aged Mahogany, Hickory Smoke, Ground Espresso, and Black Soot.
This is what my first attempt looked like:
 |
| First attempt at wood tutorial |
My first try and I was hooked on this technique! I decided to try a few other color combinations while I had the inks at hand. You'll probably see these used in other projects sometime soon!
 |
| Second attempt with additional, smaller scale, scored panel |
 |
| Third attempt. I'm definitely hooked! |
 |
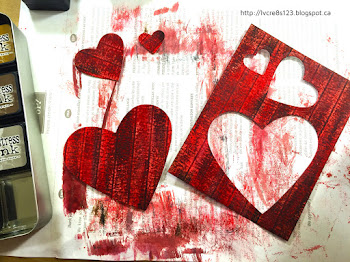
| Die cuts from panel. |
I cut a matte from Coastal Cabana and embossed it using the Happy Heart Embossing Folder. I inked the edges using Early Espresso.
On a piece of Thick Whisper White I stamped the sentiment, using my MISTI; I used Early Espresso and then Versamark, heat embossing it with Clear Stampin' Emboss Powder. To give the tag a little interest, I used the Curvy Corner Trio Punch on the corners. I then inked the edges using both Aged Mahogany and Candied Apple.
I adhered both the tag and the heart die cut to the embossed matte using Dimensionals. I tied a length of Thick Coastal Cabana Twine around the matte and then adhered it to a Early Espresso card base using Dimensionals.
For the inside, I sponged the edges of a Whisper White matte using Coastal Cabana and then adhered the two smaller hearts using Fast Fuse Adhesive and Glue Dots.


20 comments:
Wow! Such beautiful colors in your samples! Linda, this is an incredibly artsy-fun card! I like your take on the lines! The colors and textures are what really grab my attention! Hugs, de
Looks amazing Linda...
thanks so very much for sending me a link.
hugs,
Karen
Your card is a very artful one. Love it. Thank´s for playing with us. Hugs Tanja
Linda, I love this wonderfully shabby chic card. I adore the color combo too! Thanks for joining us this week at Global Design Project.
Thank you so much Donna!
Thanks for looking Karen!
Thanks Tanja!
Thanks Connie!
Saw the link on Karen's blog and had to come take a look! Gorgeous inkiness! Have pinned your take to my boards too, thanks for sharing Karen P
Linda, Amazing inkiness! The heart is absolutely gorgeous and I love the technique. Thanks for sharing and playing along with the Paper Craft Crew. ~Pam DT
Thanks Pam!
Wow, this really took a lot of time and technique, Linda, but the end result is just stunning. Thanks for joining us this week at the Paper Craft Crew. Crystal
Your shabby chic take on Connie's original project is amazing! I love how you created the faux woodgrain. Thanks for sharing how you made it. Thanks for playing at Global Design Project this week!
Thank you so much Crystal!
Linda - What a fun card! I love the colors you've used and how you've pulled the twine to the forefront of your design. Love it! Thank you so much for playing along with this week's Case the Designer (Connie Collins) Challenge at Global Design Project.
Thanks Brian!
This is so cool. Great Distress work! Thank you so much for participating with us at the Paper Craft Crew this week! We hope to see you for our next challenge!
Thank you so much Cindy!
This technique is stunning - and your card is fabulous! Thanks for joining us at the Paper Craft Crew! ~Deborah
Thank you so much Deborah!
Post a Comment