Friday, May 8, 2015

Shake It Off!

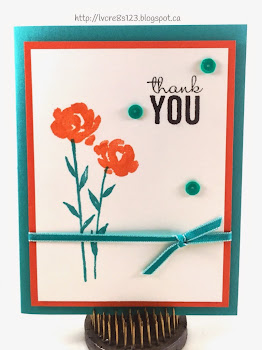
Linda Vich Creates: Shake It Off! A clean and simple card using the Painted Petals stamp set along with a striking color combo of Bermuda Bay, Tangerine Tango and Whisper White. Also learn how to align your layers perfectly every time!Don't just sit there–shake it off!

You need to run–don't walk–to the computer and place an order with me right now before it's too late!

My all time favorite products are retiring and you need to act before they are gone! Painted Petals stamp set and Painted Blooms Designer Series Paper are leaving us as of June 2, or until stock runs out!

Not only are the Painted Blooms Designer Papers lovely, but they coordinate so well with the Painted Petals stamp set!

You can utilize the designer paper on your card and then echo the paper by stamping on a few petals of your own! In addition, the sentiments from the Painted Petals set are so lovely–you will find yourself turning to them again and again!

You will remember these projects where I used either the paper or coordinating stamp set:


If you need more inspiration, you can check out this Pinterest search for Painted Petals and this search for Painted Blooms.

Today's card uses the Painted Petals stamp set to create a card with a lovely color combo of Bermuda Bay, Tangerine Tango and Whisper White.

Because I was making several of these cards, my MISTI came in very handy!

I first lined up and stamped the stems of the two flowers using Bermuda Bay on a 3.5 x 4.75" Whisper White matte and repeated this for all the cards.

Next, I stamped the flowers using Tangerine Tango. These I stamped 2X because at first stamping they looked too pale next to the Bermuda Bay stems. The double stamping was easily done using the MISTI.

Lastly, I stamped one of the sentiments from the set using Jet Black Memento ink.

After all the white mattes had been stamped, it was a simple matter to adhere the stamped mattes to 3.75 x 5" mattes of Tangerine Tango.

I don't know about you but I can get perfectly lined up mattes until it is time to glue them down and then all hell breaks loose! To ensure that my mattes are straight when adhering them, I now use a tip that I learned from one of my stamping ladies.

I use the black positioner tool from my Stamp-a-ma-jig to help me keep the correct position for my matte until I glue it down. To do this, I place my matte the way I want it to be, eye-balling that I have the matte centered. I place the black part into place at the top left of my matte and then carefully remove it to add my desired adhesive. Then I carefully hold the black part and line up my matte with the tool and press it into place. Ta-da! Perfectly positioned mattes every time!

At this point, I tied a length of Bermuda Bay Taffeta Ribbon around the mattes, securing the ribbon with a glue dot where the knot was tied, and then used Dimensionals to adhere the mattes to the Bermuda Bay card base.

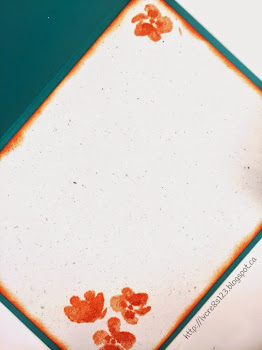
For the inside matte, I used Naturals White card stock. I added a few blooms in Tangerine Tango and then inked the edges, using a sponge dauber.

Linda Vich Creates: Shake It Off! A clean and simple card using the Painted Petals stamp set along with a striking color combo of Bermuda Bay, Tangerine Tango and Whisper White. Also learn how to align your layers perfectly every time!

A few sequins were added for a finishing touch!

Linda Vich Creates: Shake It Off! A clean and simple card using the Painted Petals stamp set along with a striking color combo of Bermuda Bay, Tangerine Tango and Whisper White. Also learn how to align your layers perfectly every time!

This was a super easy card to create but I think its simplicity and color combo is what makes it so effective! What do you think? Leave me a comment below and be sure to purchase your Painted Blooms Designer Paper and your Painted Petals stamp set before they disappear! While you're at the store, be sure to pick up a Stamp-a-ma-jig as well, so you can keep your layers straight!

Built for Free Using: My Stampin Blog

Tuesday, May 5, 2015

Corner Garden Blues

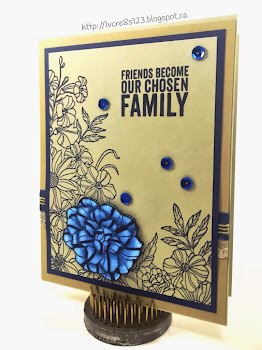
Linda Vich Creates: Corner Garden Blues. Clean, crisp lines of the Corner Garden stamp contrast well with Sahara Sand. One flower colored with Blendabilities is popped up with Dimensionals to give the card a 3D quality; sequins add some extra zing.Today was supposed to be a play day with my crafting friend, Charlene, but in the end she couldn't make it. Though I was sad she couldn't come, I was able to clean up my craft room a bit and then play with a card that had been rolling around in my head for awhile.

I was initially inspired by a card I saw on Pinterest but I have lost track of it :( It had flowers popped up over a neutral background. One flower was a brighter or darker color than the rest so it stood out.

I knew that I would be using my Corner Garden stamp but because it was a wood-mount, and I wanted to use the MISTI, I had to stop and convert to clear-mount first.

I traced the block of the stamp onto some of the retiring Clear-Mount Cling Foam and cut off the top piece to reveal the clear-mount foam below.

I inked up the Corner Garden stamp with Jet Black Stazon and stamped it onto the clear-mount foam.

Next, I carefully peeled off only the rubber stamp from the block and after revealing the sticky side of the Clear-Mount Foam, I positioned the stamp onto it.

Next, I let my new tool, a Hot Knife by Walnut Hollow, heat up. I then used it to cut carefully around the stamp, excising the excess foam around the stamp. Because the knife was VERY hot, this was like cutting butter with a hot (ordinary) knife! I highly recommend this tool - easy to use and makes the job so much easier!

My stamp was now ready for MISTI!

I carefully placed some "bumpers" into my MISTI (check out the video by Maureen Wong to find out what "bumpers" are and how to use them with the MISTI) to allow me to hang the stamp off both the left edge and the bottom of the matte I wished to stamp.

I inked up the stamp and did a test stamp on scrap paper to be sure it was how I wanted it positioned. I then proceeded to stamp with Night of Navy on a Sahara Sand matte. I re-stamped two more times to be sure it had good, clean lines. MISTI makes it so easy to get a good crisp print from a background–or any–stamp!

I also stamped the image onto a piece of Whisper White. I used by Night of Navy Blendabilities to color one flower and fussy cut it.

I stamped a sentiment from Painted Petals onto the top right of the matte and then adhered it to a Night of Navy matte using Fuse Fast.

I adhered a strip of Sahara Sand Lace, Night of Navy seam binding and some Linen Thread across a larger Crumb Cake matte and then adhered the stamped matte into place on top of it. The fussy cut flower was popped up using Dimensionals.

The Crumb Cake matte was then adhered to a Sahara Sand card base. To complete the card, a few sequins were added to provide a bit more color and sparkle.

Linda Vich Creates: Corner Garden Blues. Clean, crisp lines of the Corner Garden stamp contrast well with Sahara Sand. One flower colored with Blendabilities is popped up with Dimensionals to give the card a 3D quality; sequins add some extra zing.

Linda Vich Creates: Corner Garden Blues. Clean, crisp lines of the Corner Garden stamp contrast well with Sahara Sand. One flower colored with Blendabilities is popped up with Dimensionals to give the card a 3D quality; sequins add some extra zing.

Have you used the Corner Garden stamp in a unique way? Leave me a comment below!

Built for Free Using: My Stampin Blog

Saturday, May 2, 2015

Revving Up For Retirement

I had a slight mishap on Thursday that kept me home from work but luckily I was feeling much better on Friday so that I could continue as planned with my stamping group. To find out what happened, check out my Facebook post here.

My stamping ladies were busy last night, creating cards using products that are on the retiring list. It was good to work with these favorite products before they disappear!

Linda Vich Creates: Revving Up For RetirementLinda Vich Creates: Revving Up For Retirement

Our first card was a departure from my usual colors and style but I wanted to create something that had a vintage feel to it.

Linda Vich Creates: Revving Up For Retirement. Vintage look is achieved with the use of neutral inks and embellishments in this Petal Potpourri card.


To begin with, we distressed a Whisper White matte and a smaller piece of the same using a sponge and the retiring Baked Brown Sugar ink.

Next, MISTI came into play when we used the retiring Dictionary background stamp with Soft Suede ink. It was stamped off once and then gave a nice hint of text to the distressed matte. To further distress it, the Distressing tool was used and then the edges were inked with Soft Suede.

We used the retiring On Film Framelits to cut a frame from Watercolor paper and then sponged it with Early Espresso. We used the frame to determine where to stamp the two flowers from the Petal Potpourri stamp set.

Two flowers were stamped on the matte using Baked Brown Sugar and one was stamped on the smaller distressed piece, using Soft Suede. The centre of that flower was colored with Hello Honey using a sponge dauber and the flower was punched with the Flower Medallion punch. Its edges were then inked with Soft Suede.

A strip of Sahara Sand Lace and the previously retired Soft Suede Taffeta ribbon were adhered to the bottom of the matte and then it was adhered to a Soft Suede card base using Dimensionals.
The frame was adhered to the matte with glue dots and then the punched flower was adhered inside but overlapping the frame using doubled-up Dimensionals.

The Hello You thinlits were used to die cut the word "you" and the banner punch was used to cut two banners from Dazzling Diamonds Glimmer paper. These were each sponged with Baked Brown Sugar and the banners were edged with Soft Suede.

"You" was adhered with glue to the top of the card. The banners were angled and adhered to the bottom right of the frame. A dragonfly bead was painted with Tim Holtz Tarnished Brass Distress Paint and then adhered on top of the banners using Crystal Effects.

The sentiment, Amaze Me, from the Crazy About You stamp set, was stamped with Early Espresso at the bottom of the card base.

To complete the card, an inside matte was created from a piece of the retiring Naturals White card stock. A flower was stamped in the bottom right corner using Soft Suede and then the edges were inked with Baked Brown Sugar.

Linda Vich Creates: Revving Up For Retirement. Vintage look is achieved with the use of neutral inks and embellishments in this Petal Potpourri card.

Linda Vich Creates: Revving Up For Retirement. Vintage look is achieved with the use of neutral inks and embellishments in this Petal Potpourri card.


Built for Free Using: My Stampin Blog


Inspiration for a Mother's Day card came from a creation by the Stampin' Stud.

We used a card base of Calypso Coral. A matte of the retiring Strawberry Slush was embossed with the Spring Flowers Embossing Folder and the edges inked with Calypso Coral. It was adhered to the card base with Dimensionals.

Linda Vich Creates: Revving Up For Retirement. A Mother's Day card is embellished with sponged vellum flowers and adorned with Gold Glimmer leaves.

A strip of Irresistably Yours was sponged with gold ink, heat set, and then the white leaves brought back by rubbing with paper towel.

The 1 3/4" and the 1 1/4" Scallop Circle Punches were used to punch circles from Gold Glimmer and Calypso Coral papers. The smaller circle's edges were inked with Strawberry Slush. The circles were then layered onto a 1/4 of a Tea Doily and adhered under the strip of leafy resist paper.

A square of vellum was sponged with a combination of Hello Honey, Pumpkin Pie, Strawberry Slush, and Blackberry Bliss. The Fun Flower punch was used twice, the Pansy Punch once and the Petite Petal Punch was used once.

The punched flowers were crumpled gently to give them some dimension and then a piercing tool was used to poke a hole in the centre of each. They were then attached together with a Candy Base Brad. A rhinestone which had been colored with a R24 Copic marker was added to the brad.

Glue dots were used to secure a length of Gold Baker's Twine in a pleasing circular arrangement and then the completed flower was adhered with Dimensionals on the left side of the leafy strip. The retired Secret Garden Framelits were used to die cut some leaves from Gold Glimmer paper and they were tucked under the flower and adhered with glue.

For the inside of the card, a matte of the retiring Naturals Ivory had its edges inked with gold and then the flowers and sentiment from the Mother's Love stamp set were stamped using Strawberry Slush and Crisp Cantaloupe, respectively.

Linda Vich Creates: Revving Up For Retirement. A Mother's Day card is embellished with sponged vellum flowers and adorned with Gold Glimmer leaves.

Linda Vich Creates: Revving Up For Retirement. A Mother's Day card is embellished with sponged vellum flowers and adorned with Gold Glimmer leaves.


Built for Free Using: My Stampin Blog


Lots of inky hands at the end of the night but some lovely cards were produced and a good time was had by all! Though it will be sad to see the products we used retire, the space they leave behind will be filled with more great products with which to create!

What products will you be sad to see retire? Leave me a comment below!