Wednesday, June 29, 2016

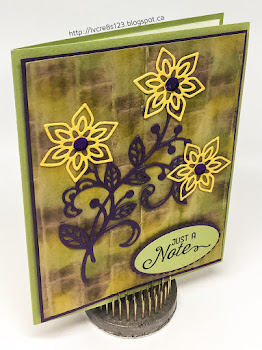
Flourishing Thinlits Note

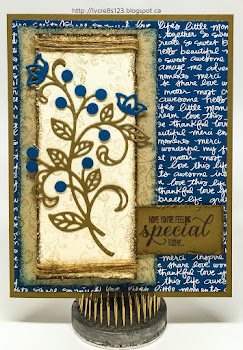
Linda Vich Creates: Flourishing Thinlits Note. Inked embossed brick background showcases the Flourishing Thinlits dies.
What starts out as one type of project sometimes ends up as another. This is what happened today.

Today I had been looking forward to trying Lyssa Griffin Zwolanek's Bamboo Tutorial. Unfortunately, my attempt at creating a bamboo look was not very successful (not any reflection on Lyssa's excellent tutorial). However, I did still like the background effect so decided to use it for a card anyway!

I started by embossing a Crumb Cake matte with the Brick Wall embossing folder. Then, as per the tutorial, I used stamping sponges to swipe on first Early Espresso ink (over the cracks between the bricks), Pear Pizzazz (below the Early Espresso ink) and finally Crushed Curry (above the Early Espresso).

Next, I used my Kuretake Fude Water Brush Pen, Medium to paint vertical strokes over the entire piece to blend the colors. Though I did like the blend of colors, I didn't have Lyssa's touch in creating a bamboo look!

In matching colors to the inked matte, I chose Pear Pizzazz and because the Early Espresso kind of looked purple to me, I tried and liked Elegant Eggplant as a contrasting color. I added a thin matte in Elegant Eggplant and then adhered the panel to a Pear Pizzazz card base using Dimensionals.

Using the Flourish Thinlits, I die cut the large flourish from Elegant Eggplant and three flowers from Crushed Curry. After snipping off the two blossoms on the flourish, I adhered it to the card front using Multipurpose Liquid Glue. The flowers were adhered on top and purple sequins were added to the flower centres.

The sentiment was stamped with Elegant Eggplant on Pear Pizzazz card stock and die cut using the Layering Ovals Framelits. An Elegant Eggplant matte was also cut. The sentiment was adhered with Dimensionals to the card.

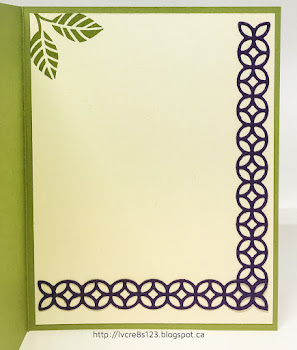
A Very Vanilla matte was cut for inside the card. Pear Pizzazz leaves were stamped in the upper corner and then another one of the Thinlits were used to cut trim from Elegant Eggplant to add to the bottom and side.

Linda Vich Creates: Flourishing Thinlits Note. Inked embossed brick background showcases the Flourishing Thinlits dies.

Linda Vich Creates: Flourishing Thinlits Note. Inked embossed brick background showcases the Flourishing Thinlits dies.


Monday, June 27, 2016

Cups & Kettles and Summer Flip Flops!

Linda Vich Creates: June Stamping Wind Up. Detailed Corner Fold card with the Cupas & Kettles Framelits.
Why does time speed by so quickly for things that I enjoy yet seems to drag its feet for things I dislike?

Friday night was the June Wind Up for our stamping group. It seems like only yesterday it was September and we were just starting our 2015-2016 stamping season!

We had a lovely gathering of 13 ladies and we had a time to socialize and eat goodies before our stamping began for the night. I was surprised with a lovely gift card to a local spa, courtesy of my lovely stampers!


In addition to this, were finally able to give Yvonne the Door Prize that she had won at the Catalog Launch Party back in May. She had left early so never got to receive it!


Because I had long ago prepared for this class, we utilized the now retired A Nice Cuppa stamp set and coordinating Framelits to make Decorative Corner Fold cards. I have hopes that Stampin' Up will resurrect this set for the Christmas Occasions catalog as a number of demonstrators have been actively petitioning Stampin' Up to bring the set back.

To make this card, we used a 8.5 x 5.5" piece of Thick Whisper White card stock, scored at 2 1/8", 4 1/4", and 63/8”. It was folded on the score lines in preparation for assembly.

Card stock mattes, 5.25x 1 7/8” in either Melon Mambo or Bermuda Bay were used to matte 5 x 1 5/8” strips of the now retired Have A Cuppa DSP and one Whisper White strip of the same size. These were then adhered to the card panels, with the white matte on one of the ends. The white matte would serve as the place to

A 1 x5.5” Whisper White strip was scored vertically in half and then folded. It was adhered, using liquid glue, to the two ends of the matted card panel, with the fold to the outside. This formed a complete box.
The cup was die cut from either a Melon Mambo or Bermuda Bay "solid" pattern, from the same DSP stack, using the Cups & Kettles Framelits. A strip of the now retired Glitter Tape was applied to the top of the cup and the excess trimmed. The sentiment was stamped with Basic Black Archival on the cup. One of the Have A Cuppa Embellishments was threaded onto a length of silver cording and attached to the handle of the cup.

Using the largest plain and scalloped squares from the Layering Squares Framelits, a Whisper White and either a Melon Mambo or Bermuda Bay piece of card stock was die cut. These were adhered together and then the cup was adhered using Dimensionals.

The card was folded flat, with the white matte to the back. Two 1" circles were punched from Whisper White using the 1" Circle Punch. They were scored down the middle and folded in half. Liquid glue was placed on one half of each and they were glued to the upper portion of the card front, folded side in towards the score line of the card. These would form the pivoting hinge for the focal image.

Glue was applied to the remaining two sides of the circles and then the matted square was placed on top. Once the card was stood up, the focal image was free to pivot at the front of the card.


Linda Vich Creates: June Stamping Wind Up. Detailed Corner Fold card with the Cupas & Kettles Framelits.

Linda Vich Creates: June Stamping Wind Up. Detailed Corner Fold card with the Cupas & Kettles Framelits.

Linda Vich Creates: June Stamping Wind Up. Detailed Corner Fold card with the Cupas & Kettles Framelits.

Linda Vich Creates: June Stamping Wind Up. Detailed Corner Fold card with the Cupas & Kettles Framelits.

Linda Vich Creates: June Stamping Wind Up. Detailed Corner Fold card with the Cupas & Kettles Framelits.

Our second card of the evening was a CASE of the card created by Sarah Lancaster. I thought that flip flops were definitely a sign of summer so would be the perfect send off for our group!

We started by cutting out the template that Sarah provided and then traced two of the top template onto Whisper White. One was fussy cut, the other was stamped on using stamps from the Love & Affection stamp set. This allowed images to be offset from the template. The stamped image was then cut out.

The template for the flip flop bottom was used to cut a bottom from Emerald Envy. The top strap for the flip flop was also cut from Emerald Envy.

Holes were poked through the strap by using a Piercing Tool. A brad was placed at the top through the stamped part and then double Dimensionals were added. The remaining two holes were pierced through the strap and the stamped piece. Once the brads were in place, the stamped piece was adhered to the Emerald Envy piece using liquid adhesive. The plain Whisper White piece was adhered to the back for written sentiments.

The Botanical Builder Framelits were used to cut a flower and stamens from Flirty Flamingo and Peekaboo Peach card stock. These were shaped and the stamens adhered to the flower with a glue dot. The flower was adhered to the strap of the flip flop using a Dimensional.

The sentiment was stamped with Versamark on Emerald Envy and heat embossed using White Stampin' Emboss Powder. It was then die cut with the now retired Washi Label Punch. It was adhered to the flip flop with Dimensionals.

A rhinestone for the centre of the flower was the finishing touch!

Linda Vich Creates: June Stamping Wind Up. Flip Flop card featuring Love & Affection stamp set.

Linda Vich Creates: June Stamping Wind Up. Flip Flop card featuring Love & Affection stamp set.


I hope you've enjoyed seeing our stamping projects!


Monday, June 20, 2016

Floral Thinlits Birthday

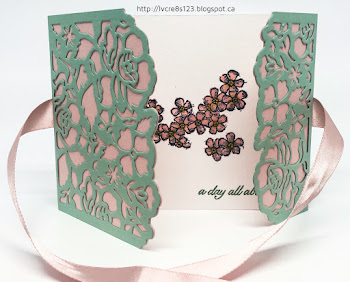
Linda Vich Creates: Floral Thinlits Birthday. Ice cream shades of Blushing Bride and Mint Macaron are the star colors in this birthday card that uses the Detailed Floral Thinlits.
In my post, Floral Thank You, I said I would challenge myself to create a card with some softer tones. I have done that today with my birthday card using the Detailed Floral Thinlits.

For my color scheme I chose Blushing Bride and Mint Macaron. Don't they look like yummy ice cream flavors?


I started by cutting both Blushing Bride and Mint Macaron card stock 4.25 x 11". After determining that I would use the Blushing Bride for the liner and the Mint Macaron for the outer cut piece, I scored the Blushing Bride liner at 2 1/8" and 7 5/8". Because the Mint Macaron needed to surround the Blushing Bride piece, I scored at 2 1/8" and 7 3/4" to allow for the extra bulk.

The Big Shot was used to die cut each end of the scored Mint Macaron card base, after carefully positioning each die with the thin trimming die in place to cut a nice edge. Using a dryer sheet under my card stock worked well to catch all the little pieces and allow me to quickly get on with the rest of my card making.

Next, I placed the die cut Mint Macaron piece over the Blushing Bride piece and laid it on my cutting pad at an angle. I lined up the thin trimming die with the cut edge of the Mint Macaron and then used Washi Tape to tape the die in place over the Blushing Bride card liner. This ensured that I would get a nice cut end that matched the one on the Mint Macaron card base. I removed the Mint Macaron and cut the Blushing Bride liner.

After both ends had been trimmed, I put the two card pieces together again and used glue to adhere the die cut Mint Macaron panel to the Blushing Bride liner.

Using Mint Macaron, I stamped the paired sentiments from the Birthday Blossoms stamp set on a piece of Watercolor paper. I then stamped the blossoms between the sentiments using Basic Black Archival ink.

One the ink was dry, I used my Kuretake Water Pen with Blushing Bride reinker to watercolor the blossoms. I dried this thoroughly with my Heat Tool and then used Fast Fuse to adhere it inside the card base.

Using Fast Fuse, I adhered the Blushing Bride ribbon from the now retired Love Blossoms Embellishment Kit to the back of the card and then tied it in a bow at the front to complete the card.

Linda Vich Creates: Floral Thinlits Birthday. Ice cream shades of Blushing Bride and Mint Macaron are the star colors in this birthday card that uses the Detailed Floral Thinlits.

Linda Vich Creates: Floral Thinlits Birthday. Ice cream shades of Blushing Bride and Mint Macaron are the star colors in this birthday card that uses the Detailed Floral Thinlits.

Drop me a comment below if you visit my blog–I'd love to hear from you!


Thursday, June 16, 2016

Floral Thank You

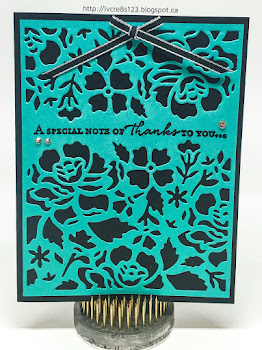
Linda Vich Creates: Floral Thank You. A dramatic pairing of Basic Black and Bermuda Bay brings the Detailed Floral Thinlits to life in this thank you card.
In my mind, Black = Drama.

When I picked up the Detailed Floral Thinlits this afternoon, I immediately knew that I would be using Basic Black with them to instill a dramatic look in my card. The hard question was what other color would I put with it? I was leaning toward Real Red but when I walked over to my card stock stash, Bermuda Bay called my name!

I cut a standard card base from Basic Black and a matte from Bermuda Bay. I used my usual cutting sandwich with a dryer sheet under my card stock and ran it through the Big Shot after placing the Detailed Floral Thinlits at the top and bottom of the matte.

I only ran it through and back through the Big Shot rather than 2X through because I wanted to see if it would cut like that. Indeed it did! All but two little pieces stuck to the dryer sheet so I consider that a successful cut.

I used my MISTI to stamp the sentiment from the Floral Phrases stamp set with Versamark and then heat embossed it with the now retired Black Stampin' Emboss Powder.

I placed dots of liquid glue all around the matte and on the little solid areas. I then used my Marsupial Layering Tool to adhere the matte perfectly. Perfectly WRONG! Somehow I turned the matte or the card base upside down! Luckily, I was able to remove the matte, re-glue it and mount it this time, right side up, on a new card base!

Wow! The combo of Basic Black and Bermuda Bay sure pops!

I adhered a tiny bow, using the now retired 1/8" Basic Black Ribbon , using a glue dot and also added three rhinestones.

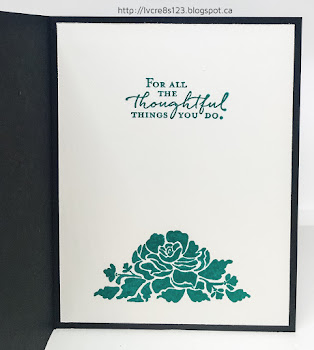
For the inside of the card, I stamped the matching sentiment and floral stamp using Bermuda Bay. I adhered the matte using Snail Adhesive to finish the card.

Linda Vich Creates: Floral Thank You. A dramatic pairing of Basic Black and Bermuda Bay brings the Detailed Floral Thinlits to life in this thank you card.

Linda Vich Creates: Floral Thank You. A dramatic pairing of Basic Black and Bermuda Bay brings the Detailed Floral Thinlits to life in this thank you card.


I really like the impact that the card has by using Basic Black and Bermuda Bay! However, the next time I use these dies, I think I will challenge myself to select some softer tones and see where that takes me!

I'd love to find out what kind of cards you like. Please take my poll below!


Wednesday, June 15, 2016

Jar of Love For Father's Day

Linda Vich Creates: Jar of Love For Father's Day. Sparkling fireflies frolic in a mason jar on this Night of Navy and Floral Boutique matted card.
I have so many new products from the new catalog that it is hard to choose what to play with next!

When I sat down to craft today, I had planned to make a Father's Day card for my husband. I was prepared to use the Best Birds stamp set and was going to watercolor one of the birds. Much to my annoyance, I discovered that once you use rubbing alcohol in a water brush pen (I use the Kuretake Fude Water Brush Pen, Small because I like the detailed tip better than on the Stampin' Up Aqua Pen) it should only be reserved for alcohol as the alcohol.

It seems that somehow the alcohol gets trapped in the end and it didn't seem to work properly for water after that! So, I have another one on order (that will be marked for water only!) but it won't arrive until Friday.

Shifting gears, I decided to work with the Jar of Love stamp set instead. Because I was drawn to the "You Light Up My Life" sentiment, I decided to put fireflies in a jar.

I used my MISTI to stamp the largest jar on a piece of Window Sheet using Jet Black Stazon. I set it aside to dry while I stamped the fireflies on vellum and heat embossed them with the now retired Black Stampin' Emboss Powder. I also stamped the lid for the jar on Thick Whisper White card stock using Versamark and heat embossed it with Silver Stampin' Emboss Powder.

I used the Everyday Jars Framelits to die cut the jar, lid, and fireflies. Before die cutting the fireflies, I used a Crushed Curry Stampin' Write Marker to color on the backside of the vellum. Afterwards, I decided that the "light" wasn't bright enough so then I colored on the front side of the vellum.

On a small Night of Navy matte, I stamped the sentiment in Versamark and heat embossed it with White Stampin' Emboss Powder. I attached the lid to the jar using glue dots and then adhered the jar to the matte using Dimensionals just under the lid. I was able to position and adhere the fireflies under the jar by lifting it up.

The Night of Navy matte was adhered to a Thick Whisper White matte using Fast Fuse. A matte cut from a sheet of the Floral Boutique DSP (you have to get this–it's wonderful!) was adhered to another Night of Navy matte with Fast Fuse and then the matte with the jar was adhered to the larger matte with Dimensionals. This entire matted piece was then adhered to a Thick White card base using Dimensionals.

After it was put together I liked it but still didn't like the "light" from the fireflies. I decided to use a Y18 Copic Marker to color some rhinestones and stuck these to the fireflies. Finally, they had lights I could appreciate!

The inside of the card was plain except for a Happy Father's Day sentiment from the Crazy About You stamp set.

Linda Vich Creates: Jar of Love For Father's Day. Sparkling fireflies frolic in a mason jar on this Night of Navy and Floral Boutique matted card.

I'm pleased with how my card turned out and I am sure my husband will like it. The crisp navy and white really look nice together! If I could change only one thing, I wish that I had stamped the jar in White Stazon instead of the black because I think it would have shown up better.


Tuesday, June 14, 2016

Flourish Thinlits For Global Design Project

Linda Vich Creates: Flourish Thinlits For Global Design Project. Shabby chic style card using the Flourish Thinlits.
I'm in love!

I had my first play today with the Flourish Thinlits and the coordinating stamp set, Flourishing Phrases. I was a little leery about die cutting them with my Big Shot because Stampin' Up has recommended that both the Precision Plate and the new Big Shot Platform be used with these detailed dies.

I'm happy to say that by using a dryer sheet with my magnetic platform, I was easily able to cut my card stock with these dies! To be sure, I ran it through twice but I might have only needed the one run through because the dies cut like butter for me!

Now because every Big Shot is a little bit different, you may not get the same results as me; you might need what is recommended by Stampin' Up and/or you may need to use some shims to cut successfully.

Choosing Soft Suede for my flourish die cut I then coordinated my mattes around that choice. I used a Soft Suede card base to make a 4.75 x 6" card and cut a matte from a piece of Dapper Denim in the 2016-2018 In Color DSP Stack. I also cut two tall and narrow mattes, one from Crumb Cake and one from Very Vanilla.

Some texture was added to the Very Vanilla matte by using the flourish from Timeless Textures to stamp with Sahara Sand after first stamping off. I repeated this process with the Crumb Cake matte with full-strength inking.

Next, I used the now retired Distress Tool to roughen the edges of both mattes and then inked the Very Vanilla matte with Soft Suede and the Crumb Cake one with Dapper Denim.

I lightly sponged Soft Suede onto two lengths of Linen Thread and wrapped them around the top and bottom of the Very Vanilla matte, securing on the back with Fast Fuse Adhesive.

My Marsupial Layering Tool was used to adhere the Dapper Denim matte to the card front and then the Crumb Cake matte was adhered on top. The Very Vanilla matte was adhered using Dimensionals.
After die cutting the flourish from Soft Suede, I cut two of the blossoms again, this time from Dapper Denim. I also punched 10 circles using the 1/4" Circle Punch. The flowers and the circles were glued onto the die cut and then it was glued to the card front.

The sentiment from the Garden in Bloom stamp set was inked with Soft Suede and stamped onto a strip of Soft Suede. The strip was then distressed and inked with Soft Suede. Dimensionals were used at one end of the strip and it was tucked between the two mattes on the card front.
Sahara Sand ink was used on the flourish to stamp the edges of a Very Vanilla matte, stamping off first. Then the large flourish stamp from the Flourishing Phrases stamp set was inked with Dapper Denim and stamped in the bottom right corner. The matte was distressed with the Distressing Tool and then the edges were inked with both Soft Suede and Dapper Denim. The matte was adhered with Fast Fuse inside the card.

Linda Vich Creates: Flourish Thinlits For Global Design Project. Shabby chic style card using the Flourish Thinlits.

Linda Vich Creates: Flourish Thinlits For Global Design Project. Shabby chic style card using the Flourish Thinlits.

Linda Vich Creates: Flourish Thinlits For Global Design Project. Shabby chic style card using the Flourish Thinlits.

I'm really liking this card, especially all the distressing and the wonderful color combination. Feel free to save this color combo if you'd like to use it for your own cards!


I'm entering this card in the Global Design Project #040. Why not come out and play with us?


My one regret is that I wish I had used a baby wipe to dab away a little of the ink from my stamp when stamping the Dapper Denim flourish inside the card. I think that a more distressed version of the stamp would have looked better with the other distressing on the card.

Have you had a chance to play with the Flourish Thinlits yet? Let me know what you think of them by leaving me a comment below!


Monday, June 13, 2016

Garden in Bloom Thank You

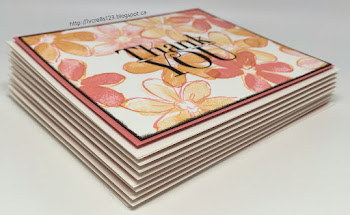
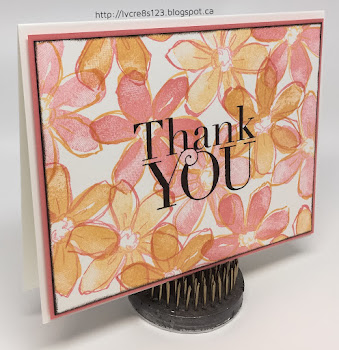
Linda Vich Creates: Garden in Bloom Thank You. Peekaboo Peach and Flirty Flamingo flowers commingle on this two-step stamping card.
I was awake at 6:30 this morning getting our granddaughter, Raine, up and ready to be taken to daycare by my husband. She slept over last night providing us with a wonderful evening enjoying her company. She is such a little character now and the time we spend with her is so precious!

Due to my early start, I was able to design, stamp, and assemble thank you cards for my stamping group by 1:00 PM! Wow! I think I'm on a roll!

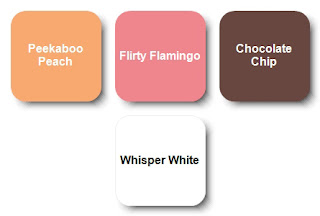
I chose a four color scheme for my card design:


Using the solid flower stamp from the Garden In Bloom stamp set, I stamped flowers in both Peekaboo Peach and Flirty Flamingo, stamping some full strength and others stamped off, on a Thick Whisper White matte. I then stamped over each flower with the outline stamp in the opposite color.

Flirty Flamingo and Peekaboo Peach worked very well for this as they blended beautifully when overlapping flowers. To create a pleasing design, I stamped full strength stamps in both colors, in a sort of triangle formation, some flowers full on the matte, others offset, and then filled in with the stamped off flowers. I then used my MISTI to stamp the sentiment from the now retired, Another Thank You stamp set, with Chocolate Chip.

I inked the edges of the matte with Chocolate Chip and then adhered it to a Flirty Flamingo matte using Fast Fuse Adhesive. This was then adhered to a standard Whisper White card base using Dimensionals to complete the card.

Though the design of this card is relatively simple, it took time to stamp the two-step stamps on each matte. After that, it was relatively easy to complete the cards.

I think the color scheme and card design work well. What do you think?

Linda Vich Creates: Garden in Bloom Thank You. Peekaboo Peach and Flirty Flamingo flowers commingle on this two-step stamping card.

Linda Vich Creates: Garden in Bloom Thank You. Peekaboo Peach and Flirty Flamingo flowers commingle on this two-step stamping card.


Wednesday, June 8, 2016

Color Blocking and Pun Intended

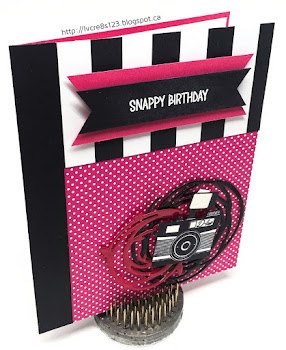
Linda Vich Creates: Color Blocking and Pun Intended. Pop of Pink papers add some real pizzazz to this color blocked card, complete with camera in a nest of glossy swirls.
I was in the mood for some in-your-face contrast when I sat down to craft today. Pop of Pink DSP immediately sprang to mind, with its crisp Basic Black, Whisper White, and Melon Mambo.

Choosing two sheets of the DSP to work with, I cut them to size for a 4.75 x 6" card. I used Fast Fuse to adhere them to a Melon Mambo card base.

My next step was to stamp the camera from the Pun Intended stamp set onto Thick Whisper White using Basic Black Archival ink and my MISTI. I stamped it a couple of times to get a really rich black and then cleaned the stamp before inking and stamping with Versamark.

I heat embossed with Clear Stampin' Emboss Powder to really make the camera show up and then fussy cut it. I used Clear Wink of Stella to add shine to the flash and other white sensors on the camera.

I die cut the two largest swirls from the Swirly Scribbles Thinlets from Basic Black and Melon Mambo. They were stamped over with Versamark and heat embossed with Clear Stampin' Emboss Powder two times to provide a really glossy and smooth coating.

The sentiment was stamped with Versamark on Basic Black and heat embossed with White Stampin' Emboss Powder and both ends were flagged with the Banner Triple Punch. A second banner was created from Melon Mambo. The two were attached with Dimensionals and adhered to the card front also with Dimensionals.

The die cut swirls were adhered using rolled up Glue Dots and then the camera was adhered with double Dimensionals over top of them. A Basic Black card stock strip adhered down the left side completed the front of the card.

A Whisper White matte was cut for the inside of the card. The dots from the Swirly Birds stamp set were stamped repeatedly in the bottom right corner using Melon Mambo and then the camera was stamped on top using Basic Gray Archival ink. The matte was adhered with Fast Fuse to finish the card.

Linda Vich Creates: Color Blocking and Pun Intended. Pop of Pink papers add some real pizzazz to this color blocked card, complete with camera in a nest of glossy swirls.

Linda Vich Creates: Color Blocking and Pun Intended. Pop of Pink papers add some real pizzazz to this color blocked card, complete with camera in a nest of glossy swirls.

I love the "punchiness" of this card! The heat embossed swirls looks like strings of licorice and make a nice little nest for the camera.


Tuesday, June 7, 2016

Just Sitting Here

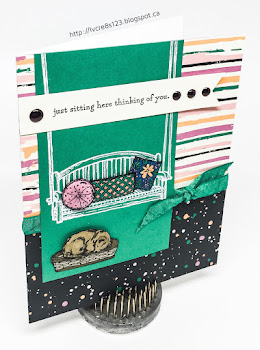
Linda Vich Creates: Just Sitting Here. Puffy pillows on a porch swing with a dog at your feet–what could be better than Stampin' Up's Sitting There stamp set paired with Playful Palette DSP?
Just sitting here thinking about what card to make for a person who needs cheering up when of course I thought of the Sitting Here stamp set!

I stamped the porch swing with Versamark at the side of an Emerald Envy matte and then heat embossed with White Stampin' Emboss. After planning for how I would make my card I decided to go in another direction so ended up trimming this matte down so that it would fit on a 4.75 x 6" card front.

Two sheets from the Playful Palette DSP Stack were trimmed to fit on a Thick Whisper White card front, adhered to each other and then a length of Emerald Envy Ruched Ribbon was knotted around the matte where the two patterned papers joined. The porch stamped matte was then adhered on top.

Using Basic Black Archival ink, I stamped the three pillows, the dog and the dog's bed on Whisper White card stock. I used Stampin' Write Markers to color all five items and then fussy cut them.

For each of the pillows, I used my McGill Paper Blossom Tool Kit to shape the back of each one to make "puffy" pillows. These were adhered to the card front using Dimensionals. The dog's bed was adhered with Fast Fuse to the card front and then the dog was popped up on it with Dimensionals.

The sentiment was stamped onto a strip of Very Vanilla and then the Banner Triple Punch was used to flag one end. The strip was then adhered to the card front with Fast Fuse. A black Sharpie was used to color three White Perfect Accents and then they were affixed to the sentiment banner.

The only embellishment for the inside of the card was to stamp the pot of flowers and to color them with Stampin' Write Markers.

Linda Vich Creates: Just Sitting Here. Puffy pillows on a porch swing with a dog at your feet–what could be better than Stampin' Up's Sitting There stamp set paired with Playful Palette DSP?

Linda Vich Creates: Just Sitting Here. Puffy pillows on a porch swing with a dog at your feet–what could be better than Stampin' Up's Sitting There stamp set paired with Playful Palette DSP?

I'm hoping this card will provide cheer for the recipient!


Monday, June 6, 2016

Swirly Bird Meets Love & Affection

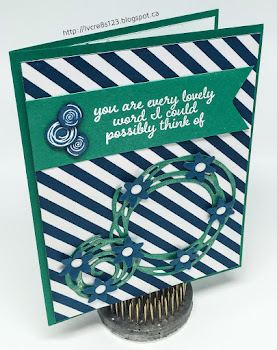
Linda Vich Creates: Swirly Bird Meets Love & Affection. Swirly Bird stamps and matching dies are combined with angled stripes in this Emerald Envy and Dapper Denim color-schemed card.
So nice to actually get my hands on Swirly Bird and the coordinating Swirly Scribbles dies! Cards using these products are all over Pinterest.

I started my card by cutting a standard card base from Emerald Envy card stock. I also cut a matte from the retired Irresistibly Yours Specialty DSP.

Using my brayer, now retired, I inked up the matte using Dapper Denim and then carefully wiped off the excess using a paper towel.

Using the dies, I cut two of the swirls from Emerald Envy and coated them with Clear Wink of Stella. While they were drying, I punched the small flowers from Dapper Denim using the Blossom Bunch Punch. I used my McGill Paper Blossom Tool Kit to shape the flowers a bit.

Using my new Marsupial Layering Tool, I adhered my matte to the card base using Dimensionals. I used dots of glue on the back of the swirls to glue them to the bottom of the card front.

Glue dots were used to adhere the tiny flowers to the swirls and then I added White Perfect Accents to the centres.

The sentiment from the Love & Affection was stamped on a strip of Emerald Envy using Versamark and then heat embossed with White Stampin' Emboss Powder. I then used the Triple Banner Punch to flag the end. Fast Fuse adhered the strip to the top of the card front.

On a scrap of Whisper White I stamped three little swirls from the Swirly Bird stamp set, using Dapper Denim. I fussy cut these and then edged them with the Dapper Denim marker so that no white was evident. These were attached to the sentiment strip using glue dots.

On a Whisper White matte on the inside of the card, I used the "dots" stamp from the Swirly Bird set to stamp using Dapper Denim, both full-strength and stamped-off. I then stamped two sizes of the tiniest swirls stamps in Emerald Envy on top of the dots to complete the card.

Linda Vich Creates: Swirly Bird Meets Love & Affection. Swirly Bird stamps and matching dies are combined with angled stripes in this Emerald Envy and Dapper Denim color-schemed card.

Linda Vich Creates: Swirly Bird Meets Love & Affection. Swirly Bird stamps and matching dies are combined with angled stripes in this Emerald Envy and Dapper Denim color-schemed card.

Have you had the chance to play with Swirly Bird yet? If not, place an order with me!


Sunday, June 5, 2016

Catalog Party Prep Part 5

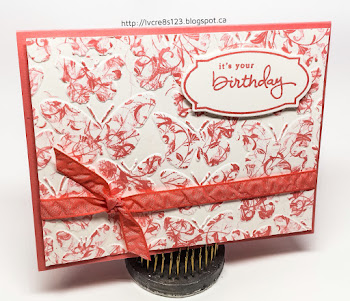
Linda Vich Creates: Catalog Party Prep Part 5. A set of cards that uses the "stamping on embossed images" technique to produce patterned card fronts in each of the new In Colors.
Today brings us to the last day of my 5-part series. If you missed them, be sure to view Part 1, Part 2, Part 3, and Part 4.

For my card set today, I CASEd the stamping on embossed images technique from Patty Bennett. Of all five card sets, I think this one is my favorite because the technique I used is just so much fun to do!

I started by cutting five standard card bases, one from each of the new In Colors–Peekaboo Peach, Flirty Flamingo, Sweet Sugarplum, Emerald Envy and Dapper Denim. I also cut five mattes from Thick Whisper White card stock.

After embossing each matte using the Fluttering Embossing Folder, I inked up the flourish stamp from the First Sight stamp set and proceeded to lightly stamp–so as not to stamp between the embossed bits–on top of the embossed matte, . I stamped several times until I ran out of ink and then re-inked the stamp for more stamping. I continued stamping until I was pleased with the coverage.

What is cool about this technique is that the stamping just goes on the raised butterflies and you get some incredible dimension to the stamping because not all of it is the full-strength color of the ink. In addition, the flourish stamp provides a truly unique pattern. I repeated this technique with all five colors.

I knotted a matching piece of the new ruched ribbon around each stamped matte and then adhered the mattes with Dimensionals.

The label outline from the Rose Wonder stamp set was stamped on Thick Whisper White using ink that matched the color of the card. As well, the sentiment from the Endless Birthday Wishes stamp set was stamped and die cut using the Rose Garden Thinlits. The sentiment label was then adhered with Dimensionals on the top right of the card front.

On a Whisper White matte adhered to the inside of the card, I stamped the flourish stamp again in the bottom left and top right. I then stamped a butterfly from the Papillon Potpourri stamp set on a scrap of Whisper White and punched it with the Elegant Butterfly Punch. I added a coating of Wink of Stella and then adhered the butterfly in the bottom left corner with a glue dot to finish the card.

Linda Vich Creates: Catalog Party Prep Part 5. A set of cards that uses the "stamping on embossed images" technique to produce patterned card fronts in each of the new In Colors.

Linda Vich Creates: Catalog Party Prep Part 5. A set of cards that uses the "stamping on embossed images" technique to produce patterned card fronts in each of the new In Colors.

Linda Vich Creates: Catalog Party Prep Part 5. A set of cards that uses the "stamping on embossed images" technique to produce patterned card fronts in each of the new In Colors.

Linda Vich Creates: Catalog Party Prep Part 5. A set of cards that uses the "stamping on embossed images" technique to produce patterned card fronts in each of the new In Colors.

Linda Vich Creates: Catalog Party Prep Part 5. A set of cards that uses the "stamping on embossed images" technique to produce patterned card fronts in each of the new In Colors.

Linda Vich Creates: Catalog Party Prep Part 5. A set of cards that uses the "stamping on embossed images" technique to produce patterned card fronts in each of the new In Colors.

Don't they look lovely in the In Colors? I hope you will give this technique a try–it should work with any embossing folder with large raised portions such as Brick Wall, Large Polka Dot and possibly the new Petal Burst. If you don't have the First Sight stamp set with the flourish stamp, try another similar stamp that you do have!

Drop me a comment below about your try with this technique–I'd love to hear from you!


Friday, June 3, 2016

Catalog Party Prep Part 4

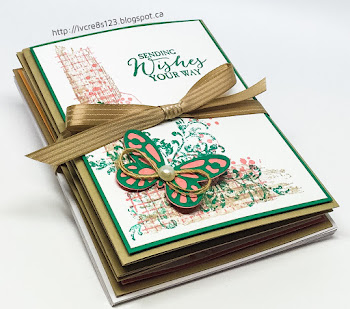
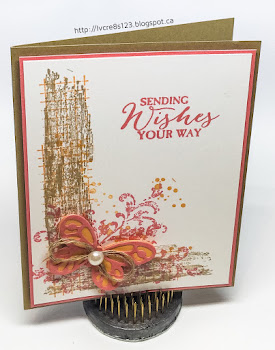
Linda Vich Creates: Catalog Party Prep Part 4. Timeless Textures provide the distressed foundation for a butterfly in this set of cards.
Today brings us to Part 4 in my 5-part series. If you missed them, here are Part 1, Part 2 and Part 3.

The card set today was CASEd from Stamper's Blog.

A standard card base was cut from Crumb Cake card stock for all five cards. Mattes were cut from each of the five new In Color card stocks and a smaller Whisper White matte was also cut for each card.

Both the Bold Butterfly Framelits and the Butterflies Thinlits were used to die cut both intricate and solid butterflies for each card.
The In Colors were paired together as follows:

Peekaboo Peach and Flirty Flamingo
Dapper Denim and Peekaboo Peach
Flirty Flamingo and Sweet Sugarplum
Dapper Denim and Emerald Envy
Flirty Flamingo and Emerald Envy

Multi Medium Matte was used to adhere the ornate butterflies on top of the solid ones. A swirl of Linen Thread and a pearl was attached to the centre of each butterfly using glue dots.

Four different stamps from the Timeless Textures stamp set were used on each Whisper White matte using Crumb Cake as well as the two inks that matched the butterflies.

The grid stamp was first used to create an L-shape on the bottom left of the matte. Over that was stamped the wood grain stamp in Crumb Cake. The ornate stamp was stamped at the intersection of the L and along each axis. The dots were sprinkled around the first three stamps. The sentiment from the Butterfly Basics stamp set was stamped in one of the matching ink colors at the top of the card.

The stamped matte was adhered to the colored matte with Fast Fuse and then adhered to the card front using Dimensionals. The butterfly was adhered using a Dimensional to complete the card.

Linda Vich Creates: Catalog Party Prep Part 4. Timeless Textures provide the distressed foundation for a butterfly in this set of cards.

Linda Vich Creates: Catalog Party Prep Part 4. Timeless Textures provide the distressed foundation for a butterfly in this set of cards.

Linda Vich Creates: Catalog Party Prep Part 4. Timeless Textures provide the distressed foundation for a butterfly in this set of cards.

Linda Vich Creates: Catalog Party Prep Part 4. Timeless Textures provide the distressed foundation for a butterfly in this set of cards.

Linda Vich Creates: Catalog Party Prep Part 4. Timeless Textures provide the distressed foundation for a butterfly in this set of cards.

 I just love the juxtaposition of the distressed textures with the ornate butterflies!