Because of this, I'm surprised that I actually finished my project today–the one day off that I have for this Canada Day weekend :(
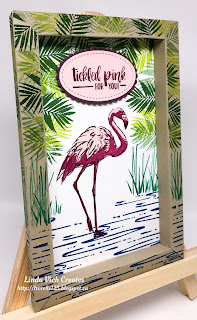
Today I tried two new things. I broke open my Fabulous Flamingo stamp set and I combined that with a new technique . . . a shadow box. And I did this with my granddaughter by my side, with her little table and chair and the stamping kit I had given her for Christmas. Today she was fascinated by cutting up paper into little tiny pieces! I think I'll get her started with mosaics . . . she's a natural!
Anyway, I had seen a few flamingo posts on Pinterest so I knew basically what I wanted to stamp but first I needed to learn how to create a shadow box. The best tutorial I found was on Joyce Rossiter's blog but the original directions came from Mary Ann Rossiter.
As I do with a lot of tutorials, I tried out the technique by creating it first with a piece of scrap paper. It was actually quite simple to create but I'm glad I tried it out first.
After figuring out the dimensions of the image that would be contained within the frame, I set to stamping. I used my MISTI since it is such a good tool for using with multi-step stamps.
I first tried a color combo of Powder Pink and Flirty Flamingo but in the end, I stamped my flamingo using first Berry Burst, Powder Pink, and finally Fresh Fig. When using the stamp set, I stamped according to the following image:
After stamping the flamingo on Whisper White, I used Pacific Point to stamp the water and then Emerald Envy for the reeds, stamping off to create some contrast.
I stamped the palm leaves around the top and sides of the matte using Lemon Lime Twist and Garden Green, again, stamping some off for added contrast and color.
With the matte completed, I started on the actual shadow box frame. Using a 8.5 x 11" piece of Crumb Cake, I scored each side at .5, 1, 1.5, and then 2". Turning the card stock so that the 11" piece was at the top, I scored at 2.5" but only down to 1". This was also done at 2.5" from the right side of the same piece. I then turned the paper 180° and repeated these two score lines.
I folded and burnished each fold line and then cut out a portion from each corner (see image #5 on Joyce Rossiter's blog).
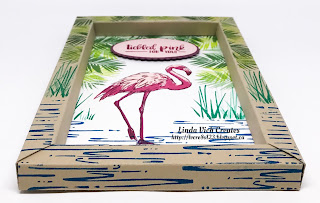
Because I wanted to stamp on the edge of the frame, I needed to mask the fold I needed and stamp it before assembling the frame. I was able to stamp all but one side correctly and then discovered that for the last side, I stamped on the wrong fold! This meant that I had to remask all the other sides again so that I had stamped on two adjacent folds for each side. (After completing this project, I decided that the next shadow box I created would be stamped on three folds–inside, top, and outside because I really liked the look of the continuous stamping!)
With the stamping complete, I adhered my stamped matte to the inside panel of the frame and then applied Tear & Tape adhesive according to images #8 and 9 and assembled the frame.
The two long sides were adhered first and then the bottom and top. The top was the hardest to adhere correctly but I persevered.
To finish off the shadow box, I stamped the sentiment on Powder Pink card stock with Berry Burst and die cut it with the #2 stitched oval of the Stitched Shapes Framelits. It was matted on Fresh Fig die cut using the #3 oval in the Layering Ovals Framelits. It was adhered with Dimensionals.
I quite like how this project turned out! I already have ideas for another shadow box as well as ideas for different ways to stamp the flamingo.
Have you used the Fabulous Flamingo stamp set yet? Drop me a line below with a link to your project!


0 comments:
Post a Comment