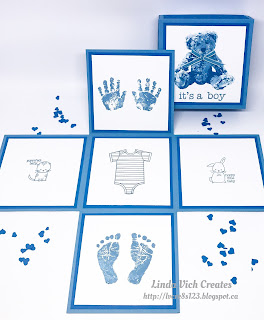
To create the box, I chose a 12 x 12" piece of Marina Mist card stock and scored each side at the 4" mark. I then cut up the score lines to cut off the "boxes" at each corner, leaving a shape like a plus sign. This would be used to form the base of the box.
For the lid of the box, I cut a piece of Marina Mist at 7 1/8 x 7 1/8" and scored each side at 1.5". I cut tabs on two sides of the piece and then used liquid adhesive to adhere them to form the lid.
I cut mattes from Pacific Point and Whisper White for each panel, inside and out, and both sides of the lid of the box. The Pacific Point mattes were adhered to the box using liquid adhesive and then I used various baby themed stamp sets, some new, some retired, to stamp the Whisper White panels using Marina Mist. The stamp sets I used were Baby Prints, Made With Love, Something For Baby, Baby Bear, and Moon Baby. These were then adhered on top of the Pacific Point mattes.
For inside the box, I created a baby carriage, complete with baby! I referenced a video tutorial and downloaded a template from Steffi Von Stempelwiese. You should note that the video is in German and is actually for a basket that uses the same technique as the carriage but after downloading the template I was able to make sense of how the baby carriage was constructed.
I printed the template onto a 8.5 x 11" sheet of Pacific Point card stock and then scored and cut it out, using both my Stampin' Trimmer and scissors. I used the now retired Project Life Corner Rounder Punch to round each segment of the template that would be held together with a brad.
Once I had all the segments and the larger piece of the carriage from one side all piled up in order, I used my Paper Piercer to put a hole through all at once and then put in a now retired gold brad. I repeated this process with the other side to construct the carriage. (My one regret is not inking each piece before putting it together–it would have given it a better look.)
I used my 1" Circle Punch and retired 7/8" Scalloped Circle Punch to create the wheels of the carriage. For the handle, I cut a 1/2' strip of card stock, scored it and adhered it inside the carriage. I added a strip of Venetian Crochet Trim to the top of the carriage using Tear & Tape. A tiny bow was made from the retired 1/8" Marina Mist ribbon to adhere to the top of the carriage.
For the baby, I used the retired Baby Bumblebee stamp to stamp twice, once on watercolor paper and once on Whisper White. I used Marina Mist for one and Basic Black for the other. I then used a combination of Watercolor Pencils and Stampin' Write Markers together with an Aqua Painter to paint the baby's face on the watercolor paper. This was then cut out and glued onto the Marina Mist stamped piece, minus the wings and antennae.
To cover the baby, a piece of Marina Mist card stock was embossed with the Cable Knit Embossing Folder. The "blanket" was adhered over top of the baby using double Dimensionals to make the blanket look rounded.
I used the retired Confetti Hearts Border Punch to punch out Pacific Point strips to adhere around the lid of the box. The resulting confetti hearts were added inside the completed box.
For my first explosion box, I think it turned out pretty well! One disappointment is that when I stamped the outside mattes, I didn't allow for the lid so you can't see the entire image until the lid is off the box :( Oh, well! The next one I make will be better!
I think my manager will like it just fine, just the way it is!


0 comments:
Post a Comment