I started by cutting a standard card base from Crumb Cake and two mattes from Very Vanilla. Next, using Sahara Sand, I stamped the leafy image from the Number of Years stamp set all over one of the mattes.
One of the edge stamps from the Timeless Textures stamp set was stamped around the edge of the matte. Finally, I stamped the distressed leafy image in Cherry Cobbler in two opposing corners of the matte.
A piece of the Regals Designer Paper Stack was adhered to the middle of the matte. Two lengths of the Sale-A-Bration gold metallic ribbon were adhered to hide the seam of the DSP. Linen thread was then wrapped around the matte and secured at the back using Fast Fuse. The matte was then adhered to the card front using Dimensionals.
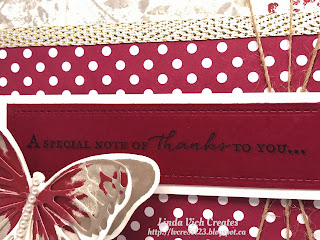
Using my MISTI, the sentiment from the Floral Phrases stamp set was stamped three times on a strip of Cherry Cobbler using Crumb Cake. I had wanted to use a stitched die for the sentiment but it was too long to fit a Stampin Up die, even if I extended one of the stitched squares into a rectangle. As a work-around I used Lawn Cuts Stitched Borders to create my own stitched rectangle. I then matted this strip onto a strip of Very Vanilla. This was then adhered to the card front using Dimensionals.
On a piece of Very Vanilla, I stamped two identical butterflies using the Watercolor Wings stamp set and Sahara Sand, Crumb Cake and Cherry Cobbler inks. The two butterflies were die cut, one with Bold Butterfly Framelits and one with the Butterflies Thinlits dies. The two butterflies were adhered together using Glue Dots. A strip of pearls was adhered to the body of the top butterfly. After shaping the wings a bit, the butterfly was adhered to the card front using Foam Adhesive Strips.
For the remaining matte, it was prepared in the same way as the one for the card front with the exception that the stamp was stamped off each time as well as stamping the corner stamps in Sahara Sand as well. The sentiment was stamped using Crumb Cake.
The smaller butterfly was stamped on Very Vanilla using Sahara Sand, Crumb Cake and Cherry Cobbler. The Bold Butterfly Framelits and one with the Butterflies Thinlits dies were used to die cut the butterflies. They were adhered together and to the matte using Glue Dots.
Lastly, I used the Envelope Punch Board to create a matching envelope from Crumb Cake. It was stamped on the front using Crumb Cake and the leafy stamp from the Number of Years stamp set. The envelope was lined with a matching piece of Regals Designer Paper Stack. Mary Fish has a great tutorial for an envelope liner.
After finishing the card, I noticed that the sentiment on the front of the card was not totally distinct after having dried completely. How exasperating!
I knew that I would have to use a darker ink to correct the look of the sentiment. With hopes that I didn't have to remake the sentiment strip, I used some of my trusty Un-Du to remove the butterfly and sentiment strip. The card front and strip were completely saturated with the Un-Du solution so I used my heat tool to dry them.
Next, I used my MISTI to stamp the sentiment on the clear matte from my Stamp-a-ma-jig using a bright color of ink. I then placed my sentiment strip under the matte and played with it until I thought that both sentiments were in total alignment. I then carefully removed the plastic matte and secured the sentiment strip with magnets. I then inked up the sentiment with Early Espresso and re-stamped the sentiment.
Upon careful examination, I discovered that the restamp was not in exactly the same spot as the original. However, by happy accident, the stamping looked like it had been planned "shadow" stamping because the lighter, originally stamped sentiment acted as a shadow for the newer, crisply stamped sentiment! BONUS! It actually now had a kind of 3D quality to it!
 |
| Original sentiment stamped in Crumb Cake. |
 |
| Sentiment Restamped in Early Espresso. Click on the image to view a larger size to see the 3D shadowed detail. |


2 comments:
Great save, and a fantastic tip! A friend gifted me with some Undo at Christmas time, but I've not used it yet. I love THE COLORS and PAPERS in this creation - absolutely gorgeous! Of course, I'm in awe of everything you make, Linda, and am constantly amazed at how Brilliance and Vibrance are your signature in creating. Beautiful colors, and a great design! Wishing you a wonderful week! hugs, de
Thank you Donna! UN-DU should be in every card maker's tool kit!
Post a Comment