 |
| 6 x 6 Glimmer Paper Assortment Pack #143831 |
 |
| Make A Medallion #143274 |
 |
| Reverse Words, #143316 (wood mount), #143319 (clear-mount) |
Be sure to place your $60 or more order to be able to receive one or more of these items for yourself!
Next up today, I have a short video tip for you. Have you ever struggled with getting your clear mount stamps ready for use? Do you have difficulty getting the labels on the stamps correctly? Watch my video below to see how I successfully prepare my clear mount stamps for use.
I hope that you found this video helpful! Be sure to give it a "thumbs up" and subscribe to my channel to catch future videos.
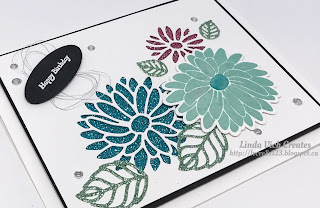
Finally, the card I have for you today makes use of the FREE 6 x 6 Glimmer Paper Assortment Pack that you can receive when you place a $60 or more order. This paper is lovely and I did hate to cut into it but in the end I was happy that I did!
To construct my card, I cut the following:
- 6 x 4.75" card base from Thick Whisper White
- 5.5 x 4.25" matte from Basic Black
- 5.375 x 4.125" matte from Thick Whisper White
Because I would be die cutting into my Whisper White matte, I needed to get an idea of the overall arrangement for the items on my matte. To do this, I first die cut two large leaves and two small leaves from the Mint Macaron Glimmer paper using the Stylish Stems Framelits. I also stamped the larger flower from the Special Reason stamp set on Thick Whisper White using Pool Party. This was die cut using the the matching framelits.
I arranged the framelits and the die cuts on my matte until I had a pleasing arrangement and then snapped a photo with my phone. I was then able to die cut the two flowers from the matte itself. I then taped small pieces of the Glimmer papers behind the die cut openings in the matte. This piece was then adhered to the Basic Black matte.
Liquid adhesive was used to adhere the die cut leaves. On the stamped flower, I used a Bermuda Bay Stampin' Write marker to color in the flower's centre and then used a Clear Wink of Stella pen to give the whole flower some shimmer. The flower was popped up with Dimensionals.
The sentiment was stamped with Versamark on Basic Black, heat embossed with White Stampin' Emboss Powder, and die cut using an oval from the Stitched Shapes Framelits. A thread nest was adhered with glue dots and then the sentiment popped up over it using Dimensionals. A sprinkling of
silver Metallic Enamel Shapes was added to complete the card.
Isn't all that glimmery goodness just to die for? Thanks for visiting today!


2 comments:
I have pinned your video, Linda! Thanks! Wonderful freebies -- especially the glimmer sheets and your beautifully designed die cut cards! Fabulous colors, and such glittering goodness peeking from behind the white cardstock! Huggers, de
Thank you Donna!
Post a Comment