There are so many of these cards being displayed on the internet now and each one that I have seen has pushed me to try one of my own. Some of the cards are quite simply embellished and some are outright over-the-freakin'-top!
The tutorial that I chose to follow was one from Maymay Made It. I had previously looked at some other tutorials but found hers to be the easiest to follow.
There are three main pieces to this type of card: 1. card base 2. mechanism for the pop up and 3. the strip for the pop out panel.
I started by cutting a 4 1/4 x 11" card base from Rich Razzleberry. It was scored at 5 1/2". The mechanism for the pop up was cut from Whisper White at 8 1/2 x 10 3/4" and scored at 2 1/4", 4 1/4" and 6 1/4" on the short side and at 3 7/8", 5 3/8" and 6 6/8" on the long side. The strip for the pop out panel was cut at 3 x 11" from Rich Razzleberry. It was scored at 2 3/4", 5 1/2" and 8 1/4".
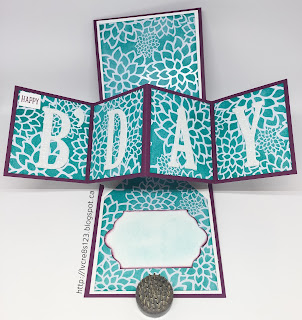
Four mattes for the pop out panel were cut from Irresistibly Floral DSP at 2 3/4 x 2 1/2". Two mattes, for the inside card panels were also cut at 3 3/4 x 5 1/2" before being trimmed to fit.
For each of the panels, I sponged them with Bermuda Bay ink to reveal the patterned resist. The two larger panels were trimmed to fit by tracing the mechanism for the pop up once it was created.
To create the pop up mechanism, after scoring, the four outer corners are cut away leaving a kind of T shape. The T has two wide pieces and two narrow pieces. Each of the narrow pieces had notches cut from each side to help get rid of some of the bulk from when the mechanism would be folded. Finally, using the score lines, the panels are folded to create an X at the centre. It is very hard to describe the actual construction of the pop out mechanism so you are best to view the video tutorial.
Once the pop out mechanism is created, the strip for the pop out panel is adhered to it. The four mattes were then adhered. Next, the two large panels for the inside of the card are trimmed by tracing the pointed shape of the pop out mechanism onto them. These mattes are then glued onto parts of the mechanism that actually form the white base matte inside the card. The mechanism was then glued to the inside of the Rich Razzleberry card base.
To finish embellishing the card, the large letters for the pop out panels were die cut from Dazzling Diamonds Glimmer paper using the Large Letter Framelits. "Happy" was stamped on a piece of Whisper White using Rich Razzleberry ink and a sentiment from the Sweet Cupcake stamp set.
Using the Lots of Labels Framelits, a tag was cut from Whisper White and edges inked with Rich Razzleberry. This was designed as a place to add greetings from the sender. Unfortunately, the Whisper White did not stay pristine! It picked up a smudge of Bermuda Bay so I compensated by lightly sponging more Bermuda Bay onto it!
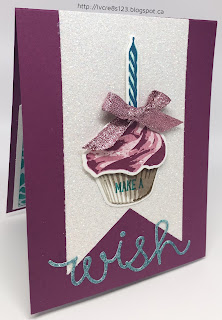
For the front of the card, I cut a banner from Dazzling Diamonds Glimmer paper using the Banners Framelits. Using the Sweet Cupcake stamp set, I did multi-step stamping to create the cupcake, its wrapper and a candle. The cupcake used Sweet Sugarplum and Rich Razzleberry, the wrapper used Sahara Sand, Tip Top Taupe and Soft Suede, and the candle used Pool Party and Island Indigo. Each piece was die cut using the coordinating framelits.
"Make a" was stamped onto the cupcake wrapper and then the cupcake had a slit cut into it so the bottom of the candle could be inserted and taped to the back. The cupcake was popped up with Dimensionals onto the wrapper and adhered to the banner. Sweet Sugarplum Glitter Ribbon was tied in a bow and adhered to the base of the candle.
To complete the card, the "wish" sentiment was die cut from Dazzling Diamonds Glimmer paper using a die from the Cupcake Cutout Framelits. It was sponged with Bermuda Bay and adhered at the bottom of the banner.
This card was a joy to create, especially knowing that I would be sending it to my special online friend, Donna!


1 comments:
Oh goody! I'm so grateful you posted how to make the card, Linda! I am so PROUD to be the recipient of this beautiful creation, and even more honored that it was your first card using this fold! THANK YOU, SWEET LINDA! hugs, de
Post a Comment