Thursday, September 21, 2017

Quilt Builder Christmas Card

Linda Vich Creates: Quilt Builder Christmas Card. Red, white and black create a dynamic quilt pattern using the Merry Music DSP on this Christmas card.
I have sewed only a few things in my lifetime–a blouse for home ec in grade 9, a dress for my wedding social, a dress for my daughter's first photo with Santa and some bibs.

Sewing is not something I truly enjoy possibly due to the way my mother tried to teach me how to lay out a pattern. Though I first learned to sew at school, in practicing my skills at home, my mother tried to get me to adopt her way of laying out a pattern on the fabric.

This method did not involve mimicking the pattern layout from the pattern itself. Instead, it involved folding the fabric in several different ways to find the most economical use of the material so as to end up with fabric left over for some future project. I simply could not wrap my brain around this method and it left me totally frustrated with the sewing process and I hadn't even got to the sewing machine yet!

Regardless, I have an appreciation for those who possess sewing skills and who can work wonders with a length of fabric, my daughter being one of those people! One year, she was able to measure, design, and sew a tuxedo for our dog, Brandy, to wear on Christmas Eve!

I have an even greater appreciation for those who create magnificent works of art in the form of quilts. The new Quilt Builder Framelits allow non-sewers like me the chance to create quilted cards. With so many lovely DSP choices, how could quilting cards not be fun?

For my first quilted card, I chose some of the lovely black paper in the Merry Music Specialty DSP as well as a red gingham paper from the Quilted Christmas pack as well as Basic Black and Whisper White card stock. Using the star dies from the Quilt Builder Framelits, I used the two dies together to cut the black outline of the star.

Using a method from Klompen Stampers I placed the outline on a piece of Press and Seal paper. I then cut the inside star shape three times using the Whisper White and the two DSP choices. After choosing the appropriate pieces from each, I filled in the quilt, sticking the pieces to the Press and Seal paper.

Once the quilted star was complete, I folded the Press and Seal over the design and turned the piece over. After carefully peeling back the Press and Seal, I applied glue to the back of the star piece and then lifted the star piece and adhered it to a Basic Black square of card stock.

After die cutting a Basic Black stitched square, I layered and then adhered the star design with the black square turned 45 degrees, using Dimensionals. I adhered a matte of the Merry Music DSP to a Real Red 5 x 5" card base and then added the quilted layers using Dimensionals. Because the card front was so busy with all the patterned DSP, I left the sentiment for inside the card.

I used a stamp from the Quilted Christmas stamp set to stamp with Basic Black on Whisper White and then die cut it with the matching die. I also cut an outline of the shape using Basic Black. These shapes were layered together and placed on top of the star piece. A Clear Faceted Gem was colored with a red Sharpie and adhered in the middle. To complete the card front, a length of the 1/8" Real Red Ribbon was wound around the card and tied with a bow.

A Whisper White matte for the inside was stamped with a sentiment from the Snowflake Sentiments stamp set using Real Red. A matching shape with a stitched outline was also stamped. Basic Black on a Sponge Dauber gave a fine inked line around the matte.

Linda Vich Creates: Quilt Builder Christmas Card. Red, white and black create a dynamic quilt pattern using the Merry Music DSP on this Christmas card.

Linda Vich Creates: Quilt Builder Christmas Card. Red, white and black create a dynamic quilt pattern using the Merry Music DSP on this Christmas card.

Linda Vich Creates: Quilt Builder Christmas Card. Red, white and black create a dynamic quilt pattern using the Merry Music DSP on this Christmas card.

I know I'll be playing with the Quilt Builders agains soon–so many possibilities, and not just for Christmas!


Wednesday, September 20, 2017

Colorful Seasons Birthday

Linda Vich Creates: Colorful Seasons Birthday. Heat embossed copper leaves peak from beneath a dry embossed wood plank matte, topped with a square of Wood Textures DSP that is embellished with die cut leaves.
The card share I have for you today was CASEd from a card by Natalie Lapakko. I liked her use of the Wood Textures DSP with the ornate leaf die cut from the Seasonal Layers Thinlits. However, I find it very hard to make a truly clean and simple card!

To begin with, I cut a 5 x 7" card base from Soft Suede. Using Versamark, I stamped the detailed leaf from the Colorful Seasons stamp set around the edges of the card front and then heat embossed them with Copper Stampin' Emboss Powder.

I then cut a Dapper Denim matte and dry embossed it using the Pinewood Planks Dynamic Embossing Folder after first spritzing it with water. A square of both Soft Suede and the Wood Textures DSP was cut and the two adhered together using liquid adhesive. A Soft Suede marker was used to edge the complete piece so that the white edges from the DSP did not distract from the beauty of the card.

Using the dies from the Seasonal Layers Thinlits, I die cut a leaf from Watercolor Paper and the detailed leaf from Copper Foil. Using sponges, I added color to the watercolor paper leaf.

The sentiment from the That's The Tag stamp set was stamped on Very Vanilla using Dapper Denim and then punched with the Everyday Label Punch. I used the now retired Paper Piercing Pack Essentials along with my Piercing Mat and Piercing Tool to line up and pierce two holes in the tag which I then punched with the 1/8" Circle Punch.

Linda Vich Creates: Colorful Seasons Birthday. Heat embossed copper leaves peak from beneath a dry embossed wood plank matte, topped with a square of Wood Textures DSP that is embellished with die cut leaves.
Photo shows the Paper Piercing Pack Essentials
being used to pierce holes symmetrically in the tag.

Linda Vich Creates: Colorful Seasons Birthday. Heat embossed copper leaves peak from beneath a dry embossed wood plank matte, topped with a square of Wood Textures DSP that is embellished with die cut leaves.
The pierced holes were used as a guideline for
punching holes with the 1/8" Circle Punch.

Dapper Denim and Soft Suede were sponged around the tag and then I used Linen Thread to attach the tag and taped the ends on the back of the Dapper Denim matte. The wood matte was attached to the top of the matte using Dimensionals with the colored leaf also being attached with Dimensionals and the copper leaf with glue dots. The Dapper Denim matte was then adhered to the card front using Dimensionals.

For inside the card, the ornate leaf was stamped with Versamark and heat embossed with copper on Very Vanilla. Dapper Denim was sponged around the edges before the matte was adhered inside to complete the card.

Linda Vich Creates: Colorful Seasons Birthday. Heat embossed copper leaves peak from beneath a dry embossed wood plank matte, topped with a square of Wood Textures DSP that is embellished with die cut leaves.

Linda Vich Creates: Colorful Seasons Birthday. Heat embossed copper leaves peak from beneath a dry embossed wood plank matte, topped with a square of Wood Textures DSP that is embellished with die cut leaves.

Linda Vich Creates: Colorful Seasons Birthday. Heat embossed copper leaves peak from beneath a dry embossed wood plank matte, topped with a square of Wood Textures DSP that is embellished with die cut leaves.

I really like the look of the Dapper Denim with the wood and the copper foil!


Monday, September 4, 2017

Pearly Gates Sympathy Card

Linda Vich Creates: Pearly Gates Sympathy Card. The Detailed Gate Thinlits are used as the gates to Heaven in this sympathy card.
It's a terrible thing to lose your mojo. Even though I wanted to craft and I loved looking at crafting ideas but actually sitting down and crafting myself just didn't seem to be in the cards (pun intended) for me.

This summer has been productive in other ways but not so much for card making. However, I was in need of a sympathy card and there was no way I was going to buy a card so I sat myself down and made one! My card is CASEd from a card by Janet Wakeland.

I began my card by cutting a piece of Watercolor Paper to 4.25 x 5.5". I used the clouds from the Up & Away Thinlits to die cut cloud templates from Thick Whisper White. Using the templates alternately, I sponged Soft Sky onto the watercolor paper to create a cloud-filled sky.

Next, I die cut Dazzling Diamonds Glimmer Paper using the Detailed Gates Thinlits. To make this easier, I first removed the protective covering layer from the back of the sheet of glimmer paper. I then used the dryer sheet method for die cutting using my Magnetic Platform.

Because I wanted to adhere the gates to the sky panel, I scored each side of the gates at about 1/4" from the edge. Finally, I used my Stampin' Trimmer to slice down the middle of the gates so that they would open.

On a strip of Vellum, I stamped the sentiment from the Rose Wonder stamp set and heat embossed with Silver Stampin' Emboss Powder. I wrapped the sky panel with the vellum strip, folding it crisply at each edge, and then taped it to the back of the panel.

I then used liquid adhesive to adhere the gates to each side of the panel. The panel was then adhered to a Soft Sky card base using Fast Fuse adhesive.

I heat embossed the inside sentiment on a Whisper White matte and then sponged the edges with Soft Sky before adhering it inside the card.

To finish the card, I die cut a dove from Thick Whisper White using a die set from Impression Obsession. I used Mini Dimensionals to adhere the bird to the front of the card.


Linda Vich Creates: Pearly Gates Sympathy Card. The Detailed Gate Thinlits are used as the gates to Heaven in this sympathy card.

Linda Vich Creates: Pearly Gates Sympathy Card. The Detailed Gate Thinlits are used as the gates to Heaven in this sympathy card.

Linda Vich Creates: Pearly Gates Sympathy Card. The Detailed Gate Thinlits are used as the gates to Heaven in this sympathy card.

Linda Vich Creates: Pearly Gates Sympathy Card. The Detailed Gate Thinlits are used as the gates to Heaven in this sympathy card.


If I made this card again, I would die cut one gate from the Glimmer paper and one from Whisper White and adhere them together. This would prevent the gate from curling at the top. Other than that, I am pleased with how my card turned out!

Hopefully, this is the kick start that I need for my mojo!


Tuesday, August 8, 2017

It's Official! My Daughter is a LPN!

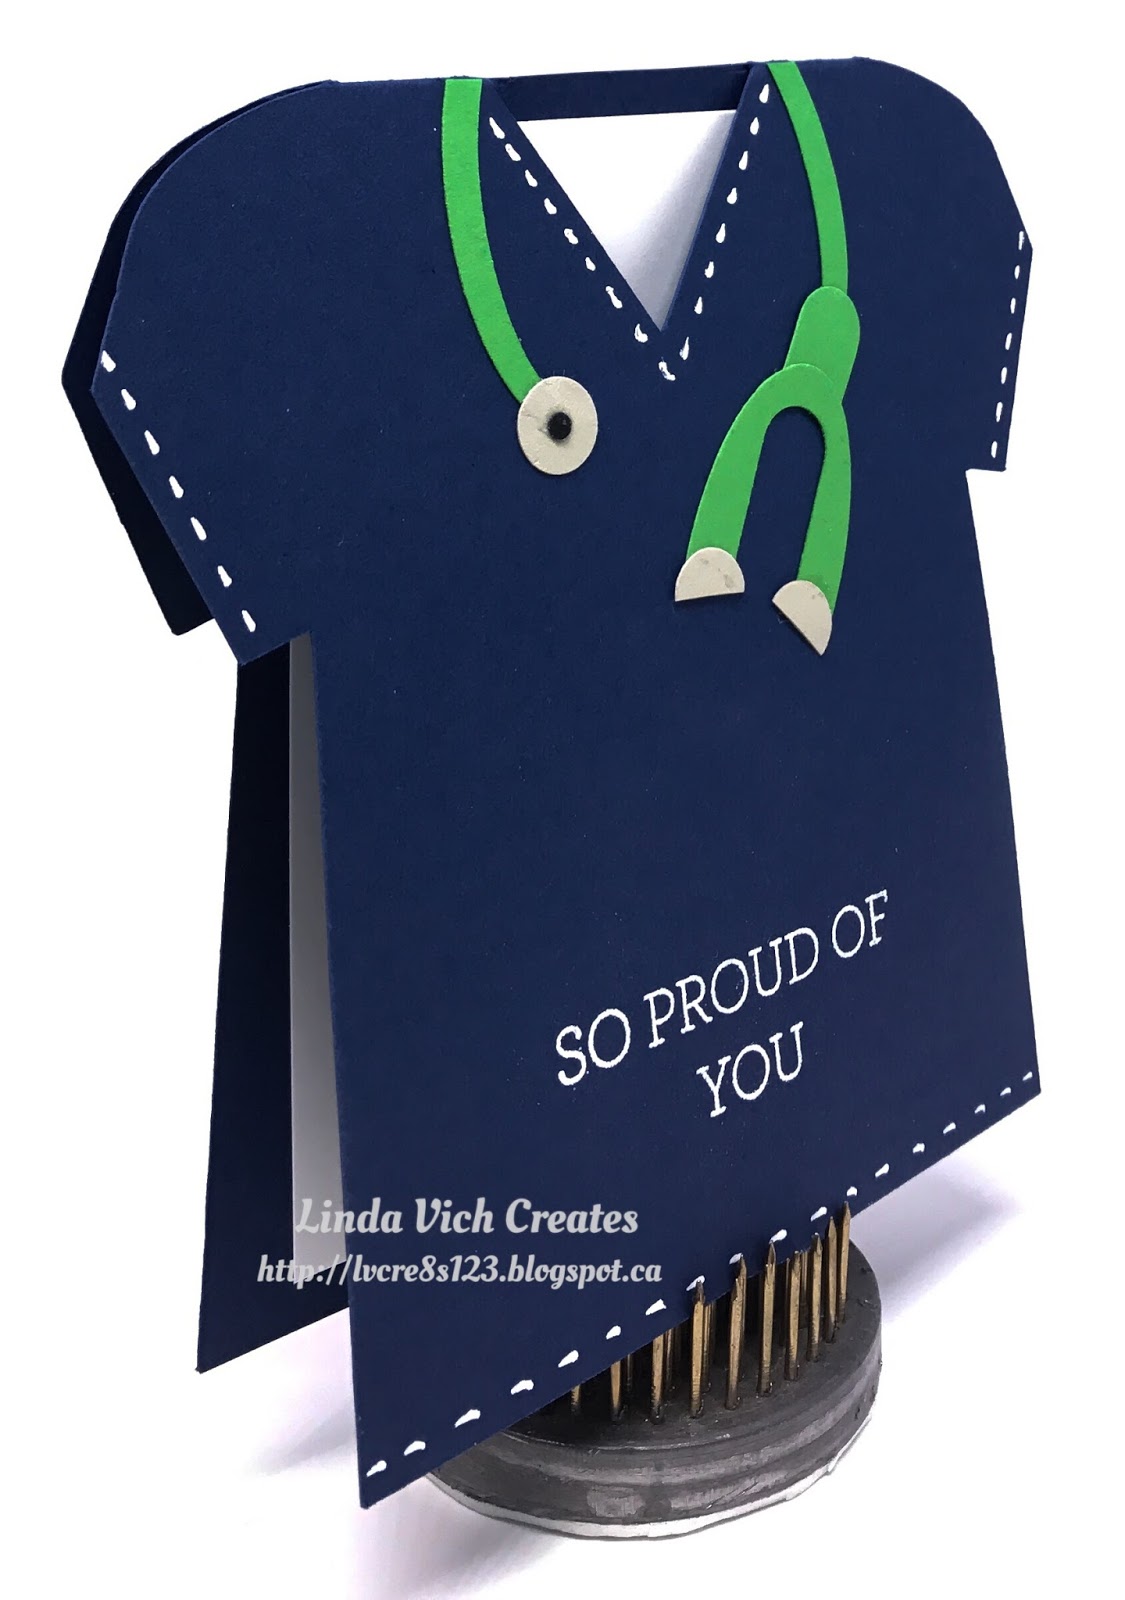
Linda Vich Creates: It's Official! My Daughter is a LPN! Nurse scrub top card created with punches and assorted card stock scraps.
My daughter Courtney received notification that she passed the exam for her nursing so she is now officially a LPN! I wanted to mark the occasion so I made her a fitting card.

I purchased a template/tutorial from Lynn Pratt for this card. After receiving the tutorial, I imported the design into my Silhouette Cameo designs so that I could resize it and cut it out.

The card was cut from Night of Navy and stitching lines were added with a Sanford-Sharpie Extra Fine Point Poster Paint Marker. I find this works much better than a gel pen.

I created her stethoscope in green to match her real life stethoscope. It was created by using an assortment of punches–oval, word window and the Itty Bitty Shapes Punch Pack. Scraps of card stock were used to create her stethoscope: Cucumber Crush, Sahara Sand, Basic Black.

The sentiment from the Crazy About You stamp set was stamped with Versamark and heat embossed with White Stampin' Emboss Powder. A Whisper White matte was adhered inside the card.

Linda Vich Creates: It's Official! My Daughter is a LPN! Nurse scrub top card created with punches and assorted card stock scraps.

Linda Vich Creates: It's Official! My Daughter is a LPN! Nurse scrub top card created with punches and assorted card stock scraps.

So proud of our daughter! She is loving being a nurse.


Saturday, August 5, 2017

Dahlia Up Close

Linda Vich Creates: Dahlia Up Close. Rose Gold embossed dahlia is painted with shades of blue Color Burst watercolors on this lovely anniversary card.
How about something totally different?

Come on now, admit it. Even if you are a Stampin' Up! demonstrator, you have one or two other craft products lying around that you use from time to time! Let's face it–we are crafty individuals or we would never have got involved with Stampin' Up! in the first place!

I have soooooooooooooo many crafting tools and media that sometimes I have to take a break from crafting with Stampin' Up! to play with my other stuff! Or, I combine it with Stampin' Up! to get the best of BOTH worlds like I have done with this card!

Today's card is one I created for my brother and his wife for their anniversary. It is CASEd from a card by Jenny Lee Yamasaki.

I started by stamping the Dahlia Up Close stamp from The Ton on watercolor paper using Versamark using my MISTI after first using my Embossing Buddy. I then heat embossed it with Rose Gold Embossing Powder.

Next, I gathered together a few of my Color Burst colors in blue: Cerulean Blue, Ultramarine Blue, Indigo and Turquoise. I tapped a little of each powder in a watercolor palette I had and then wet a #4 watercolor brush and dipped into the Cerulean Powder and changed it to liquid watercolor.

I painted this over most of the flower and then, painting spots of each of the other colors, I added strategically to the image until I was pleased with the result. Sometimes, I used a paper towel to blot up some of the watercolor to make it paler. When I was finished, I heat set the image.

The next step is where I made a mistake but due to using my MISTI I was able to rectify it. After watercoloring and then drying my image, the watercolor paper was severely warped. I wanted to get it as flat as possible before adding it to my card front. To do this, I placed it face down on a piece of copy paper with another piece of copy paper on top and then an old pillowcase. I then proceeded to iron until the watercolor paper was flat.

I did end up with a flat paper, however, the ironing reheated my embossing and transferred it to the copy paper leaving behind a white outline where the embossing had been! Now this is actually a technique in itself and can be used to good effect but for this image I WANTED the Rose Gold embossing in place!

So, I went back to my MISTI and after using my Embossing Buddy, I re-inked the image with Versamark and heat embossed it AGAIN! Luckily, my stamp had remained in place in my MISTI and I was able to re-stamp the image. I was very careful to warm up the heat tool for awhile before doing the embossing to minimize warping.

Next, I cut a Pacific Point card front 4.75 x 6. I trimmed my painted matte to fit the card front but leave about a 3/4" strip of card front on the left side. I placed a strip of Burnished Rose Gold Foil Tape down the card front and then trimmed off the excess.

On a strip of vellum I stamped the sentiment from the Falling For You stamp set using Versamark and heat embossed it with the same Rose Gold embossing powder. I folded the strip around the edges of the painted matte and then taped the ends to the back. The matte was then adhered to the card front using Fast Fuse. To add a little more zing, several sequins were adhered to the card front using liquid adhesive.

A watercolor matte was cut for inside the card and the matching sentiment was stamped and heat embossed on it. I then used sponges to ink the edges in both Tempting Turquoise and Pacific Point. The matte was then adhered with Fast Fuse to complete the card.

Linda Vich Creates: Dahlia Up Close. Rose Gold embossed dahlia is painted with shades of blue Color Burst watercolors on this lovely anniversary card.

Linda Vich Creates: Dahlia Up Close. Rose Gold embossed dahlia is painted with shades of blue Color Burst watercolors on this lovely anniversary card.

Linda Vich Creates: Dahlia Up Close. Rose Gold embossed dahlia is painted with shades of blue Color Burst watercolors on this lovely anniversary card.

Linda Vich Creates: Dahlia Up Close. Rose Gold embossed dahlia is painted with shades of blue Color Burst watercolors on this lovely anniversary card.


Delighted is how I feel about how this card turned out! I have never "painted" with the Color Bursts before so it was a learning experience but one that ended well for me! I can't wait to give this to my brother and his wife to see their reaction!

I hope you have enjoyed my deviation from projects made strictly with Stampin' Up! materials! I think that we can only become more creative by exploring all brands of media and by appreciating the resulting art forms.

Thank you for visiting today!


Friday, August 4, 2017

30th Anniversary Card Using Foil Frenzy and Paisley Framelits

Linda Vich Creates: 30th Anniversary Card Using Foil Frenzy and Paisley Framelits. Rolled roses adorn an Early Espresso Branch on this card, accented with Foil Frenzy DSP and tied up with Berry Burst Crinkled Seam Binding Ribbon.
This July, my husband Bob and I celebrated our 30th anniversary–in this day and age, this is quite a milestone!

In creating his card, I cased a project by demonstrator Barbara Meyer. I cut a 4.75 x 6" card base from Berry Burst. After tying a bow using the luscious new Berry Burst Crinkled Seam Binding Ribbon around a matte from the Foil Frenzy DSP, the matte was adhered using Dimensionals.

On a strip of Whisper White, I stamped the sentiment from the Falling For You stamp set using Berry Burst. This strip was then matted with Berry Burst and adhered at the top of the card front using Dimensionals.

A branch was die cut from Early Espresso using the Seasonal Layers Thinlits and then the Paisley Framelits were used to die cut the rolled roses from Berry Burst. The image below shows the die used.

Photo shows Paisley Thinlits and the die used to create the rolled roses.

I was alerted to the possibility of creating these flowers after watching a video by fellow demonstrator Tan. Scroll down to see the little flowers on the makeup table. The video is here. Feel free to watch the entire video but the part about making the rolled rose flowers starts at about 12:43.

After die cutting five of the flowers, I took one of the die cuts, sprayed it lightly with water, and then used tweezers to roll it up. After releasing it from the tweezers, I rolled the remaining four flowers and then set them aside to dry.

I used drops of liquid adhesive to adhere the branch to the matte with the sentiment. To finish the flowers, I placed a glue dot on the end of each paper curl and adhered it to the bottom of each flower. Glue dots were used to adhere the blossoms to the branch. I added rhinestones to the centre of each blossom but they probably could have been omitted–they were hard to place inside the flowers and I'm not sure that they make that much of a difference.

For inside the card, I simply stamped the matching sentiment on a Whisper White matte and inked the edges.

Linda Vich Creates: 30th Anniversary Card Using Foil Frenzy and Paisley Framelits. Rolled roses adorn an Early Espresso Branch on this card, accented with Foil Frenzy DSP and tied up with Berry Burst Crinkled Seam Binding Ribbon.

Linda Vich Creates: 30th Anniversary Card Using Foil Frenzy and Paisley Framelits. Rolled roses adorn an Early Espresso Branch on this card, accented with Foil Frenzy DSP and tied up with Berry Burst Crinkled Seam Binding Ribbon.

Linda Vich Creates: 30th Anniversary Card Using Foil Frenzy and Paisley Framelits. Rolled roses adorn an Early Espresso Branch on this card, accented with Foil Frenzy DSP and tied up with Berry Burst Crinkled Seam Binding Ribbon.

I am pleased with how this card turned out. Using the Foil Frenzy DSP really adds a punch to your card! I also enjoyed making the rolled roses and look forward to using these again soon. They aren't suitable for a mailed card, obviously, but they add such a nice touch to a card!

Thank you for stopping by today!


Thursday, August 3, 2017

Carols of Christmas Early Release

Carols of Christmas Early Release

With the summer half over, I am looking forward to getting back to stamping classes and preparing to use all the goodies from the new Holiday Catalog! I know that you will be anxious, too, to get your hands on these goodies!

Good news! With the Early Release from Stampin' Up! you can redeem the coupons that you earned during July when you purchase the new Carols of Christmas Bundle this month! Just think, this could be the year that you get your Christmas cards done early! :)


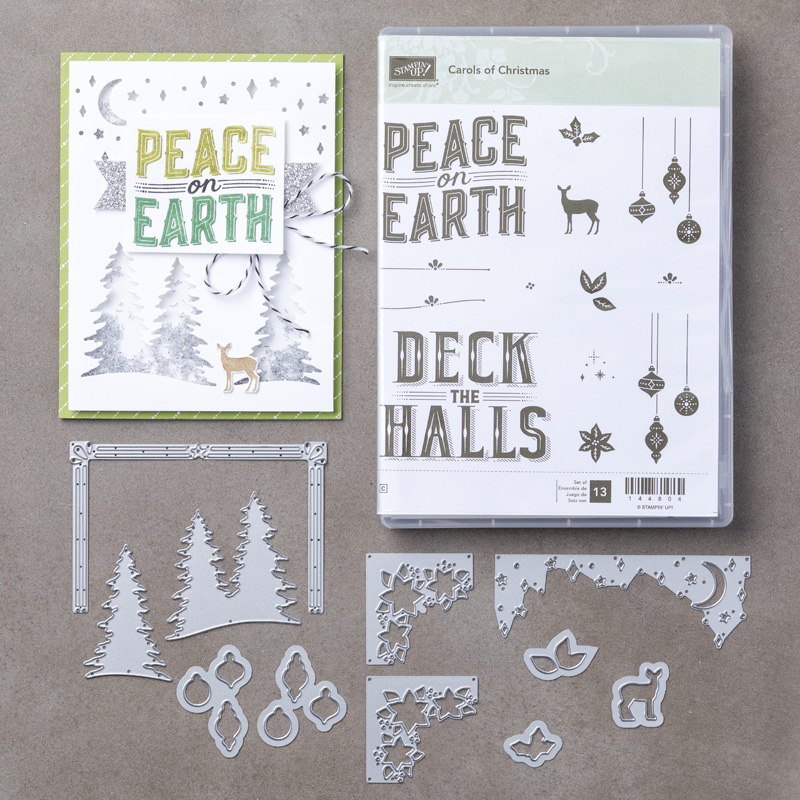
Carols of Christmas Bundle

With the stamp set, you get two big and beautiful sentiments that can become the focal point of your card or be used to create a unique background.  In addition, there are lovely ornaments, leaves, holly, and deer which coordinate with the Thinlits. The thinlits set also contains lovely card builder dies that can be used to create a border around your card front. Check out the video below which shows how you can use the stamp set and thinlits to create your own beautiful holiday cards!


Here are the catalog numbers you need in order to purchase the bundle and save 10% or purchase the stamps or thinlits separately. Click on the table below to place your order in my online store!


Carols of Christmas Table

I hope you will take advantage of this special Early Release and place your order today!