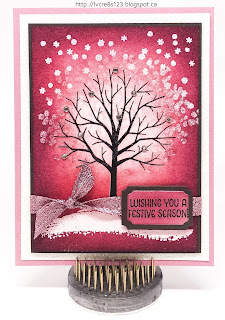
The first card I designed was actually made last, just so we could all keep our hands and work stations clean so as not to contaminate the second card!
The emboss resist card was CASEd from Lisa Brown.
To create this card, a standard card base was cut from Sweet Sugarplum card stock. Two mattes were cut, one from Dazzling Diamonds Glimmer paper and one from Early Espresso. A piece of Watercolor paper was also cut.
The MISTI was used to stamp the tree, from the Sheltering Tree stamp set, three times with Early Espresso on the Watercolor paper and then it was heat set.
The paper was placed back into the Misti and the Embossing Buddy was used. The stamp was cleaned and then the tree stamp was re-inked using Versamark. The image was then heat embossed using Clear Stampin' Emboss Powder.
The Embossing Buddy was used again before stamping both the snowdrift and snowflake stamps using Versamark. The images were heat embossed using White Stampin' Emboss Powder.
Once again, the Embossing Buddy was used and then the leaf canopy stamp was used with Versamark. It was then heat embossed with the now retired Iridescent Stampin' Emboss Powder. The purpose of this stamp step was to create ice crystals in the tree.
It was very important to use the Embossing Buddy before inking each time because with using so many embossing powders, it would be very easy to end up with a "blob" on your paper!
The next step was to sponge color onto the image. A sponge was used first with Sweet Sugarplum to cover the entire paper with ink. Next, Rose Red was sponged everywhere except within the branches themselves. Lastly, Rich Razzleberry was sponged on the very edges and deep into the corners. The result of all this inking was a wonderful glowing image that softened from light to dark.
The completed image was adhered to the Early Espresso matte and then some Sweet Sugarplum Glitter Ribbon knotted around it. This was then adhered to the Dazzling Diamonds matte using Dimensionals. Finally, the whole thing was adhered to the Sweet Sugarplum card front.
The sentiment, from the Merry Mice stamp set, was stamped on Sweet Sugarplum and then die cut with a die from the Tags & Labels Framelits. Early Espresso was also die cut to act as a matte. The sentiment was inked with Rose Red and Rich Razzleberry and then adhered to the Early Espresso matte. The tag was adhered over the ribbon using Dimensionals.
To complete the card, rhinestones were added to the branches of the tree.
The second card only involved a little bit of stamping but it used a lot of texture from both die cuts and dry embossing. It was CASEd from Mary Fish.
A standard card base was cut from Very Vanilla as well as two mattes of the same size. Two more mattes were cut from Cherry Cobbler.
One of the Very Vanilla mattes was dry embossed using the Seaside Embossing Folder. This was adhered to one of the Cherry Cobbler mattes and then adhered to the card front.
The second Very Vanilla Matte was stamped with pine sprigs, from the Christmas Pines stamp set, using Always Artichoke. The stamp was stamped off once, very lightly, before stamping the image on the bottom right of the matte. This image was then adhered to a Cherry Cobbler matte and then adhered inside the card.
Two "wreaths" were die cut from Soft Suede using a die from the Swirly Scribbles Thinlits. These were offset and adhered to the card front using liquid adhesive. Pine sprigs, in both Garden Green and Always Artichoke as well as Cherry Cobbler berries were layered over the wreath and adhered using liquid adhesive. A bow of Cherry Cobbler was adhered on the left of the wreath using Glue Dots.
The sentiment in Cherry Cobbler was die cut using a die from the Wonderful Wreath Framelits and adhered to the card front using rolled up Glue Dots to complete the card.
I think that this card is exceptionally pretty because of all the texture and the wonderful color scheme. Feel free to steal this color scheme if you'd like to use it!
I hope you've enjoyed viewing these card projects! Drop me a note below to let me know what you think!


No comments:
Post a Comment